| I have a friend who takes good
pictures, like the ones below of our Bolger Birdwatcher.
I built the boat over a three-year
period, working a few hours about every third weekend
from a set of plans I bought from Dynamite Payson (https://instantboats.com/).
The design is a marvel of simplicity. If I'd been able
to work on it full time, it would have been done in
about six weeks. Mind you, the finish is not at all
elegant. I am a determined carpenter, not a good one.
My success is mainly a testament to the clever and thoughtful
work of designer Phil Bolger.
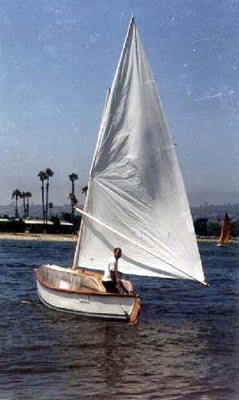 The
photo at right is from launch day, appropriately Labor
Day 2001, in Mission Bay. All did not go well -- the
rudder assembly buckled, the tiller came off in my hands
(twice) and she leaked like a sieve -- but as Buckminster
Fuller once remarked, one often learns more from failure
than from success. The
photo at right is from launch day, appropriately Labor
Day 2001, in Mission Bay. All did not go well -- the
rudder assembly buckled, the tiller came off in my hands
(twice) and she leaked like a sieve -- but as Buckminster
Fuller once remarked, one often learns more from failure
than from success.
The original rig was a sprit-rigged
sliding gunter, which works quite well when you get
it up, but which requires that it be mostly dismantled
in order to take in a reef. Also, it does not like being
jibed, controlled or otherwise (and quite an adventure
it is to experience an uncontrolled jibe in a boat this
size with a sixteen foot boom. Fellow sailors take note:
a four-letter expletive travels a long way across open
water). There are probably some little secrets to all
of this that I missed somehow, but I grew frustrated
with it.
For some time I have been interested
in the junk rig. I thought the lower, or main, part
of the mast was about the right length, so I drew up
a plan (guided in part by "Practical Junk Rig",
by Hasler and McLeod, which is surely the bible on the
subject). Materials were scrap lumber, a pile of cheap
manila twine, and a $20 polytarp purchased at K-Mart.
Total cost was about $75, as compared to the $600 I
paid for the sprit sail I bought from Dynamite Payson
(and a nice job, too, by the way). This cheap-and-dirty
method of building the rig has a noble ancestry in this
case: see this fascinating article about junk rigs,
written forty years ago:
https://www.friend.ly.net/~dadadata/junk/platt/platt_chinese_sail.html
Now look at the result of my efforts:
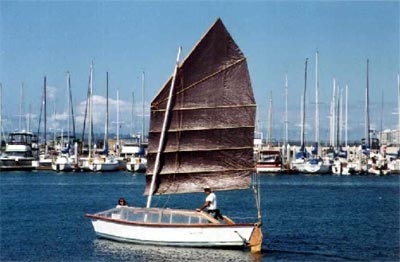
Note that I was careful
to pick a "Tanbark" (i.e., brown) polytarp,
for maximum stylish effect (the alternative being green).
As stated above, I made
it quick and dirty, not even adding a boltrope. So far
it has performed flawlessly. I've been out in reefing
winds, with no sign of stress. The polytarp will disintegrate
if I leave it out in the sun for a month, but as long
as I put it away after the sailing is done, it should
last for a while. The battens are two-piece, running
along either side of the sail and joined with screws
right through the polytarp. When it does finally die,
replacing the sail is a matter of $20 and a couple of
hours work.
Sail area is a little
more than the sprit rig, about 165 sq ft as compared
to 143. The center of effort is slightly higher than
with the original rig, but the effect on heeling is
not noticeable.
A significant benefit,
however, is the higher foot. The sprit rig literally
sweeps the deck. Well, that's okay if everyone sits
down inside the boat as Mr. Bolger intended, but guess
what? No matter how hard he tries to encourage people
to get out of the cockpit, they always want to get up
in the sun and the air (see above photo of rebellious
crew). The extra headroom under the sail is welcome.
It takes as long to set
up and take down as the original rig, longer if the
sheet gets tangled, but I have refined the process to
about twenty minutes from trailer-to-sailer, which I
think is perfectly acceptable.
Although there are probably
a dozen different methods for setting up and working
the Chinese lug sail, I use what is likely the simplest,
which consists of a halyard, a snotter (to bring the
yard up against the mast when the sail is reefed), lazyjacks
(absolute necessity!) and a one-part sheet. Underway,
there is only the sheet to handle. To reef, I loosen
the halyard, drop a panel, secure the halyard and then
take up the snotter. That's it.
Blocks are a significant
part of the material inventory for this rig. It uses
four, including a triple-sheave mainsheet block. I originally
intended to buy them at the local marine hardware store.
After recovering from sticker shock -- anything worth
having would have totaled more than the rest of the
materials combined -- I made my own from scrap quarter-inch
ply and scrap Douglas fir, with stainless nuts and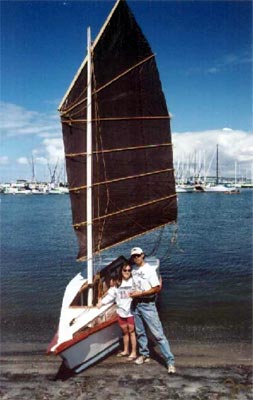 bolts for sheave axles. Ugly, but they work, and as
I was making them I chuckled gleefully in consideration
of the large amounts of money I was denying the ship
chandlery and could thus use to fatten my 401(k).
bolts for sheave axles. Ugly, but they work, and as
I was making them I chuckled gleefully in consideration
of the large amounts of money I was denying the ship
chandlery and could thus use to fatten my 401(k).
Mostly by luck I got
the balance of the rig just about right, but she comes
about more ponderously than with the sliding gunter
rig, which has the pleasant attribute of spinning her
on a literal dime. I attribute the sluggishness with
the junk rig to the large centerboard, but more likely
she just needs a bit more weather helm. I believe I
can accomplish that by adding a little jigger off the
stern. I've got a sail for an El Toro dinghy that's
just about the right size
Mr. Bolger would doubtless
consider the junk rig to be far too complicated for
a simple daysailer, and he'd be right. But aside from
the fun factor -- which is significant -- it is a great
learning tool, which is relevant considering my (eventual)
intent to build something more appropriate to it.
Postscript: The junk-rig
photo is of my wife Beth and I at Fiddler's Cove in
Coronado. The occasion was an impromptu messabout sponsored
by the SCUZBUMS (Southern California Small Boat Messabout
Society). Check out their website at
https://www.geocities.com/SouthBeach/Lagoon/6151/
|