Changing a water pump impeller is usually a relatively simple job
that is complicated by the fact that the pump is buried deep inside
the engine.. Still, on most of the old OMC outboards that I constantly
recommend to people seeking cheap power for their boats, changing
an impeller is a very “do-able” task..
The impellers used in NEARLY all OMC-built outboards from about
1952 until present day are all readily available through either
dealers or through after-market suppliers, with some exceptions.
Fasten your seatbelts for a journey through late-‘40s /
early-‘50s OMC water pump history, where diversity was spoken
and consistency was rare.
The first exception is the very early Evinrude 7.5 hp that had
a neutral clutch instead of a full gearshift (the engine rotated
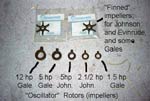
180 degrees for reverse.) This engine used a “finned”
impeller very similar to the slightly later OMC engines, but of
a size that is now difficult to find. The one bright spot is that
I have seen someone take an impeller from a later ‘50s OMC
outboard and reduce it’s thickness on a belt sander and
was able to get the engine to pump water. I can not recall which
impeller it was, but there are only 2 or 3 different finned impellers
used in ‘50s OMC engines under 20 hp.
Other exceptions are the “oscillator” pumps often
seen on engines built by the Gale division of OMC.. Instead of
the usual “finned’ impeller, the oscillator pumps
used a rubber ring with a protruding nub. These “rotor”
impellers, as I call them, were used in 5 hp Gale engines that
lacked a full gearshift or a neutral clutch; if your Gale 5 has
a full F-N-R gearshift, then it will use the same impeller as
it’s contemporary Johnson and Evinrude 5.5’s.
Gale also made a 5hp outboard with a neutral clutch and 180-degree
steering for reverse that used a finned impeller similar to, but
not the same as, the impeller used on the J. and E. 5.5’s.
At the present time I am not sure what the difference is between
the two impellers, but I suspect it is driveshaft diameter, as
the only differences that I am aware of in the two OMC impellers
that fit the J and E engines of the ‘50s, up to 18 hp, is
the driveshaft diameter.
Until I get around to actually checking it, or hear from a reliable
source exactly what the difference is, the jury is Still out on
the neutral-clutch Gale 5’s.
The single-cylinder Gale 3 hp (which was completely different
than the contemporary Johnson and Evinrude 3’s) also uses
the rotor-type pump, with one added complication. The Gale 3’s
built in the late ‘40s used the “leg” from the
2-cylinder 5 hp and so used the same rotor as the 5 hp. The later
3’s, however , used the smaller “leg” from the
discontinued 1 ½ hp model and so use the same rotor as
the little 1 ½ hp Just to add more complications, the late
‘40s Johnson 5 hp model TD-20, which is a very commonly-seen
old outboard (that I usually don’t recommend for the “cheap
power” seeker) also use a rotor-style pump, but a different
rotor that the Gale 5hp. The Gale 5hp, however, used the same
rotor as the Scott Atwater 3 ½’s and 4’s, which
had no corporate connections to OMC.
Then there was the late-‘40s/ early-‘50s Johnson
5 hp model TN, which superceded the TD and looks very much like
a TD, but which has a neutral clutch and 180-degree steering for
reverse (the TD has no clutch). The TN is in the same situation
as the Gale 5 with neutral clutch in that it uses a finned impeller
that is slightly different that the gear-shift motors used. It
may the be same impeller as the Gale 5, but again that is something
I have yet to confirm.
The late ‘40s Johnson 2 ½ hp model HD also used
a rotor type pump, but of a different size than those already
discussed.
Lastly, the big 12 hp Gale of the late ‘40s / early 50’s
used a large rotor in those models that lacked a gearshift
A few of these rotors can still be found new; The rotors for
the 5 hp Johnson model TD-20 (remember, does not fit the Gale
5hp); the rotor for the late forties Johnson model HD 2 ½
hp, and the rotor that fits the Gale 1 ½ hp and the later
Gale 3 hp (that uses the 1 ½ hp “leg” can all
be had at
https://www.grove.net/~noff/marx.html
This guy refers to these parts as ‘water pump rings,”
and these reproductions are actually made by an
Ohio company named Fox Grip, but Marx is the only one offering
them over the internet, that I am aware of, at a price a couple
bucks higher than one can buy them from Fox Grip for.
By the way, all OMC engines that used the rotor-style impellers
have the impellers mounted directly in front of the propeller.
To remove the impeller one removes the prop and a cover plate
on the back of the lower unit (2 screws).
Then there is the real “wolf in sheep’s clothing;”
the late ‘40s Evinrude (no comparable Johnson) 3.3 hp alternate
fireing twin. This baby looks just like a later Evinrude 3 hp
(of which there was a comparable Johnson) but is a totally different
engine. While the later 3 hp model uses readily-available ignition
components and pump impeller, the earlier 3.3 uses an older style
magneto for which parts are hard to come by, and it uses a three-legged
“spider” impeller which is equally difficult to find.
The 3.3 hp has a sight-glass gasoline gauge on the front of it’s
power head-mounted gas tank, which is the easiest way to differentiate
them from the 3’s which have no such sight glass.
Sound complicated?
You can avoid all the hassles by sticking to Johnsons
and Evinrudes built after about 1952: and Gale engines that featured
a full gearshift. Impellers for those are very available and very
cheap. Unlike the few years that preceded it, the era of 1953
until the early ‘70s produced OMC engines that changed little
and were remarkably consistent.
With the exception (always exceptions) of a few odd Gale models
that hung-on until the mid-‘50s.
If you are unsure as to how to identify these models, you should
consider purchasing a copy of the “Old
Outboard Handbook.” which lists year of manufacture
by model number.
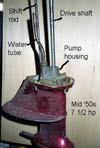
As to changing an impeller in one of the recommended engines,
all one has to do is remove the lower unit, exposing the pump
housing on the top of the lower unit; remove the top of the pump
housing and slide the old impeller up and off the driveshaft.
Slide the new impeller down the shaft so that it is seated on
it’s drive “key”; re-install the pump housing
top; and reinstall the lower unit.
Of course, it could not be all that simple. First of all, for
an engine with a gearshift, one has to disconnect the gearshift
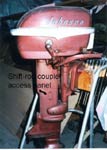
linkage before removing the lower unit . Most OMC-built Outboards
of this vintage have a small removable panel on the side of the
motor “leg” which can be removed to provide access
to a coupler incorporated into the gearshift linkage. One merely
removes the bottom bolt from the coupler and the linkage is disconnected.
Some models, however, are not fitted with this removable panel;
the 5.5’s and the old 7.5’s, for example. With these
models, one must remove the power head in order to disconnect
the shift linkage at the shift-lever shaft. Not as much work as
it sounds, it is still more of a hassle than just removing the
access panel. One needs to be careful, however upon removing the
power heads on these little engines, as there is a spring-loaded
seal arrangement for the crankshaft that sits atop the driveshaft.
If one carefully lifts the power head off the “leg,”,
the seal components will be left sitting on the driveshaft, held
there by nothing more than gravity. One needs to carefully remove
these parts and store them in a fashion that they can be reinstalled
in the proper order before reinstalling the power head.
Once the gear shift rid is disconnected (assuming the engine
has a gearshift), the lower unit can be unbolted and removed.
It is bad practice to carry around the lower unit by the driveshaft.
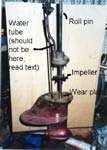
Another complication for the 5.5 and 7.5 models is that the seal
components rest on a “roll pin’ installed in the driveshaft,
and this roll pin must be removed in order to remove the upper
pump housing and the impeller from the driveshaft.
Another concern; the gaskets under the power heads of the 5.5’s
and the old 7.5’s look very similar but are different. Using
the wrong gasket will lead to overheating. I ran across this problem
in an old 7.5 that I bought for 20 bucks because the previous
owner could not trouble-shoot it’s overheating problem.
Took me a while to figure that one out.
If the gasket is in good condition, it can be reused. But keep
in mind that a gasket that is ‘squished-down” too
much can reduce the “end-play” in the driveshaft-to-crankshaft
splines. Which means the crankshaft has upward pressure against
it, which will increase wear and reduce power output. When the
engine is all reassembled, one should be able to lift-up on the
flywheel and detect a very slight amount of upward movement. Of
course, too much is as bad as none- we are talking about a few
thousands of an inch here.
With other models, primarily the “low-profile’ models
(which I do not usually recommend for cheap power) it is necessary
to unbolt the lower unit and lower it about ½ inch in order
to reach inside the opening with a screwdriver in order to disconnect
the shift linkage.
Once the impeller is out of the pump, replace it with a new one..
There are some people who have gotten it out, said “it
don’t look too bad” and reinstalled the same impeller.
It ain’t’ worth the hassle to try to save a few bucks,
with impellers for most of the engines in question going for no
more than about 12 bucks. I ALWAYS replace the impeller in any
engine that I am going to run, whether the old one is still pumping
or not.
Before installing the impeller, however, check the housing and
the metal wear plate under the impeller for wear. If they appear
to be grooved, it would be best to replace them, although I have
never felt the need to replace a pump housing in one of these
old engines. I think I have replaced the metal plate maybe once
or twice.
Reinstalling the lower unit is usually the hardest part, as
one must simultaneously align the drive shaft, shift linkage and
water pump tube. Often when the lower unit is removed, the water
tube will come out with the lower unit and remain attached to
the pump body. Remove it from the pump body and insert it into
it’s grommet up in the exhaust housing. This is also a good
time to inspect the water tube grommet in the pump housing.
When installing the lower unit, it helps if one can slowly rotate
the flywheel to aid engagement of the crankshaft splines. Be sure
the water tube enters the grommet on the pump housing. Connecting
the shift linkage comes last- be sure the shift rod from the lower
unit is fully seated in the coupler.
It will take a while if you have not done this before; try to
get the engine vertical and high off the ground when attempting
to reinstall the lower unit.
It goes without saying to be sure all bolts are snugged-up tight;
a little “anti-seize’ compound is a good idea, especially
for engines used in salt water.Make sure the engine shifts properly
and also make sure cooling water is circulating before heading
out on a cruise
Space constraints prevent discussing more specific details in
this column; for more information concerning your specific engine,
I recommend that one consider obtaining a service manual for the
engine, or maybe a copy of the generic manual I
reviewed for Duckworks.
But there is no reason not to tackle water pump impeller replacement
yourself. The money saved will pay for gasoline for many hours
on the water.
Posted here are copies of OMC service bulletins which may be
of some help; One that lists possible causes of overheating also
recommends replacing the cylinder head gasket. Although this was
good advice when these engines were new, I would not attempt to
replace a 40 or 50 year-old cylinder head gasket unless there
is an obvious problem with it. Snapped-off head bolts are only
one of the problems you may run across if you “kick the
sleeping
dog.”
Later
Max
|


