Don’t ya just love it; Its cold and raining and you’re
out on the water in an open boat. A big soft cushy couch and hot
drink are just a few minutes motor’n away.
You grab the starter rope on your trusty ole’ outboard
and give it a yank. As you pull back , the rope separates from
the pull-handle and you watch the rope slither back into the motor
to disappear like spaghetti sucked into the mouth of a hungry
kid, leaving you with the starter handle in your hand and a 45
minute row back to the hot drink.
Major bummer.
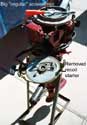
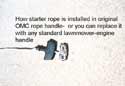
Actually, since your outboard is an old OMC, you can always remove
the cowl and recoil starter, and wrap any handy piece of rope
around the emergency starter sheave (that most 50’s Mercurys
don’t have) and get your prime mover started.
But then, if you had regularly inspected your engine’s
starter rope, and replaced it when it began to look questionable,
the above scenario probably would not have happened.
Not only is the above incident kind of a pain to deal with, there
is a good chance that the recoil starter, rewinding violently
when it was released from it’s load, may very well have
kinked the recoil starter spring, ruining it.
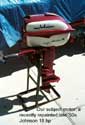
The recoil starters we will be discussing today are those which
sit on top of OMC-manufactured engines from the mid ‘50s
until the early ‘70s. A few OMC’s of this period,
notably the 6 hp and the 9 ½, use a side-mounted starter
that engages a flywheel ring gear. These buggers are a much bigger
problem to deal with and we will not address them here.
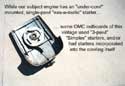
From the mid-50’s to the early 70’s, there were mainly
two different types of “top-mounted” starters used
on OMCs; the “simplex” and the “eas-a-matic.”
They are actually very similar, the main difference being that
the simplex uses three spring-loaded metal pawls to engage the
top of the flywheel, while the “eas-a-matic” uses
a single plastic pawl to engage the flywheel. The simplex also
has a few extra parts to it. Replacing ropes or springs is about
the same for either of these, however.
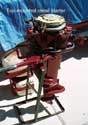
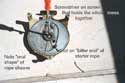
Replacing a starter rope is usually no big deal. Remove the recoil
starter from the engine and turn it upside down. You will see,
on the rope sheave, the knot where the “bitter end”
of the rope is secured. If the rope is really old, it may have
a metal fitting on the end, and the rope itself may be a natural
fiber surrounding a metal cable core.
Irregardless of what is already in there, I always replace my
starter ropes with braided nylon from the hardware store. Try
to get some that matches the diameter of the existing rope. About
the most you will need will be 7 feet. Posted with this column
is an old OMC service bulletin listing
the diameters and lengths for the starter ropes of some pre-1962
engines. I would add a few inches to the recommended lengths,
just in case.
Or you can just measure the old rope, assuming it was long enough.
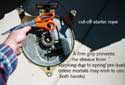
To replace the rope, pull the rope all the way out of the recoil
starter (which you have removed from the engine, remember?) and
then figure a way to hold the rope sheave from re-winding. Sometimes
some of these sheaves have a hole through them where one can insert
a special pin (nail) and lock the sheave to the housing.) or one
can use a pair of Vice Grips to lock the sheave, but be careful
not to cause damage. Usually, I just hold the sheave and housing
with one hand so as to lock them together, and then remove the
old rope by cutting-off the retaining knot. Inset the new rope
though the guide hole of the housing and into the sheave and through
the knot hole. I usually use a good figure eight knot to secure
the end of the rope. You can then let the sheave wind the rope
back in, but if you have not attached the handle to the other
end, don’t let the recoil suck the rope all the way in.
Make sure your knot is not (pun intended) so massive that the
flywheel rubs it.
On the “eas-a-matic” starters you will notice that
the sheave that the rope is wrapped on is oval-shaped instead
of round. Some engineering minds in the OMC design department
figured out that a person could use more leverage on the starter
rope during the compression stroke, and could use the non-compression
portion of the stroke to build up speed in the rotation. The oval-shaped
sheave accomplishes this, if it is properly aligned in respect
to the crankshaft. These starters will have a small arrow cast
into the recoil Starter housing and this arrow should align with
marks on the rope sheave when the starter is at rest. If it does
not, adjust the length of the rope at the handle until it does.
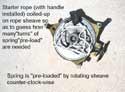
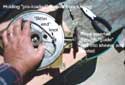
If you are installing a rope in a starter were the sheave has
been allowed to unwind and is no longer under tension, coil up
your rope on top of the sheave in order to determine how many
rotations of the sheave are needed in order to “pre-load”
the spring so it will pull the rope all the way back and not leave
it hanging
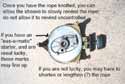
If you have too much “pre-load” you risk breaking
the spring plus you are making additional work for whoever has
to start the motor.
A bigger job than replacing the starter rope, is replacing the
spring. The spring in the top-mounted recoil starters is about
a 6-foot-long strip of spring steel, coiled up between the housing
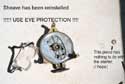
and the rope sheave, and just waiting to jump out at ya. It is
very important to wear eye protection when attempting spring replacement,
and a full face shield would not be a bad idea. So would gloves,
but I can’t seem to work in gloves so I don’t use
them.
The starter that is the subject of this column is an eas-a-matic;
the simplex starters are basically similar, with a few more parts.
The tension must be removed from the spring before the spring
can be removed. If the rope broke, that has already been taken
care of; if not, one can cut the rope or remove the handle from
the rope and allow the sheave to unwind completely.
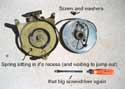
One large screw in the center of the sheave holds the whole thing
together; remove that screw and you can remove the sheave from
the housing BUT be aware that the spring is still a threat, even
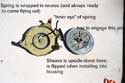
if it has been allowed to unwind. The spring is held within a
circular recess in the housing, and the spring will unwind to
the point that it is against the recess. If the spring comes out
of that recess, it will unwind more and very rapidly if it is
uncontrolled. One end of the spring has an “eye” which
is sitting on a pin mounted to the housing. The other end of the
spring has an eye sitting on a pin mounted to the sheave. One
has to very carefully remove the sheave without allowing it’s
pin to drag the spring out of it’s recess, because once
the spring starts to come out, it’s coming out and stay
out of the way.
Keep your face and exposed skin clear as you carefully remove
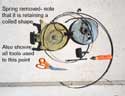
the sheave. This will reveal the spring sitting in it’s
recess. At this point you can either carefully remove the spring
by hand, keeping a tight grip on it; or you can just toss the
housing onto the ground and the spring will remove itself pronto.
Be sure to toss it several feet away from you.
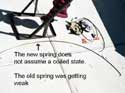
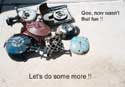
The recoil starter in the photos was still operating when the
decision was made to replace the spring . Note that the old spring
maintains some of it’s coil shape, indicating that it has
seen better days. Note that the new spring
Is fairly straight when at rest.
I will now explain how I install the new spring. This is how
I do it and is not necessaily how others do it or the factory
recommended it be done. OMC had special tools which could be used
to easily accomplish the job; I have a few of the tools but never
use them.
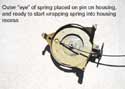
Starting with a stretched-out new spring, I place the outer eye
(eye without a bend in the spring next to it) on it’s pin
on the housing and slowly coil the spring into the recess in the
housing. This is a bit tedious, as it is easy to lose control
and have the spring come back out of the recess in a hurry. It
takes patience and a bit of manual dexterity, and keep the kids
away. Once you have successfully coiled the entire spring into
the recess, don’t breath a sign of relief as the hard part
is still to come. Keep in mind all the time that you can not allow
the spring to start to come out of that recess as it will keep
coming. The trick is to install the sheave back in the housing
and engage the pin on the sheave with the eye on the inner end
of the spring. What I usually do is take a pair of pliers and
give the end of the spring a slight twist, so that the eye stands
slightly proud from the surface of the recess. With the eye slightly
high, one can first engage the pin, and then concentrate on getting
the sheave on. If you put too much twist on the spring, it will
not stay in the recess. This is tedious work and it required a
couple of trys to get the sheave installed on the subject recoil
starter. If you get into a hurry or allow your frustrations to
take over, you risk injury to yourself or the starter. Take your
time, study the pieces, and resign yourself to spending a bit
of time on your first one.
And always be mind full of that spring.
There is another way to do this without special tools, although
I prefer not to do it that way. Many of the rope sheaves have
a hole in them which can be lined-up with the pin mounted on the
housing. The method here is to install the inner eye of the spring
on the sheave and wrap the spring up on the sheave and secure
the outer eye of the spring with a pin inserted through the hole
in the sheave. The sheave is then placed into the housing, taking
care to line up your temporary pin with the housing pin, and as
the sheave is pushed down into the housing, the outer eye will
be pushed down onto the housing pin, and the housing pin will
push out your temporary pin.
I don’t like the idea of trying to transfer the eye of
a spring under tension from one pin to another, so I do not use
this method, but it might work for you.
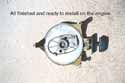
With either method, once the sheave is down in the housing and
the center screw installed, the hard part is done and you can
now install the rope as detailed way back at the beginning of
this column.
The recoil starters we are talking about here are not high-tech
rocket science; they are simple mechanical devices consisting
of only four main parts; housing, rope sheave,
rope and spring.
The one thing to always keep in mind is that the spring, when
it is under tension, can strike like a snake, and you must always
keep it under control. Any time the spring is coiled in it’s
recess and the rope sheave is not installed, you must do nothing
that will cause it to jump out of that recess.
Until next month, wishing you “Happy Motor’n!”
Later
Max
|


