|
Carburetors
In this month’s column, we will have a look at the mystical,
magical carburetor; probably the single most intimidating part
of an outboard to the novice.
It need not be; It is not necessary for you to design, cast,
and machine the carb.; just to take it apart, clean it, install
a few new parts, and put it back together the way it is supposed
to be.
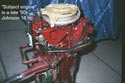
Again we will be looking at OMC-built outboards from the mid
fifties until the early seventies. For those who think that I
am concentrating on this series of outboard motors, they are correct,
and for good reason. As I stated in my long-ago Duckworks article
titled, “Primer
on Old Outboards” , I am of the opinion that this series
and manufacture of outboard motors are the best candidates for
“cheap, reliable power” because they are relatively
easy to work on, commonly-replaced parts are readily available
and relatively cheap, and these engines still exist in great numbers.
In the not-too distant future, I intend to address other brands
of outboards, such as Mercury’s and the air-cooled Clintons
and Eskas.
Most of the carburetors on OMC-built outboards of up to 40 hp,
and from about 1953 until about 1972, are basically very similiar,
differing mainly in size and in whether they are fitted with fuel/air
mixture adjusting needles, or with fixxed jets. In some cases,
the same basic casting is used for different size engines, the
differences being in the internal passages.
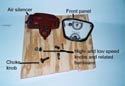
On most of the smaller engines, a choke activated by a pull-knob
is used; on the larger motors fitted with electric start, the
choke may be operated by an electric solenoid, with a pull-knob
back-up. A few 40’s were even fitted with an automatic choke,
but that did not work too well, and anyway a manual pull-knob
was also present.
The basic design of these carbs is such that they have a portion
of the carb for use at “high-speeds” and a portion
that comes into use at “low speeds.” The older versions
of the outboards will have both High-speed and lowspeed mixture
adjusting needles. Later, the high speed needle was replaced with
a fixxed jet which requires no adjustment, but the low speed adjusting
needle remained.
One thing needs to be said about mixture-adjusting needle valves;
they should NEVER be tightened down hard on their seats. The needles
are usually soft brass, and tightening down hard will usually
damage the end of the needle and render proper adjustment impossible.
It only takes a very slight groove on a needle to render it useless.
Be very careful when tightening down the needle valves.
Before tearing into the carb, be sure the problem does not lie
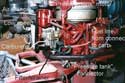
elsewhere. If the engine appears to be starving for fuel, did
you check the fuel strainers? The old OMC’s that used remote
tanks usually had a strainer bowl on the bottom of the carb, or
remote-mounted on the side of the powerhead. There was also a
strainer on the foot of the pickup tube in the remote tank. Are
the quick connectors making a good seal and not leaking?
If the engine is hard to start, are you sure the choke plate
is closing all the way? If your engine has adjustable mixture
needle valves, Setting them too lean can also make an engine hard
to start.
If your old outboard uses a pressurized remote tank, you might
check into the column on pressure
tanks for some background on the problems that they present.
Finally, those smaller engines with power head-mounted, gravity-fed
fuel tanks usually had a strainer incorporated into the fuel outlet
on the bottom of the tank.
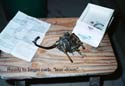
If you believe that your have isolated the problem to the carb,
then you can consider removal and disassembly.
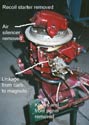
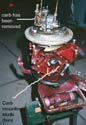
Removing and rebuilding a carb is no big deal. The carbs on the
engines in question are held on by only two nuts, but usually
one must remove the cowls and recoil starter in order to gain
access to the nuts. On some carbs it is necessary to disconnect
the linkage that synchonizes the carburetor to the magneto. Usually
a screw on a bell crank can be backed-off allowing the linkage
to disconnect.
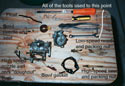
Once the carb has been removed, you can disassemble it, usually
by removing the 5 or 6 screws that hold the bowl on. Once the
bowl is removed, the float and float needle and seat will be visible
up under the upper half of the bowl. Be sure not to lose any small
parts.
Although in the past it was recommended that the carb be soaked
in cleaner, I have noticed that the factories have backed-off
that recommendation of late, and now generally recommend using
an aerosol cleaner. That is what I use. I remove the float (usually
it is varnished cork and carb cleaner removes varnish) and needle
valve, and generally a small plug on the bottom of the bowl. Most
of these carbs also have a brass high-speed nozzle extending vertically
up into the center of the upper half of the carb, and this too
can be removed. One will notice numerous welch plugs (metal plugs)
that are stamped into various places on the carb body. These cover
holes that were necessary in order to properly machine the carb,
and although some recommend removing these metal plugs ( which
will destroy the old plugs) in order to clean underneath them,
I rarely if ever disturb them. The Sierra rebuild kits that I
use do contain new plugs.
If your carb. has a fixed high-speed jet, it probably is not
necessary to remove the jet itself, but one should remove the
plug that covers the jet so that cleaner can be sprayed in.
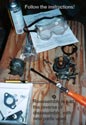
In case you are already lost, be not afraid. A good manual with
a few pictures will help, and I suggest the manual that I
reviewed for Duckworks, or a similar manual, as the minimum
to get you by. Also, the carb rebuild kits that after market supplier
Sierra has available through boat dealers of any brand outboard,(
and also through NAPA auto parts) come with excellent instructions.
I have to admit that I don’t know if OMC factory carb rebuild
kits come with instructions; I have never used one of their kits.
Once the carb is apart, you can use the plastic tube that usually
comes with the aerosol carb cleaner to shoot cleaner into all
the exposed passages of the carb. Remember not to get any cleaner
on the varnished cork float. If it’s varnish is peeling
off (usually because some idiot ran automotive “varnish
removing” carb cleaner in the gasoline in an attempt to
clean the carb while the moter was running) you might have to
remove all the old loose varnish, allow the float to completely
dry, and lightly sand and then re-varnish. I have used fuel-proof
model airplane dope for coating cork floats.
I should point out here that you should be wearing eye protection
when spraying cleaner into passages on the carb. Many times I
have shot cleaner into one hole on the carb, and had it shoot
back out of another hole right at me. Safety glasses are not enough;
you need chemical hazard safety goggles and maybe a full face
shield. Carb cleaners burn exposed skin pretty bad; it will really
eat-up your eyes.
Once the parts are clean and dry of cleaner, you can begin reassembly.
I really suggest that you use a rebuild kit when you put the carb
back together. It doesn’t cost that much money and may save
you from having to do the job all over again. Keep in mind that
the old “soft” parts of the carb (gaskets and such)
may date from the days before alcohol was common in gasoline,
and these parts may be harmed by exposure to alcohol.
Some things to be mindful of as the carb goes together: the float
needs to be set to the proper “level,” so as to maintain
the proper amount of gasoline in the bowl. The sierra rebuild
kits provide a nice drawing of what you are trying to achieve
There is a little cork “doughnut” that goes over
the brass high speed nozzle that some of the carbs have extending
vertically up into the upper half of the carb. Be careful when
installing the doughnut that you don’t tear it.
Another area to be aware of is the “packing” which
seals the mixture needle valves. Although tiny, this is basically
the same sort of “packing gland” (stuffing box) that
seals inboard propeller shafts and also valve stems. New packing
is supplied in the rebuild kits. I usually just add new a new
ring or two of packing on top of the old stuff, since it can be
hard to remove the old packing, but be careful that none ends
up being pushing down into the fuel passages. The proper way to
do the job is to remove all the old packing.
Once the carb is back together, you can reinstall it on the
engine. Make sure the linkage to the magneto goes back together
correctly, and you may need to reset the carb/ mag synchronization
if it was off to begin with, or if you disconnected the linkage
in such a manner that it could not be put back together exactly
as before. On most of these engines, “synching” is
no big deal , being about a 5 minute job needing no special tools.
I always replace all the fuel hoses as the old ones may be rotted
and if they are not rotted, alcohol in the gas may soon rot them.
Use good clamps on the hoses. I like tiny little worm-screw clamps
(I think the British call them “cheney clips”) when
I can find them small enough. I also always install a small plastic
“in-line” fuel filter on the engine, even if it has
it’s original strainer/filter. If I am going to spend some
time and money cleaning and rebuilding a carb, I want to make
sure that only clean gasoline is running through it.
And, of course, the clean 2-cycle oil that should be mixed with
that gasoline.
Later
Max
|


