Bolger Houseboat #481 Update 3
Paul McLellan
First Report - Update
2
Structure
With the hull in almost
perfect alignment the interior 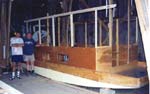 construction
could start almost immediately. With the help of John we leveled
the cabin floor timbers and built the honeycomb of stringers to
hold the forward and rear deck. The four corner posts were installed,
the forward and aft cabin bulkheads measured, cut and installed.
At the same time I epoxy coated the ply for the floor, coated
and glassed the deck pieces and the upper sides. Also by coating
and glassing the preconstructed forward and aft bulkheads we saved
a lot construction
could start almost immediately. With the help of John we leveled
the cabin floor timbers and built the honeycomb of stringers to
hold the forward and rear deck. The four corner posts were installed,
the forward and aft cabin bulkheads measured, cut and installed.
At the same time I epoxy coated the ply for the floor, coated
and glassed the deck pieces and the upper sides. Also by coating
and glassing the preconstructed forward and aft bulkheads we saved
a lot 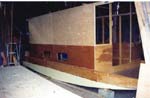 of
finishing time after construction. We pre finished the uprights
for the window frames and installed them with alignment for the
bathroom and closet. The window frames are made out of 1/4"
ply and we cut them before epoxy coating and glassing the exterior.
Since the windows are so large, very little epoxy or glass was
used for this operation. of
finishing time after construction. We pre finished the uprights
for the window frames and installed them with alignment for the
bathroom and closet. The window frames are made out of 1/4"
ply and we cut them before epoxy coating and glassing the exterior.
Since the windows are so large, very little epoxy or glass was
used for this operation.
Before installing the window
frames, the roof was built.
Roof
The roof trusses were made
out of full 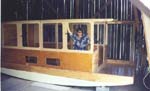 1"
ash wood and the stringers out of 3/4" ash
also. The clear wood was a treat to work with, is very strong
and beautiful to look at without any finish on it. We precut the
trusses and aligned them on a bench and planed them to the same
exact size. After installing the header, (Mr. Bolger calls it
a clamp) we attached the trusses the laid in the stringers with
thickened epoxy using a string to align them. When dry we laid
on the first sheet of ½" ply which was glassed on
the topside and nicely finished with epoxy 1"
ash wood and the stringers out of 3/4" ash
also. The clear wood was a treat to work with, is very strong
and beautiful to look at without any finish on it. We precut the
trusses and aligned them on a bench and planed them to the same
exact size. After installing the header, (Mr. Bolger calls it
a clamp) we attached the trusses the laid in the stringers with
thickened epoxy using a string to align them. When dry we laid
on the first sheet of ½" ply which was glassed on
the topside and nicely finished with epoxy 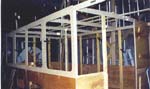 on
the underside. We marked where the stringers were, removed the
sheet, pre drilled from the marks and then drilled for counter
sinks from the topside. (About 40 screws per sheet) Then we applied
thickened epoxy to the top of each stringer and truss before CAREFULLY
setting each sheet in it place then screwed them down. The result
was well beyond my expectations for both appearance and strength. on
the underside. We marked where the stringers were, removed the
sheet, pre drilled from the marks and then drilled for counter
sinks from the topside. (About 40 screws per sheet) Then we applied
thickened epoxy to the top of each stringer and truss before CAREFULLY
setting each sheet in it place then screwed them down. The result
was well beyond my expectations for both appearance and strength.
Windows
Various options were discussed
at length. I decided to build all the windows (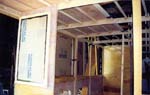 10
large windows for both sides and the front) from 1 ½"
eastern pine and tinted acrylic mainly because I had the lumber
and the price of the acrylic was very reasonable at a local plastic
supplier. They turned out looking very nice and with gluing and
screwing them together with a ½" grove
for the acrylic are very strong. After installing the window frames
and mocking up the window slides, we decided to add three smaller
windows so it would be 10
large windows for both sides and the front) from 1 ½"
eastern pine and tinted acrylic mainly because I had the lumber
and the price of the acrylic was very reasonable at a local plastic
supplier. They turned out looking very nice and with gluing and
screwing them together with a ½" grove
for the acrylic are very strong. After installing the window frames
and mocking up the window slides, we decided to add three smaller
windows so it would be 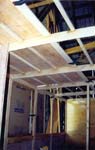 possible
to see outside while the bed was down and in use. These windows
will be fixed closed but the upper windows will have both the
forward and rear ones sliding to open. This give plenty of ventilation
or visibility for the skipper at the helm, one in the bathroom,
one over the cooking area and one over the dinette. Since each
window is 36" high by 30" wide this gives plenty of
opportunity for ventilation. Roll down screens that velcro will
keep the bugs out when the windows are open if necessary. Both
front windows are removable with a couple of wing nuts and the
same arrangement for possible
to see outside while the bed was down and in use. These windows
will be fixed closed but the upper windows will have both the
forward and rear ones sliding to open. This give plenty of ventilation
or visibility for the skipper at the helm, one in the bathroom,
one over the cooking area and one over the dinette. Since each
window is 36" high by 30" wide this gives plenty of
opportunity for ventilation. Roll down screens that velcro will
keep the bugs out when the windows are open if necessary. Both
front windows are removable with a couple of wing nuts and the
same arrangement for
screens is used.
Trim and Doors
Discussion is now under way
to determine the final look. With the structure and roof done
and almost paint ready, we have to decide on the overall look.
I am leaning towards using the eastern pine to make 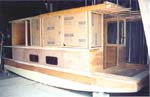 1
½" inch trim and door frames. We have decided to made
a sliding door for both the rear entrance and the bathroom door,
probably out of ½" ply with brass or bronze screen
and a removable window for the rear door. Right now I am leaning
towards the modified bifold door for the front doors with 2 18"
doors on long piano hinges which fold away from the helm station
and nest flat against the front bulkhead. Again I would make two
windows in each front door with screens and removable acrylic
panels for inclement weather and trailer travel. 1
½" inch trim and door frames. We have decided to made
a sliding door for both the rear entrance and the bathroom door,
probably out of ½" ply with brass or bronze screen
and a removable window for the rear door. Right now I am leaning
towards the modified bifold door for the front doors with 2 18"
doors on long piano hinges which fold away from the helm station
and nest flat against the front bulkhead. Again I would make two
windows in each front door with screens and removable acrylic
panels for inclement weather and trailer travel.
More to come on the final
look and assembly of the windows, doors and
trim.
|