Braided
Line Eye Splice
by David Seidman
(Excerpted from Small Boat Journal - Sept. 1990)
If braided line is less likely to kink, resists
twisting under load so it is less prone to stretching, flattens
to gain friction when put under strain on a winch, and comes
in nifty designer colors, then why do I always buy three-strand
laid line instead?
Ill tell you why. There's just not that much you
can do with braided line except use it.
Laid line is made up of three friendly strands
that beg your hands to weave them into hundreds of satisfying
shapes. The braided stuff looks impenetrable, requires an arsenal
of equipment, and worst of all, whatever you do with it looks
as if a machine could have done it better.
Like many of you. I'm intimidated by braided line,
especially when it comes to eye splices. The problem is that
all the important workings—in fact, the whole splice—is
hidden. You can't look at one you did last year and copy it.
So you have to go back to the instructions that came with the
splicing kit and figure it out all over again.
Well, maybe I can help. I'm not going to explain
how to make the splice. You'll get that with the instructions
when you buy a splicing kit (which you must have). I will tell
you some things they don't, and try to give you a better picture
of what's really going on. Hopefully, this will reduce the intimidation
factor and let you get more out ofbraided line.
•An Insider's View
Double braided line is actually two ropes in one.
There is a braided center (or core) that provides the rope's
primary strength, and a braided cover (also called ajacket or
sleeve) that protects the center.
You may find that some lines look as if they are
double braided, but they have a center of continuous parallel
fibers, or no center at all. These require very specialized
splicing techniques. The most common braided line is the standard
double, and that's what we'll deal with here.
Although a braided eye splice may resemble two
snakes trying to swallow each other, it is not quite the paradox
it seems. The concept is deceptively simple: (see illustration)
1) Separate the center from the cover.
2) Put the cover into the center.
3) Put the center into the cover.
4) Feed the eye into the cover of the standing part so that
the point where the cover and center cross disappears.
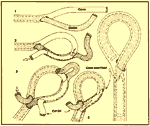 click
to enlarge
click
to enlarge |
Naturally, there's more to it than that, but the
big picture is here in these four steps. So maybe now youll
feel more in control, rather than like an automaton following
orders. For those of you who still don't get it, I've also provided
an over-simplified cutaway view of the finished splice.
• Things They Didn't Tell You
Here are some hints that might make the process
a lot easier:
Don't be tempted by quickie splicing alternatives.
If regular splicing seems too much for you, use a seizing (BJ
#72). It will be faster than any of the quickie splices and
just as strong. Remember, a good splice retains 90 percent of
the line's strength. Nothing else comes close.
If you can't get a splicing
kit at your local store, order one from any rope manufacturer.
Solid, rather than hollow fids, work better for smaller lines.
These are like large needles that pull the line through. As
they do this, they stretch the line out to its smallest diameter,
making it easier to pull through.
Use a grease pencil (China Marker) to mark the
first spot for the splice. Any marker will do for the other
spots. This rubs off when you're through. On dark rope, where
a felt tip marker won't show up, mark your spots with small
pieces of fine white thread around a strand or two.
The finished appearance of your splice is largely
dependent on the care you take in the initial withdrawing of
the center from the cover. Be careful separating the strands
of the cover. Never cut the strands.
If a piece of old rope is too tight to work, let
it soak in water and knead it every once in a while.
Never cut line with a hot knife. To do so will
bond the cover to the center, making it impossible to separate
the two. Use one turn of tape to seal the ends.
On line over 3/4 inch in diameter, an overhand
knot may not be enough to keep the cover and center aligned.
Instead, insert a large pin, like a nail or a knitting needle.
Taper the cover before trying to stuff it into
the center. You'll have to do it eventually, and this way it
makes the stuffing a little easier.
Put the line and eye under strain before cutting
off the remaining center. If not done, there is a chance of
getting a hollow in the neck of the eye. This may not compromise
strength, but it definitely looks unprofessional.
Finish off the eyes with a common whipping, or
palm-and-needle whipping.