| How do you secure the line when you give someone
a tow? Stand on it in the cockpit? Snub it to a mooring cleat?
Wrap it around a stanchion or around the mast? We did, until we
built a proper samson post.
In addition to its role in towing, the post is handy for securing
anchor lines, and both bow and stem anchors can be led through
fairleads to the post. A properly installed post will also reinforce
the deck and provide structural support.
Location and height of the post depend on the size and layout
of each particular boat and deck. The post should not be so tall
that it dominates the deck area, and it should be designed with
fatrleads both fore and aft to protect cap rails. A post can be
very short and stilt work effectively, and shorter posts are stronger.
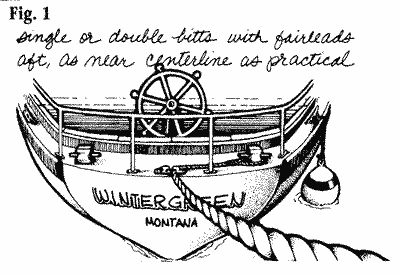
Workboats commonly have towing bitts located aft, in the cockpit
or closer to the operator. But lazarette bulkheads aft are also
a likely location, as are cockpit sides. Samson posts or towing
bitts don't have to be located on the centerline. So long as you
provide fairleads to position the line on center, fore and aft,
the post can be located anywhere on the deck (Fig. 1), assuming
there is room, the possibility of arranging a good bracing system,
and no interference with the operation of sail control lines or
other on deck jobs. If you can keep the post out of walkways on
a large deck, it will hopefully never become a hazard.
Posts and bitts are traditionally oak or hardwood, but even
softwoods like fir make good posts when sealed with epoxy. Larger
posts can be laminated for more strength and to allow use of cheaper,
standard-sized wood. Two 2 x 4s laminated together will make a
post with a top 3 inches square, and leave plenty of room for
making a taper in the part of the post below deck. The taper is
important to provide flexibility and shock-absorbing motion to
the post to prevent breaking under a sudden strain (Fig. 2). We've
seen posts as small as 2 inches square on top, which is probably
just about the smallest practical size. This doesn't allow much
taper, but the small size will probably provide flexibility anyway.
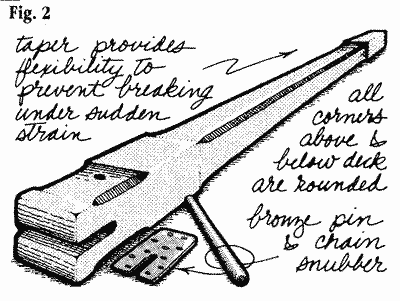
Round all sharp comers on the post, both above and below-decks.
A wood rasp will help in the corners, and a block plane will make
the edge cuts. This provides a pleasing shape and your lines will
stay healthier. It will also do less damage if you bang your head
into the postwhile rummaging in the forepeak.
We laminate our larger posts with epoxy, and also use epoxy
as a final seal coating. Three coats protect the wood very well.
You'll need a few coats of sunscreen varnish over that if you
leave the wood natural. The end grain on top has to be protected
in some way; sheet lead or brass, tacked in place around the top,
can provide traditional-looking protection.
If you want to stick a pin through the top of the post to help
in securing lines, old bronze keel bolts work very well. Drill
the hole just slightly oversize, clean and file the bolt to rough
up the surface, and glue it in place with epoxy. One operation
will seal the wood and secure the pin in place. Round the corners
of the pin to keep them from barking your shins, and you're in
business.
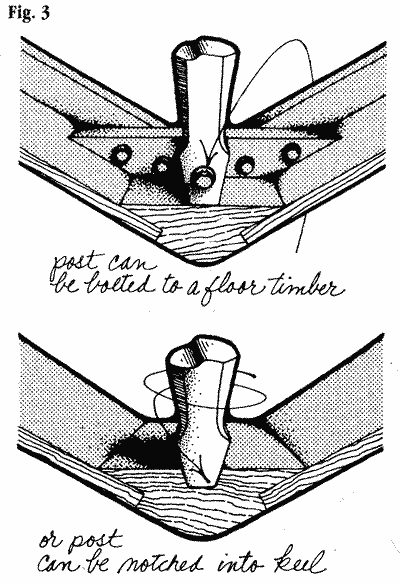
Samson posts can be used on fiberglass, wood, or metal hulls.
The post should be attached at the bottom by mortising a notch
into the keel or by bolting to a floor timber (Fig. 3 ). A bulkhead
or a forepeak sole can also be used to support a post but should
be solid and tight. A post can also be attached belowdecks to
a bulkhead, and in this case might as well be cut short since
almost all flexibility is lost anyway. Make sure the bulkhead
is well secured around its perimeter. The post may, at one time
or another, take a lot of shock, fore and aft and athwartships,
and you should prepare accordingly.
In fiberglass hulls without obvious methods for bracing, it
may be necessary to epoxy glue a partial bulkhead in place to
provide support to the post. Epoxy will also glue plywood to aluminum
hulls, provided the aluminum surface is properly sanded, etched,
and cleaned beforehand. We have attached full and partial bulkheads
to aluminum hulls using epoxy and fillets of silica and microballoons.
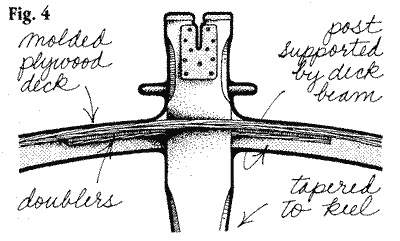
The post should ideally lay against a deck beam where it passes
through the deck, but this isn't always possible to arrange; then
doublers are the next best method of support (Fig. 4). Plywood
makes the best doublers, on fiberglass and wood decks, and has
much better resistance to splitting than timber cleats. Plywood
will also bend slightly to conform to the shape of the deck. You
may wish to use laminations of thin ply instead of a single thicker
lamination to allow it to bend easier.
The doubters should rest on timber cleats, screwed and glued
into the post (Fig. 5). Since these cleats will be primary support
members for the deck, they should be strong and run entirely around
the post. (For purposes of illustration, the cleats are only shown
on two sides of the post.) When cutting the hole in the deck for
the post, it's best to cut slightly oversize, at least a sixteenth
on each side, to allow for a good epoxy seal of wood edge grain
or fiberglass, and for the silicone seal caulking. It's important
to seal this area carefully to prevent rot and to keep raw fiberglass
matrix from soaking up moisture and weakening. After a thorough
seal, the post can be installed using silicone or polyurethane
caulk around the post for watertightness and gap filling. It's
best to form a small fillet of caulk around the post using your
Finger. You can shape this silicone fillet by wearing apair of
rubber gloves. After you make the fillet, .get away and don't
pester it, let it kick and then trim the excess with a sharp razor
blade.
The after face of the samson post is a good location for a chain
snubber, which must be tailored to your particular size and type
of chain (Fig. 6). The slot should be wide enough to easily accept
a link of your chain, held vertical, while the next link will
lay horizontal and very effectively lock the chain in place. Stainless
steel or bronze plate 0/16 inch or Uinch) will work very well.
All edges should be well rounded and the flat-head screw fastenings
should be countersunk flush with the surface.
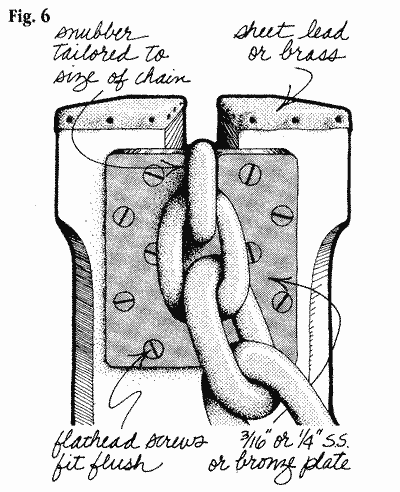
A snubber makes it possible to handle heavy lengths of chain
even without a winch. The snubber can be useful in breaking out
a stubborn anchor in rough water, since you can take all the slack
possible, then let the motion of the boat jerk the anchor from
the bottom. The rougher the water, the better this works. An efficient
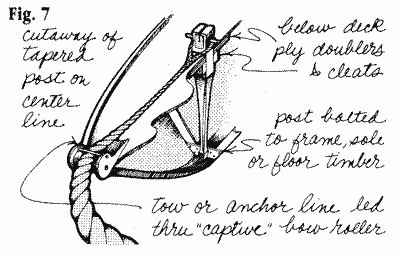
bow roller, with a free rolling large diameter wheel (Fig. 7),
makes pulling the anchor much easier by eliminating friction over
the gunwale or dragging through a fairlead.

|

