Twenty Two Years for the First
One Year for the Next Two
by Richard Oderwald
I began building a boat in 1982. Two rivers, many floatable creeks, and several impoundments are within a half hours drive of home, and many more of each are reachable without much more effort. Most people use a canoe or kayak. Most of my river time has been spent in a canoe, but I consider a canoe an upset in progress, and using a paddle to maneuver is like peeling a banana with one hand. A kayak is stable and the double paddle puts two hands on the banana, but space is limited and you can’t move around very much. So, I set out to find an alternative.
I wanted to build the boat myself
(click images to enlarge)
|
 |
|
I wanted to build the boat myself. When I was twelve my father had helped me put together a kayak from a kit by Dedham Kayaks. I found the ad in the back of Boy’s Life magazine. However, I had never built anything more complicated than a cutting board (it started as a lamp) by myself. Ease of construction would be strong selling point.
The ideal boat could be car-toppable, loaded, unloaded and moved by one person, perhaps with a mechanical assist, stable enough for fishing, moving around, and general gawking without causing panic, and able to handle class I and II rapids with an occasional III. It would be propelled by oars and be able to accommodate two, although usually I would be the only occupant.
I pored over books and magazines, sent away for study plans, and checked out every boat I saw go by. Finally, I stumbled on to Bolger’s Small Boats. I had found the mother lode. I settled on Yellow Leaf since it met many of my wishes (just ignore the canoe aspects). I could put on oarlocks. It didn’t look heavy, at least not in the book. The slanted sides promised secondary stability. Construction didn’t look too involved. The alternative construction of fiberglass on the chines was the first mention I saw of what has become tack-and-tape or stitch-and-glue.
Several weeks later a strongback was in place, forms had been cut, and a clever (I thought) means of attaching the forms while allowing adjustment had been devised. At any moment a boat would spring to life from my basement like Athena from the head of Zeus.
Then I lost my nerve. How could I line up the forms? What if the boat was crooked? Would it really work? How were the bow and stern pieces mounted? Every problem, real or imagined, loomed larger and larger. I let everything set while I thought it all over. A year or two later the strongback had lost its legs to another cause. The forms were pushed in to a corner. Every now and then I’d pick them up and set them down.
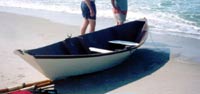
I saw a picture of the Gloucester Light Dory in a WoodenBoat magazine a friend had. It was gorgeous. All thoughts of desired features left me entirely. I was in love. This was the boat everyone should have. The GLD is mentioned in Small Boats by way of the Light Dory Type V, but there were only line drawings of the Type V and the double pointed ends didn’t seem stylish. But the GLD in the flesh with H. H. Payson pulling her ashore was graceful beyond imagination.
I ordered the booklet “How to build the Gloucester Light Dory”, a reprint of the WoodenBoat articles. The strongback was still good. New forms were cut. Plywood for the sides was marked, and cut, and butt-strapped. My proudest achievements were the stem piece and transom; they looked exactly like the pictures. Incidentally, the glue was WeldWood dry powder resorcinol, at the time the only reasonable priced wood glue that promised any water resistance. My kayak was held together with WeldWood and the frame was still intact when the cloth and fiberglass were history. The dory glue joints have held for over twenty years through moves, flooded basements, and haphazard storage.
|
I saw a picture of the Gloucester Light Dory in a WoodenBoat magazine a friend had. It was gorgeous. |
|
My biggest problem was how to attach the stem and transom pieces to the strongback. The pictures showed Mr. Payson confidently nailing them to a ladder-like frame on the floor. I would need to add some kind of brace to each end of the strongback to make it work but they would be hanging over the ends. Fear again set in.
After another six months of inaction we moved across town. All the accumulated junk had to be disposed of or relocated to the new house. The 12 foot long strongback was cut in half to make the move. The braces and carriage bolts for the forms went in a bag. The forms themselves were packed with all the loose lumber and plywood pieces lying around. The sides, already butt-strapped and cut, ended up against a damp basement wall “temporarily” but were never moved. The strongback became two upright boxes behind a desk in a corner. Out of sight, out of mind, and so it stayed until May 2004.
May 2004 I suddenly decided I needed to finish the boat so it could be at the beach the second week of July. I have no idea why this became so important after years of nothing, but there was no stopping. I dug out all the pieces I could find, which were the two halves of the strongback, the sides, the stem and transom, and the middle form. Attaching the stem and transom to the strongback was still a problem, so I went around it instead of solving it. The sides had been cut to the dimensions given plus a little slop, but at least they were the same (the instructions clearly say the dimensions are approximate and to get the shape from the forms, exactly what I didn’t do). I attached the front of each side to the stem with epoxy and screws, aligning everything as best I could. The test was in bringing the sides to the transom, where they actually fit quite well. They were at the same height top and bottom and there was no obvious skew in the sides. With the bevels on the stem and transom the sides flared enough to make this look like a success.
To give the boat shape I forced the middle form between the sides at its approximate position and wiggled it until it fit. The sides bowed out smoothly, all the lines looked fair, and it really looked like a boat, except for the lack of a bottom. I was worried that there wouldn’t be enough curve in the sides from the middle to the ends, so I forced in two more forms, one on either side of center. I’m not sure that this accomplished much but I felt better. The whole process was a reverse tack-and-tape. I don’t recommend it, but I had a boat in progress.
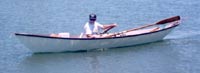
It rows smoothly, easily handles any rapids I care to get into, and always attracts a crowd at the landing. Even with all the fits and starts and the long delay it is every bit as gorgeous as I imagined when I first saw the picture.
(click images to enlarge)
|
 |
|
From then on it was all downhill. The bottom went on the second try with 3/8 inch plywood as called for in the plans. The first time I tried a ½ inch sheet that was lying around. It was too stiff to curve to the bottom but it has made a great work bench top, even if it’s boat shaped. There was no chine log since the boat went together backwards. Bottom and sides were epoxyed in typical tack-and-tape fashion and all screws were pulled after it set. My brother-in-law, a renowned deck builder (“the more nails and boards the better”) and I decided the sides weren’t stiff enough, so I put in two more braces at the positions of the additional forms. This was before the gunnels went on and were entirely unnecessary. The gunnel boards were steamed to take the rake in the sides by wrapping them in blankets and plastic and pouring on boiling water. This does work. However, ask you wife before you grab random blankets and head out the door.
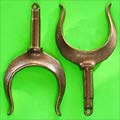
Six ounce fiberglass and epoxy completed the bottom. Seats went in and primer and paint inside and out finished the project. A set of brass oarlocks and sockets from Duckworks added the last touch of elegance. I bought a pair of seven foot oars for $20 at a yacht store. Someone had brought them in with a trade-in and the store owner didn’t know what to do with them. They stood in a corner out of the way of the big money boats. The store people waved happily as I took the oars out the door. I was happy, too.
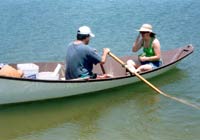
The first trip was to the river with my wife and daughter. We christened it with a tiny wine that we drank instead of breaking. The dory felt shifty if anyone breathed heavy, but it never showed the slightest tendency to do anything else. Once we got used to the movement there was no need for concern. We got a lot of compliments from the people at the public landing where we put in. Some couldn’t believe I made the boat, but these were people with very bad eyesight.
A week after the first launch we headed to the beach with the boat on top of the car. I rigged a set of wheels to help get the boat loaded and unloaded and to get to the water. It weighs much more than it should, but I don’t really know how heavy it is. With the wheels I can handle it by myself.
Since that first trip I’ve floated the river many times while pretending to fish. It rows smoothly, easily handles any rapids I care to get into, and always attracts a crowd at the landing. Even with all the fits and starts and the long delay it is every bit as gorgeous as I imagined when I first saw the picture.
Lessons Learned: One - Don’t wait. Do something even if it’s wrong. You may have to redo something or even start all over, but twenty years is too long to wait. Two – Read and reread the directions. It’s amazing how many explanations I found in the directions once I had done it wrong. Three – Stop worrying about making a mistake. Do something obviously and clearly wrong at the beginning and you can stop worrying. It’s going to happen sometime, so make a mistake and get over it.
Following these principles I made two more boats in the last year, a drift pram and a Pointy Skiff, each a unique experience. The Skiff is going to the beach with us in July.