|
Obsolete Outboards |

|
|
by Max Wawrzyniak - St Louis, Missouri - USA
Lower Units
Part 1 - Part 2 |
 |
If you are a perfectionist, you are not going to like what I am about to say. I am going to suggest that living with imperfection will simplify your life. I am talking about tolerating a lower unit which allows a little water to leak in. I am going to suggest that a willingness to frequently change
the lower unit lubricant (say, after every 3 or 4 outings) might be less of a hassle than trying to re-seal an old lower unit. Seal kits are available from Sierra for these old OMC outboards, but consider this; some of these outboards require special tools (or “jury-rigged” tools) in order
to change some of the seals involved.. A damaged propellor shaft, scored by having fishing line wrapped around it, will probably damage a new prop shaft seal and cause it to leak. Worn bearings on the propeller shaft or vertical drive shaft may not be bad enough not to run the engine but may allow the shaft to “wobble” so much that it tears up the new seal. Stocking up on cheap lower unit unit oil from a discount store and frequently checking the lubricant for water and changing it when it becomes contaminated might be a viable option for a lower unit that does not leak too badly. If it leaks like a sieve, however, then an attempt at resealing is probably warranted, but don’t be surprised if it still leaks a bit afterwards.
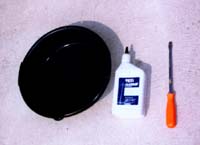 |
Figure - 01
The only items needed to change the lower unit lubricant is fresh lubricant, a drain pan
of some sort, and a large regular-head screwdriver. |
(click images for larger views)
|
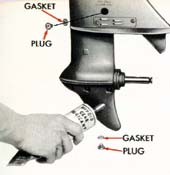
Starting with the basics, changing the lower unit lubricant is a simple albiet messy job that ANYONE can do, and little in the way of tools is required (Figure Lower Units-01).. The oil is drained by removing two plugs from the lower unit (Figure Lower Units-02). NOTE; there is a screw, much smaller than the drain plugs, located near the very bottom of the lower unit that is actually a pivot pin for part of the shift linkage; this pivot pin screw usually has a Phillips-head on it. Do not confuse this pivot pin screw with the drain plugs. If you should manage to accidentally remove the pivot pin screw, immediately try to reinstall it and DON'T TOUCH THE SHIFT LEVER UNTIL THE PIN IS BACK IN.
Figure - 02
After draining the old lubricant, fresh lube is injected into the drain (bottom) hole until
it flows out of the upper (vent) hole. Note the little gaskets on the drain plugs. |
|
|
If you are lucky, the bell crank that rides on the pivot pin will not have slipped out of position and the pin will go back in without trouble. With the pin back in, try shifting the engine, keeping in mind that you must slowly turn the propeller or the flywheel to allow the engine to engage the gears; do not force the lever. If the gears do not engage, then the bell crank slipped out of position and you will have to remove the pivot pin screw and, utilizing a good light and an awl or long nail or something similar, attempt to pry the bell crank back into position with it’s hole aligned with the hole in the housing so that the pivot pin can be reinserted.
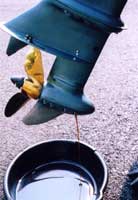 |
Figure - 03
Inspect the drained lubricant for the presence of water, which will either flow out of the
lubricant separately or combine with the lube to form a “milkshake.” |
|
With both the drain and vent plugs removed, allow the oil to fully drain. Catch the oil in some type of container and inspect it for the presence of water (Figure Lower Units-03). Compare the oil that drains out to the new oil; lower unit oil that resembles a vanilla milk shake is water contaminated. Sometimes, clear water will drain out. While the lower unit is draining, check to see that both the drain plug and the vent plug have little washer-like gaskets on them. Missing plug gaskets may be the cause of your leaking lower unit. That pivot pin screw should also have a gasket under it’s head. Partially loosening it without fully removing it should allow you to check to see if it’s gasket is in place.
Figure - 04
The lower unit lubricant capacities of older OMC outboard motors. |
|
|
To refill the lower unit with oil, insert the nozzle of the lower unit lubricant tube or quart bottle into the bottom hole and squeeze-in oil until it runs out of the upper hole; while holding the bottle or tube in place on the lower hole, install the upper plug. Then quickly remove the tube or bottle from the lower hole and install the lower plug. Yes this is a messy job, and no, you can not refill from the upper hole as you may not get the lower unit completely full (Figure Lower Units-04).
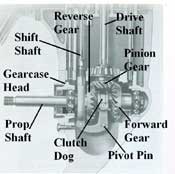 |
Figure - 05
The general arrangement of parts in a gear shift lower unit.
|
|
I always use lower unit oil purchased at a discount store. Since most of my lower units leak a bit of water and require that the oil be frequently changed, I try to buy the cheapest oil available. About any lower unit oil on the shelf at a discount store will work just fine in older OMC outboards; I don’t even bother to check what “type” of lower unit oil it is. The exception would be for an electric shift lower unit, which requires a special lower unit oil, but I have already advised you against buying an outboard with electric shift.
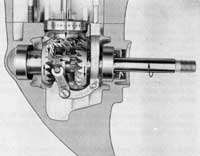
Figure - 06
Forward gear engaged. |
|
|
One other comment; there is a white grease (not oil; grease is thicker than oil) sold as a lower unit lubricant for outboard motors without a full gearshift lower unit, such as the little Johnson and Evinrude 3 hp models and the 5 hp models sold for just a few years in the 1960's. This grease is called Lubriplate #105 grease and while it is normally only recommended for the non-shift engines, it has been used in full gearshift engines with very leaky lower units. The heavy grease is much less likely to “wash-out” than oil, although water can still leak in. After use, the drain plugs can be removed, the water allowed to drain out (allow to drain for several hours) and then the grease can be “topped-off” rather than totally replaced. With the Lubriplate #105 one does not have to be as concerned with having all of the lubricant leak out of the lower unit, leaving nothing but water.
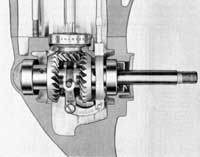 |
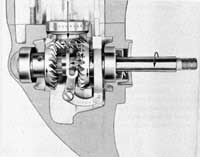
Figure - 07
Neutral position.
|
|
Now, using the grease in a shift lower unit is akin to using very heavy motor oil in a worn auto engine in an attempt to maintain oil pressure; it is generally considered poor practice. But whether we are talking about an old car or an old outboard, if one is not expecting too many more hours/miles of use, it will work (for a while). Lubriplate #105 is also used when assembling automotive engines during rebuilding and it can usually be found at a good auto parts store.
No matter what lubricant you use, be sure to drain and refill the lower unit before the onset of freezing weather to avoid the possibility of water in the lower unit freezing and breaking the aluminum housing. If you are using Lubriplate #105, the grease will not drain; leave the plugs out for a few hours to be sure that the water has drained, and top-off with more grease. Leaving a lower unit sit all winter with no lubricant in it risks corrosion of the shafts and gears, and also of the roller or ball bearings in those engines that have them.
Figure - 08
Reverse engaged. Note that the all gears are always engaged; the shift is
effected by locking free-wheeling gears to the prop shaft. |
|
|
The “transmission” that gives one forward, neutral, and reverse is located in the lower unit (Figure Lower Units-05) . Outboards use a dog clutch which works as follows; there is a small pinion gear mounted on the bottom of the vertical drive shaft, and which is always in engagement with the forward and reverse gears, which ride on the horizontal propellor shaft but which are free to rotate
loosely on the prop shaft. Also on the prop shaft, between the forward and reverse gears, is the dog clutch, which is splined (locked) to the prop shaft. The shift linkage moves this dog clutch foward in order to engage forward gear (Figure Lower Units-06), to the center position to provide neutral (Figure Lower Units-07), and rearward to engage reverse (Figure Lower Units-08). All gears are always engaged with each other; the shift is made by the dog clutch locking one gear or the other to the prop shaft instead of allowing the gear to rotate freely on the prop shaft.
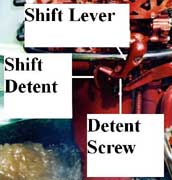 |
Figure - 09
Shift lever adjustment point.
|
|
A gear shift lower unit that “jumps” out of gear has a problem that must be addressed immediately or severe damage could occur, if it has not already. Often, the reason for an engine “jumping” or “slipping” out of gear is a worn or incorrectly adjusted shift linkage. The linkage adjustment is made at a bolt on the shift lever on the side of the engine (Figure Lower Units-09). Be sure not to force a non-running outboard motor into gear (Figure Lower Units-10 ) as the engagement lugs on the clutch dog and gears may not be in alignment. It might be necessary to slowly turn the flywheel or the propeller a bit in order to allow the gears to engage. If you attempt to force them, you will damage the linkage.
Figure - 10
Care must betaken when attempting to shift a non-running engine into gear. |
|
|
Most of these outboards (the 5 ½ being an exception) have a spring-loaded detent which acts upon the shift lever to hold the engine in gear. When I adjust the linkage on these engines, I like to set them up so that the
strength of the detent spring is forcing the shift lever to the “forward gear” position. In other words,
I want the shift linkage to “bottom-out” in the forward gear position before the detent “bottoms out”
in the forward position. This is done by shifting the engine into forward gear (with the engine not running, of course; disconnect the spark plug wires as a safety precaution), then loosen the adjusting bolt and move the gearshift lever just SLIGHTLY towards the neutral position while not allowing the rest of linkage to move, then tightening-up the adjustment bolt. Adjusting the linkage in this manner means that the linkage is in full forward gear but that the spring-loaded detent is still trying to force the gearshift further forward. If the linkage is a little worn, adjusting it in this manner will
help to hold the engine in forward gear, possibly at the expense of reverse. While an engine that jumps or slips out of forward gear should not be run, jumping out of reverse is not as big of a concern as reverse gear is used much less often than forward, and at much slower speeds. The ideal situation of course is an engine that stays in both forward and reverse gear with no “jumping.”
-- on to Part 2 --
|