|
I love yard sale season. Whether they are yard sales, garage sales, estate sales, farm auctions, or whatever, these events are good opportunities for anyone trying to outfit a shop on a budget. Here I will offer a few pointers for the uninitiated.
Know what you want. Make a list and stick to it. It is easy to start buying things you don’t really need simply because they are a bargain. Then you’ll have to waste a day holding your own yard sale to get the clutter out of your shop. A little discipline pays off here.
Do your homework. Most newspapers list upcoming sales and auctions with at least a partial inventory of what is to be sold. There’s no point in going to a sale where they’re only unloading their collection of useless knick-knacks or kids’ clothes. And this accounts for well over half of these sales.
Plan your route. In many cases you’ll have multiple sites to get to at the same time. First prioritize by what they advertise versus what you want. Putting the most promising site first, get out your map and set up a route to get the other promising sites in as little time as possible. Which relates to…
Arrive early. The good stuff goes fast. Especially power tools and anything that looks “antique”. Unfortunately, a lot of these antique collector types have gotten turned on to tools. Try to beat them to the punch, but don’t try to outbid them at an auction if you can avoid it. They’re crazy.
Tools to look for
Here are some tools that most folks seem to have forgotten, but that are plenty useful to the small home shop. In most cases they have been forgotten due to an infatuation with power tools.
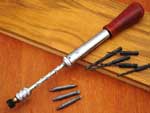
| Yankee spiral ratchet screwdriver |
|
|
These funny-looking screwdrivers were the cordless drill of their day. You push on the handle and this causes the bit to turn, and the chuck can be set it to drive, retract, or lock. Do not underestimate this tool just because it has no motor. These screwdrivers zip screws in with surprising speed, keeping up with a 14v cordless drill in most circumstances. And their superior low-speed torque handily outdoes the power drill on larger screws. Not only are these handy for general shop work without the noise of a drill, electronics people like them because they generate no magnetic field like a drill motor does. But most folks don’t even know what they are anymore, so you can get them for under $10. Oddly, if you wanted to buy one new you’d have to search a little. Stanley only sells them in the UK, but Garrett Wade Tools imports them for about $60. A company called Lara makes a cheaper version for about $25 new.
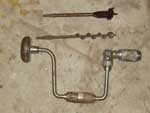
| Braces |
|
|
If the screw is too big or stuck for the Yankee screwdriver, the brace is a sure-fire way to apply enough torque. People who refasten big carvel hulls simply couldn’t get those screws out without these things. A drill motor wants to move to fast, and will just heat up if you try to make it run slow under heavy load. And it’ll try to run fast at the first opportunity, chewing up the screw head. But with a brace, you lean your body weight against it, so it can’t even think about jumping out of the fastener. Then you can apply torque as slow as your arm will go. A brace with a longer “throw” gives you more torque at the expense of speed, so it’s nice to have a few. Especially nice are the braces with a ratchet. Then you can use only the part of the arc with the most torque. Braces are also a marvel for large holes. Ever try to drill a 1” hole with a power drill and a spade bit? It’s not something I look forward to. But it’s quite pleasant with a brace and you’ll like the smooth and precise cut. Be sure the chuck opens and closes smoothly, and that it will firmly grip a bit. The chucks are occasionally worn out when someone has been chronically careless about tightening it all the way, and occasionally parts are missing. So be sure to check. Also check the ratchet, if equipped, and be sure both handles turn smoothly.
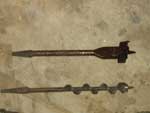
| ... and Bits |
|
|
Be sure to grab the bits when you see them, since they are nothing like the bits made for electric drills. Most notably, they have a special square shank. And they’re not standard, either. So when you get a brace, try to get the bits with it. Even if the cutting head is junk you can always cut it off and have a magnetic ¼” hex head welded on, so you can insert any screwdriver bit you’d like. But you’d be surprised how often those “junk” bits can be saved with some polishing and a re-sharpening. They are made with plenty of metal, since it was assumed that people would re-sharpen often. Most types of brace bits will look unfamiliar to the modern handyman. Pictured above is the familiar auger type along with an adjustable hole cutter. The spoon bit looks like the spoon bait you fish with and has been around since ancient Roman times. It also cuts a good hole. The gimlet doesn’t make the prettiest hole, but it cuts fast. It looks sort of like a twisted spoon. The center bit cuts an accurate flat-bottomed hole with minimal disturbance to the underlying wood. It looks like a common spade bit, but with one side dished. The auger is the only type that pulls itself into the wood, eliminating the need to apply so much pressure to the brace. I usually only see augers, but you might get lucky. For a full explanation of the uses best served by these various types, see Restoring, Tuning & Using Classic Woodworking Tools by Michael Dunbar. One final note. Get the auger file if you see it, since it makes it way easier to sharpen auger bits. It is a double-ended file, with both ends tapered. One end has safe edges and the other has safe faces, so you can control which part of the bit you cut into.
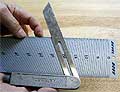
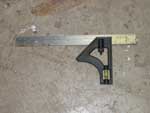
| Adjustable Combination Square |
|
|
These are much handier than they first appear. Of course it can be used as a regular try square or for getting a 45 degree angle. But that little adjuster wheel allows the angle head to slide up and down the rule. This means you can use it as a depth gauge or a marking gauge, which is already worth the couple bucks it’ll cost. Even better, some of these tools have separate protractor heads and heads for finding the center of a round object. Some also have a leveling bubble built in, which I haven’t found all that useful on boats. At least not yet. New, these tools can run from $15-150, depending on precision. For our purposes any of them will work.
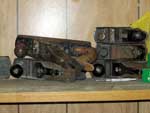
| Hand planes |
|
|
Block planes and small jack planes are quite cheap. Look for cracks in the casting, especially near the mouth. Cast iron cracks when dropped, and many planes have been dropped. Also be sure none of the parts are loose. You can usually tighten a loose handle or frog, but check. Sometimes the holes are stripped, and then it’s not worth the effort unless it’s a special plane that you really need. Take it apart if you can. Be sure all the adjustments move. See if the cap iron comes close to perfectly meeting the blade. It’s a pain to fix if it doesn’t. Collectors like Stanley, Record and Bailey planes. They’re nice, but the no-names work just as well for us. Look especially for the long jointer planes and small-mouthed smooth planes. Anything meant to take a fine shaving will have a mouth that seems impossibly small—only wide enough to allow 5-6 sheets of office paper into it. These are less common, and usually get more money. Maybe $20 or more. Check the prices of new planes before you go looking. But while you’re learning to restore these things, stay away from the big expensive ones since you may very well ruin a couple. Aimé Ontario Fraser recommends in "Your First Workshop": A Practical Guide to What You Really Need that one start with a fully-adjustable block plane ($25 new at Hartville Tools), then add a #4-1/2 smooth plane and a #7 jointer. A #4 smooth plane would be fine too, but the #4-1/2 uses the same iron as the #7. Here’s a link on planes. For some price comparisons on new planes, a Lie-Neilsen #7 jointer can be had for $400, Stanley for maybe $300, and a reportedly decent copycat brand from India is about $60. The price range for new smooth planes is about the same, maybe slightly less. There appears to be no cheap 4-1/2 from India, though. The #4 is $30 at Hartville. Let these be a guide as to how much you are willing to pay for a used version, and be aware than both new and used planes need some work to set them up.
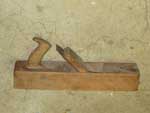
| Wooden Planes |
|
|
Wooden hand planes are getting to be a target of the antiques crowd. You can still find them, but they are likely to be in poor shape. But sometimes they still go cheaply if they’re not “rustically beautiful” enough for some antique collector’s display. (Can you tell that I don’t really understand this “collecting” business?) Being wooden, they are of course restorable if you know what you’re doing. Recommended reading is Mike Dunbar’s "Restoring, Tuning, and Using Classic Woodworking Tools" for some very detailed restoration and repair guidance. Also see John Gardner’s "Building Classic Small Craft". He has a chapter on how to make these things, and you’ll want to read it to know about how they work and what to look for. This might seem like a lot of work, but wooden planes have some advantages over their cast iron cousins. The heavier irons chatter less, the wooden sole enjoys less friction, and the larger examples suffer less from superfluous weight. For some price comparisons with new tools, see https://www.knight-toolworks.com/wooden.htm. Their smooth plane is $165, jack is $150 and jointer is $166. (These prices are for planes handmade in America by a master, too!)
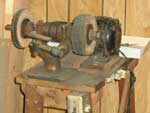
| Sharpening Stones |
|
|
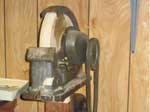
I got lucky with the wheel seen above. This was from the estate sale of a fellow who was clearly serious about a sharp edge. By the time I got in, the hunting knives had been pretty well picked over. But one of the few remaining knives was still scary sharp after its owner was dead and gone. I bought that knife for $2.50. The woodworking tools were already gone, but for $4 I bought an absolutely beautiful homemade walnut and lemonwood flat bow. I have a bowyer friend who got pretty jealous. Obviously I should have gotten there earlier for the tools! (See recommendation #4 above.) Anyway, I got the water cooled grindstone above and a buffing wheel setup. These were homebuilt tools, and I think the earlier crowd thought they looked rickety and unreliable. Certainly there were no safety guards of any kind. But there was no denying the edge on that knife, so for $10 each I dragged ‘em out to the truck.
The water cooled stone is a miracle. It’s geared down slow so it can be controlled, and the water keeps the blade cool while sharpening. This is good, because if the steel heats up it will ruin the blade’s temper. Repairable, but a pain. The buffing wheels put the final polish on a blade. All this takes radically less time than I am used to spending on a blade, which is a welcome change. Best of all, they came with all his angle-setting fixtures. If I can ever figure ‘em all out, I might be able to get some edges like he used to. I wish I’d had a chance to pick that fellow’s brain while he was still in this world.
Another note for the non-initiated. Grinding wheels rotate with the top of the wheel going away from you, but buffing wheels rotate with the top toward you. The tool blade always points away from the wheel’s rotation, so it’s on the top of the grinder and bottom of the buffer. Always use eye protection and stand to the side in case that wheel grabs the blade and drags it fully around the wheel to launch it at you. It can happen!
| Buffing wheels |
|
|
Relatedly, don’t miss out on a deal on only the buffing wheels. You can do quite a bit of sharpening with emery on one wheel and rouge on the other. Any good hardware store can set you up with these compounds for about $2 each for enough to last you several years.
| Stone Dresser |
|
|
This is one of those tools you just can’t figure out unless you know what the heck it is. A grinding wheel gets uneven in use, and it will sharpen unevenly if you leave those grooves in it. This thing cuts it back to being even. Again, always use eye protection and stand to the side!
| Toolboxes |
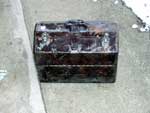
|
|
The nice rolling tool boxes tend to remain relatively expensive, since auto hot-rodders love them. But smaller portable toolboxes can be quite reasonable. And it is hard to find metal ones new at any price. This box was $10 at a farm auction and needed only new pins in the fold-out trays to be fully functional. It carried all of my automotive tools for years until I came across the right deal on some rolling tool boxes.
| The BFH – Big Friggin’ Hammer |
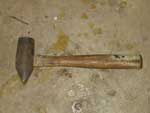
|
|
You may not know it yet, but you need one of these. The novice is thinking “what nail needs that hammer to drive it?!” But the experienced builder is thinking, “Any nail does… if it’s attaching a gunwale to a plywood panel hanging out in mid air!” You use this big hammer to back up the material when you’re nailing something flimsy and unsupported. Sure beats using a brick. And if you ever need to bend some metal, you’re equipped.
| Vice |
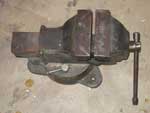
|
|
I’ve never met a clamp or vice I didn’t like. I have a feeling that’s true for most of us. Big vices are very expensive new, even for the cheap Chinese junk that passes for a tool at most box stores. So if you see one that’s hard to lift solo, have a closer look. It is well worth $50 if it has all its parts and the action runs reasonably smoothly. The big hammer and a solid vice can easily bend 1/8” steel to your will.
| Saw-Zall |

|
|
These are not necessarily cheap at auctions. The cheap Chinese brands don’t last long enough to turn up at auctions, so normally you’ll only see good ones like DeWalt, Milwaukee Tool and Makita. I got this one with plenty of life left in it for $40 from a retired sheet metal worker’s garage sale. Well worth the expense. The rebuild of my motorwell alone justified the expense, to say nothing of working on my folks’ bathroom remodeling. When you want to cut a frame rib that is attached to a flat surface that must be preserve, this tool slashes through the waste fast but allows enough control to stay away from the good part. And with an 8” blade, it does so in a narrow space.
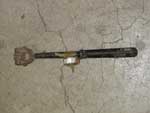
| Grinders |
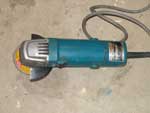
|
|
These are not necessarily cheap at auctions either. Again, the cheap Chinese brands don’t last long enough to turn up at auctions, so normally you’ll only see good ones. Figure $10 per inch of wheel diameter as a minimum. This is about half price of a new one. But these tools are well worth the expense. They are built for full-time professional use and will stand up to many years of occasional use. I think a 4” grinder is probably essential for metalwork, but also keep in mind that they make 4” circular saw blade for these things. Just also keep in mind that it’s a fine way to lop off a hand, so watch yourself.
| Welders |
|
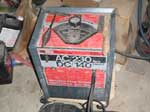
|
If you get a grinder, you might consider a welder. It’s a handy thing to have. I built myself a boat trailer and numerous other fittings with the one pictured above. It cost me $60 at a shop auction and I had to put a $30 switch and a $30 fan into over the following year. But that makes it almost like a new welder, and $120 is less than half the cost of a new one of the same capacity. This one went relatively cheaply because everyone else was there for the excavation equipment. These professional shop guys already had welders and only bid thinking of a cheap backup. Just be sure you can get enough electricity to feed it! You’ll need 240v for sure. Mine takes 60a, the outlet for which has parallel primary blades and a ground pin. A smaller welder would run off 30a, which is probably what your clothes dryer runs on. It has slanted primary blades and a ground pin. Look at the electrical fittings in a large building supply store and you’ll see what I mean. If you’re not sure of how to wire this kind of thing, by all means talk to an electrician. Or read a book on it – it’s not rocket science. (Just don’t blame me if you burn your house down!) You might be questioning whether it’s worth getting into this whole welding mess, but remember: a guy with a welder and some scrap is never without the right clamp! Speaking of clamps, notice (at the bottom of the photo) the reach-around-jaw vice grips. These are made specifically for holding things in place while welding them and work very well.
Rob Rohde-Szudy
Madison, WI
robrohdeszudy@yahoo.com

Other Articles by Rob Rohde-Szudy:
|