|
From the Drawing Board |

|
|
By
John Welsford - Hamilton - New Zealand
|
|
|
The Miniature Shipyard
and teaching boatbuilding |
|
Building a full sized
boat may be the goal. For many this is a daunting
prospect. The heart may desire the finished product,
but the mind is jumping up and down in panic about
all the unknown “how do I?”, where do
I start? and “what if’s?” that run
round inside the head when you don’t want them.
It also can take a little while to organise a building
space, find and fund the tools and materials, and
last but not least to get a good understanding of
the building process itself. How can a beginner keep
the inspiration and vision alive while organising
al the mundane things that have to happen before building
can begin?
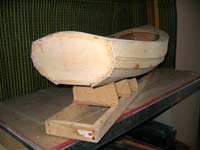
|  If
it wasn’t for the background it
would be easy to mistake this for a full
sized project. The lap joints are all
nicely done, the deckline fair and the
boat is still sat up on the building jig
just like a “real” one. If
it wasn’t for the background it
would be easy to mistake this for a full
sized project. The lap joints are all
nicely done, the deckline fair and the
boat is still sat up on the building jig
just like a “real” one.
- Nigel Ryan photo
(click
images to enlarge) |
|
Building a boat is a learning process, and many will
say at the end of the project “I wish I had
known what I do now, when I begun.”. In other
words, having built one boat, the next one will be
far easier.
But not everybody is like me (22 boats ranging from
tiny tenders and plywood kayaks to middle 20s ft yachts
in 19 years, the aim is to stay ahead of one a year!)
and building pretty much constantly, so how to gain
the experience in a relatively painless way?
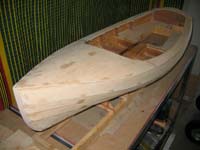
|  And
looking at her from the stern it is apparent
that there is a little sandpapering to
do yet, just as would be the case with
a full scale boat. This model will finish
off very well and I am sure will help
motivate the builder, as well as providing
a conversation piece that will help to
explain what the clutter in the garage
is during that time before the boats shape
emerges from the chaos. - Nigel Ryan
photo And
looking at her from the stern it is apparent
that there is a little sandpapering to
do yet, just as would be the case with
a full scale boat. This model will finish
off very well and I am sure will help
motivate the builder, as well as providing
a conversation piece that will help to
explain what the clutter in the garage
is during that time before the boats shape
emerges from the chaos. - Nigel Ryan
photo
|
|
Models!
Most plans intended for home boatbuilders are to
a largish scale, mine are mostly 1 /10, many are 1/12
and a few at 1/8th scale. All of these are workable,
and building direct from the plans will give a scale
model large enough to use the full sized construction
method, and give a feel of how the real thing will
go.
At 1/10 scale my Pathfinder
design used to illustrate this article will come out
at about 21 x 8 inches, large enough to work on without
having to use a magnifying glass and robust enough
to stick modelling pins in, but small enough to not
require a huge investment in tools and materials.
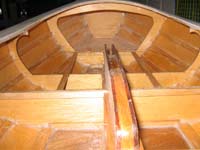 |
You can
see here how using the scale method of
building gives a real feel of the scope
and nature of the building job, this is
a shot showing the centercase, the center
thwart and the framed up sleeping deck
within Pathfinder.
- Nigel Ryan photo
|
|
The pics here are of Queenslander Nigel Ryan's Pathfinder.
He’s built her directly off the plans at that
1/10 scale. He’s stuck faithfully to the building
method and if you look at some of the close ups you’d
think that she was the real thing. When he gets to
build a “real” one he’s going to
fly through the project having done it all before.
Note that it is simple to try different interior
layouts and any other alterations that you might contemplate.
A cardboard cutout model manikin with drawing pin
pivots in hips, knees and arms can help, you can measure
yourself and make up a stick figure, then allow the
appropriate amount of roundedness and you can customise
the boat to fit. As a designer I usually have to deal
with average sizes and not everyone is the same so
a model man in a model boat is a good way to check
the fit before wearing the real thing.
A nice shot
from above that gives a good impression
of the shape and proportions of the finished
item.
- Nigel Ryan photo
|
|
|
What to build her from? I’ve seen cardboard
models, plastic sheet models, paper, wood veneers
and solid wood. But for this purpose I like the Balsa
wood sheets that the model airplane shops sell, SIG™
balsa is nice consistent stuff in grade and finish,
comes in a wide range of thicknesses, cuts, saws,
glues and paints well, and can be tacked together
very very quickly with the right adhesives.
Note that at these scales in balsa 1/16in thick works
about right for 6mm (1/4in) ply, 3/32 for 9mm ( 3/8in)
and 1/8in for 12mm ( 1/2 in) plywoods. You’ll
find that you can massage it into shape in much the
same way as plywood, and it is easy to do the final
shaping with sandpaper contact glued to a piece of
wood in the same way as a manicurists sanding tool.
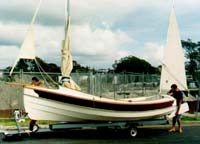 |
The real
thing, this one Paul Groom's lovely Varuna
being rigged up.
- John Welsford photo
|
|
Also available at these model airplane shops are
thin wooden strips that make good stringers. Use a
larger size than scale though as it is too hard to
handle in the tiny tiny sizes. There is also very
thin plywood, glues, fillers, paints and all of the
tools needed to do the job. You can set up a miniature
boatyard for a few dollars, one that will allow you
to explore and learn about boatbuilding inside, in
comfort in a few hours a week.
Set your boat factory up on a piece of flat panel,
MDF (Medium Density Fiberboard) is nice. The big box
type hardwares sell it in smaller pieces, get one
that overlaps the job by a bit all round. Keep it
dry though when damped on one side it tends to curl.
You’ll need a modelling knife, looks like a
scalpel, and a packet of spare blades as balsa is
surprisingly hard on sharp tools (it’s a hardwood,
even though it's soft). Some of your ladies sandpaper
fingernail boards, a very fine saw, (about 25 teeth
per inch or finer), some fine sandpaper and some modelling
pins.
|  Plenty
of room in the real thing, but they have
all watched the process as their boat
gradually appeared out of an untidy pile
of wood and fittings, a model could have
shown them what was coming. Plenty
of room in the real thing, but they have
all watched the process as their boat
gradually appeared out of an untidy pile
of wood and fittings, a model could have
shown them what was coming.
- Paul Groom Photo
|
|
On pins: standard ones hurt if you press hard on
them, perhaps you can borrow grannys thimble but otherwise
look for the tee headed ones that the model shop sells.
Note that some of the plastic and glass headed ones
have no “head” inside the glass or plastic
and that, being brittle can split away and the pin
can go right through the fingertip. I can tell you
that it makes hitting your thumb with a hammer seem
like a picnic!
Glues: if you read the model airplane magazines,
you will be confronted by a bewildering list of adhesives,
as with the full size boatbuilding scene this is an
area of chemical development that is moving very quickly
but you only need a couple of the old standard glues.
The cellulose and acetone “Balsa cement”
is one essential, it sets off quickly, goes hard enough
to sand smooth, is plenty strong, and is very easy
to use. Its my standard, and will glue any of the
wood products that get used in model building.
 |
The plans,
this is where it all starts! |
|
Cyanoacrylate, Elephant glue, Mother in law glue
etc, that’s superglue to most, and it wonderful
stuff. I carry a gel type, and a standard type. It’s
not quite instant but I can pull two pieces together
with my fingers and tack weld it in a few seconds
with the standard superglue. There are times when
clamping a joint with pins is a pain and this superfast
glue is great. I do go over it and reinforce it with
balsa cement but as a quick hold its wonderful. Mind
you don’t stick the fingers to the job though.
Fillers, a tiny amount of handyman autobody filler
will do, cheap artists brushes from Walmart, perhaps
one sheet each of 100 grit and 180 grit sandpaper,
some filler undercoat and cellulose based “coloured
dope” from the model shop does the painting,
and all that is left is making a nice mounting so
you can perch it on the mantelpiece so you can admire
the handywork and dream about the boat to come.
I like building models, it’s a great thing
for wintertime and the result can be very inspiring.
Have a look at the model and the finished result here,
and lets see you get started.
John
Welsford.
Designer

Click HERE for
a list of articles by John Welsford
More Articles about Models:
Click
here for more information about Welsford plans.
|