|
Birdsmouth... |

|
... and Other Wooden Masts and
Spars
From time to time we are asked make
masts, spinnker poles and the like. Our largest spar
set to date was for an Italian Schooner that hit trouble
when en route to Cape Town along Africas East Coast.
The yacht was some 70 feet long and in a heavy Carvel
Planked timber construction, so quite a large boat.
The Main mast (aft on a schooner) was all of eighteen
meters long. The Fore Mast was fourteen and a half
meters long. Both of these masts were quite new and
the Oregon Pine (Douglas fir) timber and workmanship
used to make them was very much top draw. It’s
a pity both broke in some heavy weather when voyaging
from Mombassa, Kenya, to Durban, then on to Cape Town,
South Africa.
As mentioned the timber and labour to construct with
was the best but they used the wrong glue. How can
this be? Well, glues come in various types; waterproof
may be just that but when its not suitable for boiling
it may and most probably will fail under severe heat.
The name WBP in a glue stands for ‘Waterproof
& Boil Proof’, WP stands for ‘Water
Proof’ only. Now we know we are never going
to actually Boil our timbers but given the Tropics
and its humidity, added to that the heat that can
exist, its not so far off such high temperatures on
a mid summers day on the coast in Central Africa.
What happened with those masts was the glues used
were just WP and a common type used world wide. It’s
a white powder base and is mixed with clean water,
making a nice paste that is easy to apply and wipe
clean after clamping. What should have been used is
the same glue that is used in both marine and WBP
grade plys, Phenolic or Recourcenol glue. Its easy
to identify. It has a very dark red, near black glue
line and its either mixed in two parts with a white
powder or a similar dark red liquid. The mix ratios
are varied and some types can be ordered with an extended
pot life; very usefull when building the larger masts.
Depending on the size of the masts being glued up,
the choice of which to use can be important as some
have a thicker mix consistency making application
by brush less easy. You will also need to ensure that
which ever type is being used has a reasonably long
pot life. Once started with the mix process you have
to be fully committed to complete the glue application
and clamping of all the various mast partners in the
time available!
The masts for the Italian Schooner were fine from
the breakage down and into the boat, so in that case
we just scarphed new timbers onto them and advised
the boat's owner to steel strap what was then left
of the old masts inside the boat.The masts were a
simple rectangular box section,the glue was doing
all the work, well should have originally. We rebated
the new timbers to form a proper rebated joint. This
way the glue line was near 50% larger than originally
built, with that and the correct Phenolic Glues, the
boat was ready to sail off on its voyage. The last
we heard was they were safely arrived into Trinidad
and Tobago, West Indies.
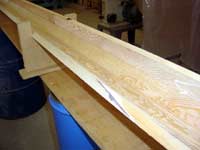
That type of construction is very easy to do and
can be successfully attempted by most, even in their
own back yard. A simple Skill Saw can do all the rebates
and that is what we ourselves used on the Italian
Masts. Another way of doing Masts, especially round
ones is a more complex (seemingly?) ‘BirdsMouth’
construction, named from the angle joint that resembles
a Birds Beak when open.
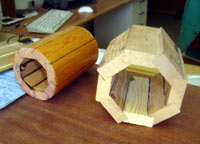
| Drawn in a
circle, typically a 152mm round (6”)
mast will have eight staves 60mm x 22mm
(2 3/8” x 7/8”) |
|
|
Birdsmouth Spars:
When the diameter of the mast or spar is known, it
is is drawn out to look like eight parts, or Staves
as they are called. Drawn in a circle, typically a
152mm round (6”) mast will have eight staves
60mm x 22mm (2 3/8” x 7/8”) with the Birdsmouth
joint cut along just one long length of each stave.
They are very easy to form into a round form. To make
this more simple, all our Kits and Mast builds also
have CNC cut building jigs,set up on a long bench
or set on 220 liter drums. They allow the eight staves
to be glued up one by one and then dropped into the
jig, one at a time. We also taper our masts to allow
a little weight saving and to make the masthead look
a little sleeker.
Mast Tapers:
On this mast we decided a taper down to 125mm ( 5”)
diameter would be fine,this was for the top 1500mm
( 5 feet) to do this,simply plane off a taper along
one flat edge of the top of each stave,in this case
10mm (3/8”) was all it took,remember to do the
taper after the birds mouth section has been cut.
We have a mast in build now - its going on a 30 foot
wood/ply/epoxy catarmaran. It will be Gaff rigged
and we will next make up the Gaff. Wood is heavy you
are thinking? Some are but if you can source the correct
timbers they are actually lighter than Alloy, much
to my own surprise when I first calculated the masts
weight. The client was very happy. He said the wooden
mast is lighter than the alloy option, which was to
be around 67 kgs. Our timber spar in Clear Oregon
comes in at about 44 kgs. The choice of timber used
is important. Using a lower grade American Spruce
or Pine would have given us a wall thickness or some
30mm or 1 ¼”; using the better and lighter
Oregon Pine Clears we got away with a wall thickness
of just 22mm,or 7/8”
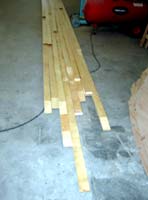 |
a set
of mast staves for a nine meter mast,152mm
in diameter
|
|
This is important to understand: as total end costs
can easily become quite close between two similar
timbers that have different cost structures. The 22mm
will easily come out of 25mm but the 30mm needs to
come out of 38mm timber stocks, so already we are
buying in more timber but wasting it on the machine
shop floor when it is later planed to thickness. So
the final costs will not be as far off as you may
have thought. Added to this the mast with the thicker
timbers will be noticeably heavier. That is a penalty
most will not want to carry.
Traditionally, a round wooden spar can also be made
from just four sections of timber as wide as the spars
diameter and to what ever the design thickness may
be. This becomes a square box but has some 45 degree
internal blocks glued in each corner prior to making
up the box.Once the box and internal blocks are assembled
and the glue is set,the corners can be planed right
away, making a round section eventually. This build
also uses eight parts and will make for a fine spar,
if not a little time consuming by the time the internal
blocks have been attatched and the whole thing glued
and planed to its round shape. Which takes more skill,
as when the eight part Birdsmouth section is being
shaped, you have eight smaller flats to plane down
to, rather than the four of the more traditional construction.
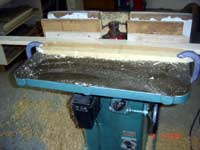
| Spindle work
on a 60mm x 22mm mast stave |
|
|
Either way make up a half section and full size jig
template from a scrap of ply, this will allow you
to check you are not planning to an undersize or misformed
shape section as you go.
Gluing up:
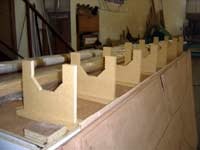 |
CNC cut
mast building jigs,all part of what we
supply with our mast kits,the one closest
is smaller than the rest to allow for
the mast head taper.
|
|
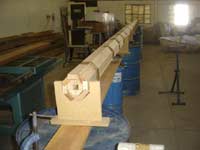
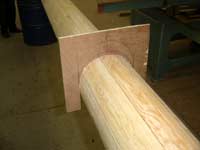
Our masts ,kits and those being built by ourselves
to completion all have neat CNC cut MDF jigs. Each
jig is exactly the right section and has a base that
just slots together with the vertical jig. You will
need a bench or stands nearly as long as the spar
itself. On the 9 meter long (29.5 feet) mast we are
building now, we have used empty 220 liter (44 Uk
gallons) epoxy drums, plus some smaller ones that
when stood on top of each other came to exactly the
same hight as the larger drums.
Over the drums we then laid a pair of long 152 x
25mm planks screwed together at their ends, then we
spaced out the jigs. This is not over important, excepting
if the mast has a taper at the mast head as this one
does. The smaller jig needs to be right at the mast
head end as it will only fit in that position.
| The jigs need
to be both straight and level, with no twisting. |
|
|
The jigs need to be both straight and level, with
no twisting. This is important, as once the eight
staves are glued up and assembled in your jig, they
will take its exact shape. It is easy to glue up a
spar with a kink at this stage otherwise.
The easy way to set the jigs up is to screw down
the mast head one to your bench or plank first but
before doing this,pencil a line along part where the
lower Stave will lay ,this is from side to side and
using a set square.
Note: due to the mast mast
taper, the mast head jig must have its pencil line
drawn in the same position as the other jigs. This
will then be lower than the stave face at the mast
head but in line with all the others.
Fit the masthead top jig first; square it off to the
building jig. Now screw it in position, then fit the
lower jig at the other end. You now need a long line
or string to line the jigs that fit in between. Nylon
Fishing Line is perfect for this job. Screw a spare
screw about midway on the lower face of the bottom
jig; make sure it is exactly on the pencil line you
have already made. Then a second screw on the upper
face of the top jig. Make a loop at the end of the
chosen line and pass it over one screw. Now take the
other end of the line to the opposite end jig, wrap
it around the screw and pull it nice and tight. Now
make off the end of the line. This needs to be secure.
Possibly a little masking tape around the line will
help secure it.
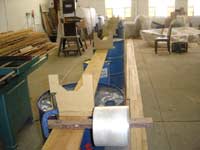
Dry fitted
Now take some scrap wood or ply. 9mm (3/8”)
is perfect. You need three pieces the same size. Take
two and slip them under the line where it touches
the side edge of the vertical jig, the line tension
will hold them in place, if it does not, the line
is too loose and needs more tension.
Now take the other jigs, in our case we had seven
jigs so we have five left over to space out, more
or less evenly but this is not critical. With a square,
line them up at 90 degrees to your building bench.
Then taking the third block of wood or ply you prepared,
use that as a spacer guide to meet up to the line.
The reason we use such a system is that with the spacer
block being used there is never any danger of pushing
the line out as each jig is being placed, which will
be the case without the spacer. Once each jig is in
place, screw it to the bench before moving to the
next jig.
Check all of the jigs are in line as close as you
can as this accuracy will help later when shaping
your spar. One last job is now to check the lower
edge of the jig. This is where the first stave will
lay when assembly takes place. Due to the mast head
taper in this case, we can not take a line along the
center, end to end, you can now use the pencil lines
and the tight line already in place to check the lower
face of the jig is straight. When this is done you
can easily check the see the bottom of the jig is
straight, adjusting with packing as required.
 |
Dry fitted
as a trial run
|
|
You can now lower the eight mast staves into place,
dry at this time and ready for a check to see everything
fits as it should. On the mast we have just built,
the staves were premade to a length of around 9.5mtrs
(31 feet) by scarphing and gluing in lengths of suitable
timbers until we had the correct length. In our case
we could then lay in each full length as we were gluing
up the mast proper. In fact this pre scarphing and
gluing on the bench first is not really required.
It will add to the time taken to build the mast too,
due to the extra gluing process time taken on the
bench. As the scarphs (150mm, or 6 inches long) are
all staggered and held in place by the birdsmouth
joint section it is quite easy to glue the scarphs
at the same time as the mast itsself.
Assembly:
Lay in the lower stave, keeping the top of the stave
level to the outer face of the mast head jig, then
lay in two more; port and starboard sides; then two
more. You now have a ‘U’ shaped box. Now
fit in the top and bottom mast blocks, normaly shorter
at the head. If a masthead cable conduit is to be
installed, this is the time to glue up the plastic
conduits. The internal masthead and lower wood blocks
will need to have been glued up with suitable internal
holes for the conduit to pass through.
| Dry assembly
ensures you understand the process. |
|
|
Note: when the mast is
glued up and the conduit installed, always keep a
screw through the conduit and into the inside of the
mast, as if you (or anyone else) ever pulls the conduit
part way out of the mast, it is highly unlikely you
will ever get it back in again!!
With the mast in its ‘U’ shape, top and
bottom blocks in place, you can now fit the next three
mast staves, port and starboard as before. Then the
last and top one. The joints should push up neat and
tight. To check this out take some 50mm (2”)
plastic wrapping tape and make up tight bands around
the mast every 500mm (18”) or so will be fine.
You now have a mast as what we call ‘Dry and
in The Round’. This is how we would ship such
a mast as a ‘Kit’.
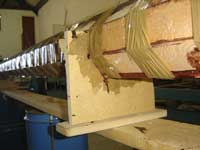
Gluing Up:
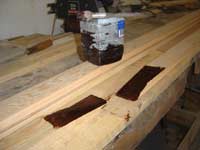 |
This is
the mast stave scarphs being glued. The
glue is a special Phenolic Resin.
Note! NEVER GLUE UP MASTS WITH EPOXY!
|
|
This is obvilously a repeat of what you have just
done. When taking the staves apart, lay them in a
reverse sequence so that you will pick them up in
the right order; numbers may help in this regard.
The Phenolic Resin glue we use has a ‘Pot Life’
of around 30 to 40 minutes, so you need to be quick
when applying the glue. Use rubber or surgical gloves
as when this glue gets on your hands its liable to
stay on them for some days. It is important to get
as close to a 100% glue cover as possible. This is
why we glue up on two edges of the joint. This may
not be really needed but it sure takes any doubt from
our minds that we have enough glue in each joint.
| Easy ways
are often the best. This is just 50mm packing
tapes but plenty of it. |
|
|
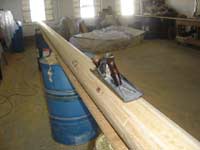
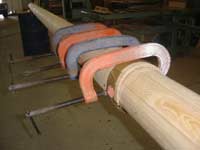
Clamping:
As mentioned you can us the packaging tape. This is
all we ever use to date on this type of spar - only
that for the gluing stage we apply every 150mm (6”)
to ensure we have maximum pressure but a better system
is based around using large hose clamps, the type
we see on Auto Hoses on Radiators and the like, but
you will need a great deal of them and at some cost
too. Avery neat system is to use a plastic or steel
strapping or banding tool. You may be able to hire
one of these. If you do it needs to be one that does
not have the tool sitting ‘Under’ the
strapping, as you will never remove the tool if this
is the case.
 |
A simple
and low cost way to clamp. Large hose
clamps work well too.
|
|
Plane to Shape:
This will be the next day. Remove whatever clamping
system has been used. You will now have a nice stiff
mast or spar. You can remove it from the building
jigs as they will now be in your way for this next
stage of shaping. Each flat section will have a small
corner standing up; use this as a guide before you
plane this away. Take a small block of wood, half
the width of the stave flat showing, then with a sharp
pencil and walking along the mast apply a pencil line
the full length of the mast,do this on each of the
eight flats. This is your secondary planing line,
which in a perfect world will not be planed off ,just
sanded away. You will need to use a straight edge
at the mast head to pencil in the line.
| This is a
number 6 Record steel plane. It’s
a good size for the job but a longer one
would be even better. |
|
|
On this mast we wanted to see what was taken off
when planer and sanding was complete so we collected
it all - 7 ½ kgs would you imagine! The wooden
mast was then at least 22 kgs lighter than the Alloy
alternative, our mast was cheaper as well.
This is where you will become fitter; after the short
session with the power planer, its back to traditional
hand planning. This is a number 6 Record steel plane.
It’s a good size for the job but a longer one
would be even better.
With luck you will have access to an electric power
planer. If not you're in for a keep fit session, well,
you are in for that already! In truth you will do
about one third by hand plane anyway. It is good to
collect those shavings so that you can work out what
the finished spar will weigh.
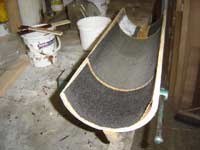
Sanding:
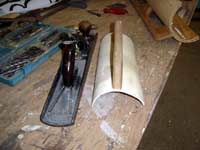 |
A simple
way of making a sander mould; this is
a half section of a 100mm plastic plumber
pipe with a Teak grab rail screwed from
the inside.
|
|
Masts and spars up to 100mm (4”) can use a
home made sanding jig from a piece of Plastic Plumber
Pipe. Split in half, its just the right shape and
you can buy various diameter pipe sizes to suit your
application. On this 152mm (6 1/16 ”) mast we
made our own sanding jig from two pieces of Long Grain
Bendable 5mm (1/4”) Plywood (in the background
in photo above). This is how: Wrap the mast at its
thickest diameter with thin plastic sheet, a dustbin
bag is fine, to protect it from excess glue, then
take the bendable plywood, pre-glued with the same
phenolic glue you used for the mast. This is important
as this form of glue sets hard and will allow no stretch
or flexing back to the ply's previous flat form.
| Glued and
clamped, the 40 grit floor sander paper
is on the inside to give the correct clearance. |
|
|
Wrap the half section of plastic covered mast with
some 40 grit floor paper. This is dry and used only
as a spacer to ensure the correct size is arrived
at. Then clamp the plys onto the mast. We used four
large ‘G‘ clamps. Some stiffeners will
work well here on the two long edges. When the glue
has dried by the following day, you have the exact
shape to sand with, after first applying on a double
handed handle. Then contact glue on the 40 grit floor
paper you used as a spacer the day before.
 |
Happy
Sanding!!
|
|
| A shaper jig
is not always required but its nice to check
your progress with. |
|
|
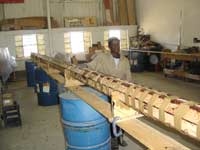
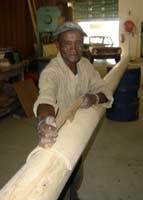 |
This is
where we are today. Mike our local guy
has lots to keep himself busy with,so
he is a happy guy right now.This will
take a number of days,after which we will
install the mast sheave boxes for the
boats forestay,this is a single sheave
at the front of the masthead and a double
at the lower end and the rear of the mast.
|
|
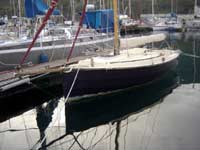
| A Cape Cutter
19 with one of our Birds Mouth Masts. |
|
|
We then apply six coats of Perfection, International
Paints clear twin pack varnish and Bill, the mast
owner, will hire a truck to take his new mast across
the Cape Flats and onto False Bay where he will step
his mast and launch his new 30ft Catamaran.
To be continued,with assembly pictures and final
stepping of mast in about four weeks time False Bay
YC, Simonstown.
Yours in wood and Kits,
Roy Mc Bride - Founder - www.ckdboats.com
email - kits@ckdboats.com
Cape Town, South Africa

More articles about Birdsmouth
Masts:
|