|
Lumpy - the carbon-fiber sprit boom |

|
|
By Gary Blankenship - Tallahassee, Florida - USA |
As the old joke sorta goes, I wanted to make a carbon fiber spar in the worst way, and I very nearly did. That the failure wasn’t complete is a testament to the strength of this exotic material and in fact the experiment has yielded a very usable, if somewhat bumpy sprit boom.
 |
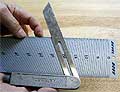
A painted Lumpy shows the spars, um, "irregularities" . . .
(click images for larger views) |
|
There was a two-part impetus for this venture. The first is I wanted to add a small mizzen to our Jim Michalak-designed Frolic2, Oaracle. Not to add any more drive under sail, but more as a balance sail, to add a little needed weather helm when on the wind and to hold the bow to the wind when reefing the main sail. And then I had a one foot by 60 inch piece of carbon fiber cloth, picked up at our last visit to Fiberglass Coatings Inc., in St. Petersburg, FL. Carbon fiber ain’t cheap, this modest sized piece is priced at over $20, compared to $5 to $6 for a yard of 6-ounce cloth of the same width.
I settled on a 13-square foot standing lugsail for the mizzen, with a sprit boom, hoping that will be a suitable size compared to the 114-square foot balanced lug main. Despite it’s modest size, this sail requires four spars: mast, sprit boom, yard and a boomkin to extend off the stern for the sheet (the mast will be stepped at the stern). Three of the spars were already in hand: mast, yard, and one that could either be the boomkin or the sprit. They did need to be cut down, having been laminated way too big for a 13 square foot sail.
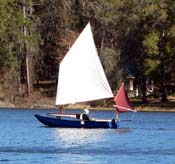
| Here is the 13 square foot mizzen and "Lumpy" the sprit boom |
|
|
The initial thought was to use the foot-side piece of carbon fiber to make a tube that could be mounted on the stern and take the mast, using the mast itself as a mold. Then the insidious thought struck; if the carbon fiber was cut in half lengthwise, there would be two 6 by 60 inch pieces, which would be wide enough to wrap around a 1.5 inch round spar, with some left for overlapping.
A digression is in order here. There are a couple ways to get a carbon fiber spar. One is to call a company that builds them, financing the considerable cost by selling your first born. Out of curiosity I had priced a 17-foot mainmast for our Frolic2, and the cost was about the same as for building the entire boat, including the sail (although we made that from a Sailrite kit). It would have, however, weighed 1/3 to 1/4 of the solid wood mast.
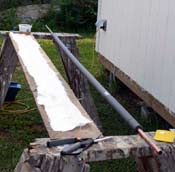 |
The insulating foam in on the pipe and the first layer of fiberglass is laid out and ready to apply. The shiny spot on the foam is tape holding the two pieces of foam together. |
|
The second way is to get kits from a couple of vendors, such as boatbuildercentral.com. These make use of sleeves of fiberglass and carbon fiber (think of a fire hose with no end attachments). For a typical small boat spar, a sleeve of fiberglass of the proper diameter is slid over a mold, usually foam pipe insulation, which is held straight by running a section of pipe through the middle. After the sleeve is stretched tight, it is wetted out with epoxy and squeegeed (usually by gloved hands) to remove the excess resin and allowed to cure. Any rough spots are sanded smooth (and any blush washed and/or sanded off) and then the carbon sleeve is slid over and epoxied, saturated, and squeegeed. After that’s cured a final sleeve of fiberglass is applied. Extra glass is applied on areas of high stress, such as the partners or where gear might be attached. It ain’t cheap. A 10-foot mast kit (including resin, carbon fiber and fiberglass (but not the foam or the pipe) costs $180. A 15 foot push pole kit is $155. If you want to buy the components, the carbon fiber sleeves in these sizes cost $2.50 to $4 a foot, and the fiberglass sleeves are similarly priced.
The do-it-yourself construction seemed straightforward. But I didn’t have sleeves, I had strips both of carbon fiber and of fiberglass. It seemed reasonable to try a pole, wrapping the 6-inch wide fabric around 1.5 inch diameter foam pipe insulation, held straight by running a pipe through the middle of the insulation. (The pipe is easily removed at the end as the resin and fiberglass don’t stick to it.)
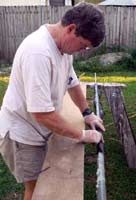
| Applying the first piece of carbon fiber; like wresling a Vaseline-coated eel. |
|
|
The first mistake was not using store-bought six inch fiberglass tape, but rather cutting it from scrap cloth on hand. No matter how carefully I cut, there’s always lose strings of glass hanging off that form lumps, bumps, and all sorts of problems when it’s wet out. Despite this, the first layer went on rather well. Since I wasn’t using sleeves, I planned to laminate all three layers at once, so it was on to the carbon fiber. This had more heft than the cloth and was less flexible. The plan was to saturate the edge and place it on the foam form, and then roll it on, bit by bit, adding more epoxy and hoping that the still wet fiberglass underneath would hold the carbon fiber in place until it was fully wetted out. It started out okay, but it wasn’t long before problems began. I figured that once that initial edge of carbon fiber was overlapped, it would stay in place. Wrong! Pretty soon it began slipping out, longitudinal ridges, puckers, and bulges began forming. Trying to slide things back into position kept dislocating the first layer of fiberglass cloth. It was like wrestling an eel dipped in Vaseline. Quickly it became obvious I was fighting a losing cause. So I smooth it out as best I could and, since it was already cut, applied the last layer of fiberglass. Since the carbon fiber had drooped and bulged, this last layer was no longer wide enough to go all the way around, And of course the frayed edges made lots of bumps and irregularities that would become razor sharp once the resin cured. Not expecting much, I set it aside to cure for a couple days.
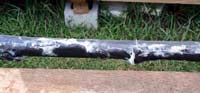 |
This shows a section of the finished and cured spar. Not pretty, but there was strength under the ugliness. |
|
What happened next is a testament to the wonders of modern materials. The pole actually was very strong, much more than I had anticipated. It had been made 7 feet long so it could be used for the mast, or cut down for the boomkin or sprit boom. There was one obvious weak point, about 18 inches from one end, where the carbon had sagged and failed to completely encircle the foam. I snapped that off and was left with a strong piece, still of sufficient length for the sprit boom or boomkin. It was obvious that had the glassing been well done, the pole would have been plenty strong for either purpose.
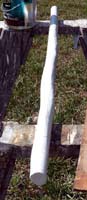
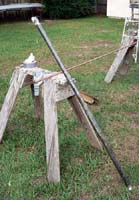
| After sanding and spiral wrapping with glass cloth, there is a marked improvement. |
|
|
But given the irregularities, I wanted to do some more reinforcing. A belt sander removed the worst of the hardened strands and lumps of glass. A sander belt cut open, making a 3 by 18 inch strip of sandpaper, was used “shoe shine” style to sand the spar. It’s a very effective technique to sand small round masts and booms. The result came out surprisingly well, considering. There were still bulges and ridges, but it looked likely that another layer or two of glass would go on smoothly.
I finally got smart. For the final layer, I bought some 6-inch fiberglass tape. And rather than try to edge wrap it, I spiral wrapped it at about a 45 degree angle. That allowed the tape to overlap itself and functionally to apply two layers at once. With the tube coated with epoxy and using the tape without raveled edges and at an angle, the application took only a few minutes. The few puckers and bulges were easily smoothed out. After curing, a final coat of epoxy filled the weave and the spar, duly christened Lumpy the Sprit Boom, was ready for sanding and painting.
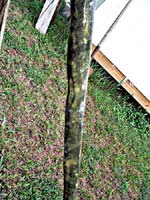 |
Lump is still irregular, but smooth and very strong and usable. Paint will help appearances even more. |
|
Lumpy’s maiden voyage is, at this writing, still a few weeks off. But a few observations can be made. Lumpy is about 3 inches longer than the boomkin, which is about 1 1/4-inch square tulip poplar (a local lightweight hardwood), with rounded edges. Lumpy is noticeably lighter, even though it has two extra layers of glass and is probably 20 to 30 percent heavier than necessary. Neither bends much, but Lumpy feels a little stiffer.
Final thoughts: I’d like to play with carbon fiber some more, if there’s ever an application where weight matters and price doesn’t. In the meantime, I’ll keep my eye out for super deals which my wife constantly assures me is, when it comes to boats, “wishful thinking” and highly unlikely!

Other articles by Gary Blankenship:
|