Rudder & Daggerboard Foils
|
|
| by Warren D. Messer - Seattle,
Washington - USA |
Constructing A NACA
0012 Rudder and
NACA 0010 Daggerboard Foils
Part 1 -
Cutout and Assembly
Part 2
- Fairing the Foils
A daggerboard or rudder can be made from designed
stacks of 1/8" (3mm) plywood strips. This can
be done without all the hand cutting, shaping and
sanding from solid materials like plywood or dimensional
lumber. Try to get marine grade if you can find it,
but a good quality of 1/8" plywood can also be
used. The non-marine grade plywood's, as well as the
marine grades, will be covered in fillet material,
epoxy, and a good coating of paint. So water penetration
issues should not be a problem. The only place where
marine grade plywood should be used; is in a daggerboard,
centerboard or rudder that is attached to a hull kept
in the water most or all of the time.
There will be 8 strips of various widths and lengths
to make a daggerboard with a NACA 0010-10 cross section.
The 0010-10 designation means that the formula works
out to be a daggerboard that has a cross section of
1" @30% from the leading edge and a cord length
of 10" and is a "lifting foil". The
rudder is a NACA 0012-8. It will look a little thicker
for it's 8” fore and aft length, even though
it to has a 1” cross section thickness; and
will also be made with 8 strips. This laminated style
of foil section also makes it easy to hollow out a
spot to place lead bars or shot to weight the lower
end of a swinging centerboard and help it go down.
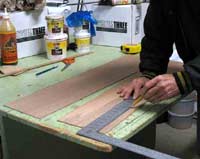
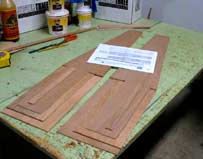
Start by studying the plans to determine the size
of each of the matched pairs of strips. Note the arrows
on each of the strips showing the direction of the
top grain of the plywood sections. This will ensure
that the finished daggerboard and rudder will have
the greatest resistance to bending and twisting. Set
the guide on the saw of your choice to the width of
one of the panel strips. Do some pre-planning and
layout of the strips to see which of the narrower
ones can be cut from the wider strips so you don't
waste wood. Remember that there are only "two"
strips of each size for a total of four “matched
pairs”. So you will have eight pieces for the
daggerboard and eight pieces for the rudder. Stack
them in mirror image sets.
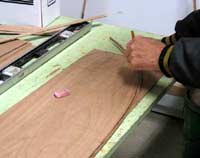
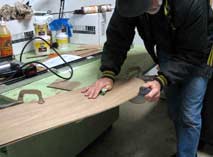
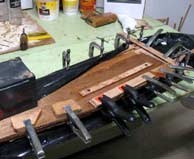
Lets start construction of the daggerboard. Take
the two biggest strips and match them up along their
ends and sides and clamp together. On the upper strip
of the pair, lay out the starting and ending points
for the "arc of the tip". There is a measurement
for the leading and trailing edges of the arc; and
one about halfway up the trailing edge. Mark these
points. Lay out the 1" x 1" grid at the
tip of the strip and pencil in a smooth curve following
the crossing points on the grid diagram and joining
up with the leading and trailing arc points.
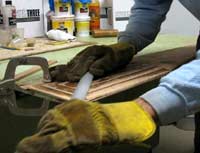
Use the saw of your choice to cut out the faired
tip of the two "matched" and clamped together
center strips. Shape and sand the edges to the fair
curve. Repeat this process on the rest of the matched
strip sets.
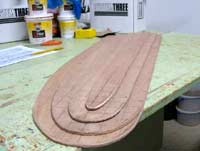
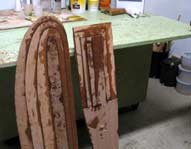
You now have two halves of the daggerboard. You
need to separate them into two "MATCHED"
sets that are "MIRROR" images of each other.
I can't stress this enough. Be careful or you could
epoxy up the sets and end up with two left feet/halves.
Look at how I have arranged and marked the mirror
image sets.
To make it easier to assemble the strips, do only
one half of the daggerboard at a time and place the
other mirror image set somewhere out of the way.
Take each of the cut pieces and stack them in position
(widest on the bottom) according to the dimensions
in the plans, and on a solid, flat surface. I use
an old piece of 2x12 to act as my level base. The
top ends of all the strips are even. The first two
strips are even on their leading edges. The next strip
set back 1" from the leading edge. The top strip
is set back 1" from the front edge to the strip
under it. Look at the cross section drawing to see
the relationship of all the strips that make up the
framework of the foil.
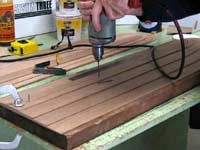
To keep the stacked strips from moving about while
you epoxy them together later, drill four holes on
the lengthwise centerline of the 2" strip and
equally spaced down it's length; and drilling into
the flat surface you are using underneath (2x12).
Make sure that the stacked strips are still in
alignment. Use a drill bit that is the same diameter
as any small finishing nail you have laying around
the shop. Push a nail into each of the drill holes
(and into the 2x12) and remove any clamps.
Take a pencil and mark the outline of each strip
on the one below it. This will give you a reference
of how far to spread the laminating epoxy. You will
coat the rest of the strip and the edges later before
you spread on the EZ-Fillet.
Less exposed epoxy, less chance of getting it on you.
Pull the nails and set the top three strips aside.
You will want to place some plastic sheeting under
the first strip to protect your work area. Take the
first (biggest) strip and line it up with the nail
holes in your backing board and insert the nails through
it, the plastic, and seated in the bottom of their
holes in the 2x12. Do this now or it gets sticky if
you wait until the strips are coated with epoxy. It's
ok to coat close to the nails with a layer of epoxy
as you build the stack; just don't leave a big puddle.
The SilverTip epoxy will not stick to the nails, but
you may need to use a hammer to get them out again.
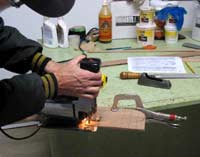
Coat both the "top" of the first layer,
and the “bottom” of the second layer with
a good thickness of epoxy. I don't use the rubber
squeegee for spreading the epoxy on these strips.
It spreads it too thin for a good lamination layer.
I use one of my old plastic squeegee's that is a little
rough along the working edge. That way I leave more
behind. I coat one strip, and then do the other, and
then come back and give the first one another coat.
I find it leaves me with an epoxy coating of the correct
thickness that's not too dry or with excessive squeeze
out.
When you place the second strip on top of the first
strip; pull the “top” nail and place it
through the top hole in the second strip. The first
strip is still held in place by the other two nails
and it won't move around on you. That way you don't
have to go poking around trying to find the hole in
the plastic and the backing board. As you rotate the
second strip around to line up with the first; you
can pull the other two nails. Just make sure you also
keep the first strip from rotating, as you line up
the second strip and replace the two nails. Repeat
this by coating the top of the second layer and the
bottom of the third and place in the stack. Repeat
with the top of the third and the bottom of the forth
strip. Check to see that the strips are all laying
flat, with no warps and replace the nails with sheet
rock screws and just snug them tight. Cover with some
plastic sheeting and place something with enough weight
to keep everything flat on the wider trailing edge
part of the daggerboard. If you have an edge that
wants to lift, just use a short sheet rock screw to
hold it down. The fillet material you use later will
cover the holes. Let the assembly cure overnight.
Note: Remember the second
stack is a Mirror Image; is laid out backwards and
requires it's own set of nail guide holes. Stack
this set and drill new holes as before.
Repeat the process with the other set of strips,
but in a mirror image of the first. Everything is
done the same again as before and let this set cure
overnight.
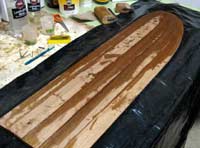
After the two mirror image sets have cured, it's
time to join them up. Coat the bottoms of the two
stack sets with epoxy, line them up with new holes
for the nails or screws (the old ones from the first
set will not match up), and lightly clamp (protect
the clamps with sheet plastic) the edges all around.
Let cure overnight.
Repeat everything we have just done with the daggerboard
for the assembly of the rudder pieces into mirror
image sections and epoxy the halves together. The
measurements are different, but the construction is
the same. Only the center six pieces meet at the rudder
head to give a ¾" thickness overall.
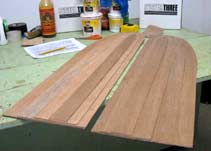
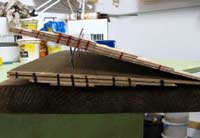
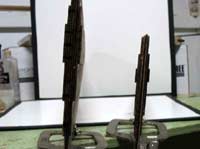
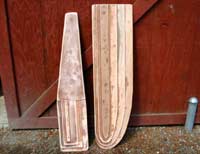
Now you have the two halves of the daggerboard and
rudder laminated together to form their foil sections.
You can now see what we have been trying to develop
by looking down the foils from their ends. The stair
steps have formed the outlines of the foil sections.
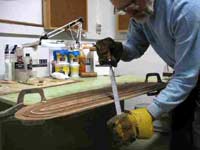
It's time now to take out the rasp and dress up
the edges of the foils. Make sure to keep straight
vertical lines on the leading and trailing edges and
not ruin your good workmanship up to this point. Radius
the corners; round and smooth the leading edge following
the cross section outline drawing above. Just sand
smooth the trailing edge.
The daggerboard and rudder foils have been cut,
laminated, and smoothed to their “skeletal”
shapes and now only need to be fleshed out with some
wood filled epoxy fillet material.
This will conclude the basic construction part of
the story and we will pick it up again in a couple
of weeks for the filleting, fairing, and finishing
out of the foil sections.
Thanks again for reading my stories.
Warren Messer
Red Barn Boats
 |
Here is
a downloadable
PDF file with layout and measurements
for constructing a complete rudder and
daggerboard set.
(click
image to download PDF file) |
|

|