| By Steven David Roberts -
Marshfield, Massachusetts - USA |
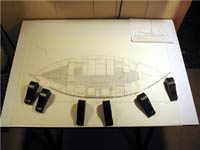
One of a Yacht Designers most prized tools is his
Spline Weights (also known as "Ducks" or
"Whales"). These are used to hold the drafting
spline in place as it forms one of the many curves
necessary to draw the lines of a shapely boat. Spline
Weights can also be used when lofting the plans full-sized
onto the floor of your shop. The cost of a Spline
Weight is in the vicinity of $30. This may not seem
to outrageous until one considers that you will typically
need between 15 and 20 Spline Weights to design a
boat by hand. This brings the cost to as much as $600.
The steps that follow describe a cost-effective method
for making your own Spline Weights. If scrap lead
can be found, the cost can be as little as a couple
of dollars per weight. While these are not fancy,
they get the job done as well any other Spline Weight.
The steps
that follow describe a cost-effective
method for making your own Spline Weights.
(click images to enlarge) |
|
|
Before getting started, it is extremely important
to understand the risks of heating lead. Here are
a couple of things to know, but further education
is strongly recommended before considering this method:
- 1) Lead vapors are extremely toxic and should
never be inhaled under any circumstances. Take the
necessary precautions.
- 2) Liquefied lead and moisture of any kind do
not mix (even the slightest bit of water) and will
"erupt" and splatter everywhere. Be sure
that your molds are free of any moisture.
MAKE A TEMPLATE
The pattern for this method is based on the measurements
taken from an article in the July/August 1994 issue
of WoodenBoat
Magazine. From the pattern measurements
make a template out of paper or Mylar.
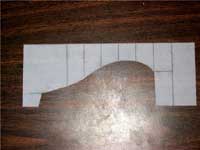 |
Make a
template out of paper or Mylar. |
|
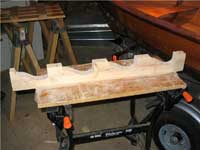
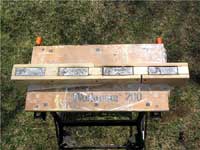
MAKE A MOLD
The mold is made out of a 2x4 and two 1x4's, all
about 3 feet in length. This is sufficient for making
4 weights at a time (a good sized batch for the amateur).
The pattern is cut into the 2x4 by tracing the template
(4 times) along one side of the 2x4, so that the open
edge of the template falls along what will be the
top edge of the 2x4 mold. These are then cut out.
| The mold is
made out of a 2x4 and two 1x4's, all about
3 feet in length. |
|
|
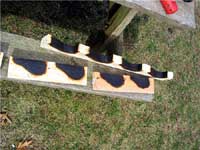
The 1x4's are then secured on both sides of the 2x4
with wood screws to complete the mold. These will
need to be as tight to the 2x4 as possible to eliminate
any gaps.
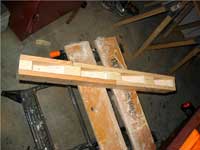 |
I didn't
have 3' long sections of 1x4 so had to
improvise, but the result is the same. |
|
SETTING UP
Because of the serious dangers associated with working
with lead, it is recommended to work outside. The
mold must be secure from movement. A WorkMate workbench
works well. Melting the lead in a large can over a
camp stove is a sufficient method. Work gloves, pants,
long-sleeved shirt, safety goggles and a properly
rated gas mask are a must. A long pair of grilling
tongs works well for handling the can of melted lead.
| Melting the
lead in a large can over a camp stove is
a sufficient method. |

|
|
MELTING/POURING LEAD
Only melt enough lead for one Spline Weight at a
time. The weights will be about 5 lbs a piece. Since
you'll always get residual lead sticking to the inside
of the can, melt about 6 lbs at a time to be sure
that you have enough. It takes a bit for the lead
to start to melt, but once it does the rest will melt
quickly.
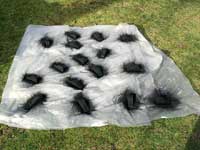
As previously mentioned, be sure that the molds
are free of moisture before pouring the lead. Also,
be sure that everything is ready to go before taking
the lead off of the stove. The pouring process needs
to happen quickly since the lead hardens rapidly.
Pour the lead into one of the molds as quickly as
possible without splashing. Since the lead will shrink
a little, pour as much lead as possible into the mold.
If anything, pour it slightly above the top of the
mold... the lead will actually be higher in the middle
than it is along the edges (this will need to be filed
down, later). Continue this process until all four
molds have been filled.
 |
As previously
mentioned, be sure that the molds are
free of moisture before pouring the lead. |
|
After the lead in the mold has cooled, take the mold
apart by removing the 1x4's. Turn the mold upside-down
and strike the bottom with a rubber mallet to free
the weights. You'll notice that the inner portions
of the molds are burnt... this is normal but I wouldn’t
recommend using a given mold more than 4 times. Put
the mold back together and start the process, again.
| You'll notice
that the inner portions of the molds are
burnt... this is normal but I wouldn’t
recommend using a given mold more than 4
times. |
|
|
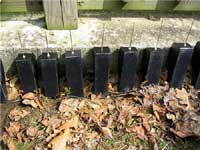
Repeat until you have the number of weights you require.
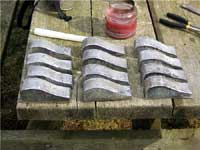 |
Repeat
until you have the number of weights you
require. |
|
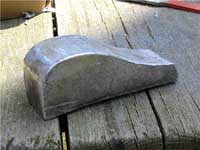
FINISHING
When all the weights have been molded, they need
to be smoothed down with a file or rasp. Even out
the bottoms and round over the edges. You can spend
a lot of time smoothing down the weights, but it won’t
make them any more effective. In fact, a rougher surface
is easier to handle when drawing.
| You can spend
a lot of time smoothing down the weights,
but it won’t make them any more effective.
In fact, a rougher surface is easier to
handle when drawing. |
|
|
The next step is to paint them. This is necessary
to prevent getting lead on your drawings. You can
get as creative as you want, but 3 coats of black
Rustoleum spray paint is a safe choice.
 |
The next
step is to paint them. This is necessary
to prevent getting lead on your drawings. |
|
To protect your drawings, cut and stick felt material
to the bottom of each weight (you can purchase sheets
of black felt with an adhesive side, that work well).
ADDING THE HOOK
Finally, the hook must be added. I made mine from
1/16" thick copper rod I found at craft store.
However, after using mine for a couple of years, I
might consider trying 1/8”. The length of these
will depend on your need and how deep of a hole you
drill to set them in. NOTE: Lead is a pain in the
neck to drill. Have a few bits available to get the
job done. Drill one hole in each weight centered horizontally
at its fatter end and about an inch high. Set the
rods in the holes with glue or epoxy. After the glue
has dried bend the rods to shape and cut to the appropriate
size
| NOTE: Lead
is a pain in the neck to drill. Have a few
bits available to get the job done. Drill
one hole in each weight centered horizontally
at its fatter end and about an inch high. |
|
|
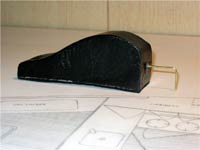 |
Finally,
the hook must be added. I made mine from
1/16" thick copper rod I found at
craft store. However, after using mine
for a couple of years, I might consider
trying 1/8”. |
|
Steven David Roberts
https://www.get-outside.com/
More by Steven David Roberts:

|