|
King Canvasback Kayak |

|
|
By Tim Lehman - Steelton, Pennsylvania - USA |
Stretching the Kayak to 17 ½’ X 31”
This past spring, I built a King Canvasback skin-on-frame kayak. The plans were originally published in a 1973 edition of Mechanix Illustrated. It came out really nice, light, stable and easy to paddle. But, as is the way with kayaks, it only held one person - me. My kids wanted to share in the fun, but they’re a little young to be turned loose in a boat by themselves. So I decided to try stretching it into a tandem version.
I expanded the frame spacing by 20% to end up with a boat of 17' 6" LOA. The beam remained the same, at 31”. I printed out another set of plans, got out my calculator and carefully figured the new dimensions. I read a few books and most of the web sites that dealt with building skin-on-frame boats, so I was a pretty comfortable with making changes to the original plans.
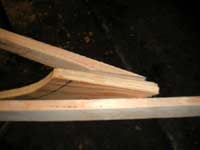
I splurged and bought two very clear 8' 2X4 premium studs at Home Depot to cut the keel and stringers from. Instead of using six ¾" X ¾" stringers per side as the plan specifies, I used three ½" X 1 ½" strips ripped from the edge of the 2-by. These were butt-joined using polyurethane glue.
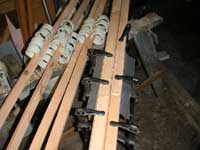 |
The keel and shears were cut ¾" X 1 ½" as per the plans and scarf-joined to the necessary length.
(click images for larger views) |
|
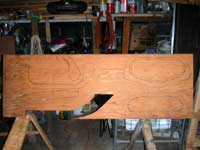
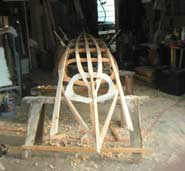
Using the full-size templates that I made for the original KC frames and stems, I laid out and cut a new set of frames. I lengthened the bow stem piece about six inches and made the curve a bit more sweeping.
I varied the design somewhat by making the rear deck flat instead of peaked like the fore deck. I simply cut straight across at the top of the shears. This makes entering and exiting a little easier by providing a surface to sit on.
| Since this is going to be a tandem, I left out the top frames, labeled 3T in the original plans, to allow for a longer opening. It wound up being a little over six feet in length. |
|
|
 |
The frames were attached to the keel with screws. The shear strips were first fastened at the middle frames. I used a piece of heavy twine to pull the shears in toward the stem and mark the miters.
|
|
| Once the ends were mitered to make a flush joint with the stems, they were fastened to the frames working from the middle toward the ends. |
|
|
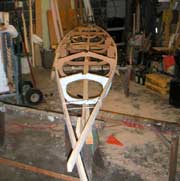
Once these primary frame members were in place, it was time to (carefully) turn the frame over and attach the stringers. It’s not very rigid until the rest of the stringers have been attached.
The bottom stringers met the stems at a long, shallow angle, and in retrospect, I probably could have cut them off at the first frame without any negative impact. But they are attached to the stems with that long thin taper.
 |
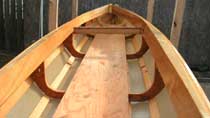
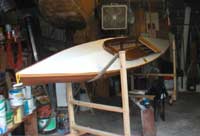
The other two sets were pretty straight forward, attaching in the same manner at the shears, as you can see in the picture. Once completed, the frame got two coats of spar urethane before the skin went on. |
|
I also added a stringer on either side of the deck ridge stringer fore and aft of the cockpit. I found on the original KC that a little more support in those areas for sitting during entry and exit and carrying "stuff" on the deck would have been a good thing.
For the skin I used a cheap canvas drop cloth from Big Lots. The 9' X 12' drop cloth turned out to be two 6' X 9' pieces sewn together. A half hour with scissors and sewing machine transformed it into a 6' X 18' cloth that fit almost perfectly. It was about four inches short, so after trimming and sewing, I added a small scrap to the stern. The result was almost impossible to spot.
| All I had to do was sew a single seam down the length of the centerline of the deck and a couple of tucks and darts at the ends. |
|
|
I used some strips of 5mm luan ply for the cockpit coaming. A piece of 1" X 12" clear fir provided stock for the keel and rub strips. A 12" X 8' piece of ½" plywood screwed into the frames serves as a floorboard. This more evenly distributes the weight of the occupants and prevents sitting in the puddle that accumulates from water dripping off of the paddle shaft. I screwed a piece of 1 X 3 to the first frame in the cockpit to serve as a backrest for the front paddler. The end result was a thing of beauty, if I do say so myself.
The launch and shakedown voyage went very well, up to a point.
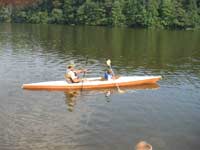 |
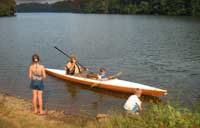
Here we are, showing off for the photographer. |
|
My youngest took to the paddle like the proverbial duck to water. I had a hard time getting him out of the boat so that his siblings could have a turn.
| You can see his older brother and sister exploring the edge of the lake, patiently waiting for their turn. However... |
|
|
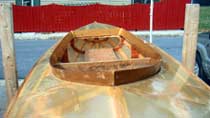
I'm not sure if it was the canvas or the paint (some old latex house paint that I had in the basement) that was the problem, but after a couple of hours in the water I noticed a rather large amount of water inside the cockpit. Closer inspection revealed no holes in the skin, but a LOT of seepage through the canvas. Quickly paddling back to shore and getting out to inspect the hull, I found that anywhere the boat had rubbed against the bottom or objects in the water, the paint had peeled off in sheets about the size of my hand. For some reason, probably the age of the paint, the paint didn’t form a watertight bond with the cloth.
Whatever the reason, it was a pretty sorry sight with paint peeling like an old, neglected house. I didn't think that simply putting more paint on would solve the problem. So, back into the shop...
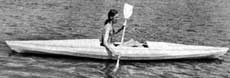 |
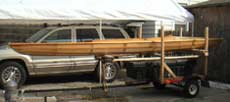
A picture of the original King Canvasback for comparison. |
|
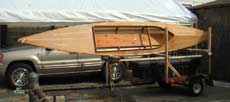
I picked up 10 yards of cheap nylon from the $1/yd bin at Wal-Mart. It was really too lightweight for the application, but it made for a good, tight base. Then I put a layer of six-ounce fiberglass on top of it, which has held up very well. It's a light tan color, so with the FG on top of it, it's almost clear. The framing is clearly visible through it and when you're paddling you can see the waterline undulating on the outside.
Here it is on my modified Harbor Freight trailer. You can see just how visible the frame is through the skin. I also have a piece of pool noodle that I split lengthwise to pad the forward backrest.
I worked on the boat in my garage over a period of about two or three months. I kept the doors open during the warm spring and summer evenings. After a while, it got to be a regular occurrence for folks in the neighborhood to walk down the alley to see how things were progressing. As I'm sure you can imagine, I got questions and comments on it during construction, and still do, wherever I go. "Did you build that yourself?" "Will it float?" "Wow, that's COOL!" "Was it hard to do?" "What's it made of?" "How long did it take you to finish it?"
We've had lots of fun paddling and fishing on the local lakes and rivers this year. The kids are so enthusiastic that next I guess I'll have to work on a couple of boats for them to paddle. We might just be on the way to starting our own kayaking club. Stay tuned for that installment.

|