|
Building a Michalak Jon Jr. |

|
| By Tim Lehman - Steelton,
Pennsylvania - USA |
After building three kayaks and a canoe,
I decided that I “needed” something a
little larger. I wanted to be able to take my kids
out fishing and have room for some gear and maybe
even something to shade us from the sun.
I settled on a jon boat for its capacity and stability,
so I got on the ‘net and started looking around
at designs. I narrowed it down to three finalists,
all Jim Michalak designs: Campjon,
Jonsboat and Jon
Jr.
I gave it a lot of thought. Campjon
would be my first preference. It has an enclosed cabin
area for getting out of the sun and maybe even catching
a little siesta. It would also be good for keeping
the kids corralled and it’s certainly large
and stable enough. But I didn’t feel comfortable
taking on that large a project solo. I’m sure
I could have gotten someone to help me turn the hull
as needed, but then there was also launch and recovery
to think about. I figured better safe than sorry.
Jonsboat,
at roughly the same overall dimensions as Campjon
and 100 lbs lighter, started to look like a better
option. And I already had the plans in Jim’s
book. But my workspace is somewhat limited, so I turned
my attention to the Jon
Jr.
I ordered the plans from Duckworks along with some
other items that I planned to use on the project.
Then I waited patiently for their arrival. Fortunately,
it didn’t require a lot of patience. Chuck and
Sandra must do nothing all day but fill orders because
I received all of the hardware items in less than
a week after submitting the order. The plans came
direct from Jim a day or so later.
Once the plans arrived, I decided to make a model
first to get a better idea of how the boat would look
and to try out some ideas. I made copies of the panel
layouts and used them as templates for cutting the
parts from 1/16” balsa. Then I glued the parts
together in basically the same process as building
the full-sized boat.
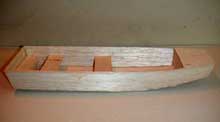 |
I decided
to make a model first to get a better
idea of how the boat would look and to
try out some ideas.
(click
images to enlarge) |
|
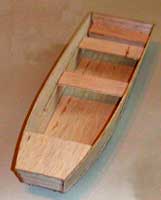
I didn’t put the frames in. I didn’t
think that would have made a significant difference
in the way the model turned out. I was just interested
in getting to the basic shape so that I could visualize
it better and play with some ideas.
| I was just
interested in getting to the basic shape
so that I could visualize it better and
play with some ideas. |
|
|
I experimented with putting some sort of well/floatation
chamber in the stern, but I didn’t like the
look of it and was afraid that shifting the seats
forward to accommodate this feature would make the
boat hard to trim so that idea got scraped.
Next it was off to Home Depot for materials. Three
sheets of luan ply, a 2 X 6 X 12’ plank, two
tubes of PL Premium, a box of drywall screws and some
miscellaneous nuts and bolts.
The 2X6 was destined to be ripped into ¾”
X 1 ½” strips for chines, keels, gunwales
and frames. This technique yields nice vertical grained
stock at a good price. It was the clearest one that
I could find in the pile without spending all day
digging clear to the bottom, but it still had a few
knots in it, some of which came back to bite me later.
I wanted to use Chief Red Elk’s cloth-and-paint
method of covering the bottom, so the next stop was
Big Lots for a canvas drop cloth and a gallon porch
and deck paint. They were out of drop cloths so all
I got was a gallon of oil-based dark brown porch paint.
Wal-Mart had some suitable fabric in the dollar-a-yard
bin, so I picked up six yards. That was enough to
cover the bottom and both transoms with a little left
over. The bits that I trimmed off make good shop rags
and the extra half yard or so will get used for something
eventually.
Time to get busy…
I temporarily joined two sheets of ply with duct
tape, being very careful to keep the factory edges
aligned. I laid out the side panels and cut them out
leaving about 1/8” excess outside of the lines.
Then I removed the tape and joined the sections with
Payson fiberglass joints, again keeping the factory
edges aligned. After the joints cured, I clamped the
panels together and used the belt sander to sand down
to the lines.
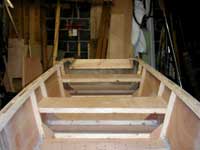 |
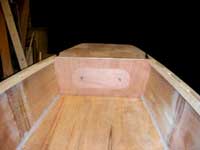
Looking
Aft
|
|
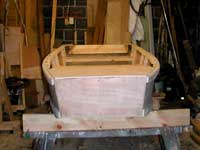
I built the boat to plan with two exceptions. First,
I substituted 3/4" ply that I had on hand for
the transom and added a 1X6 doubler for the motor
support. Second, instead of a triple 1X for the outer
wale, I installed a single outer and a single inner
with spacers on the inside. I prefer this because
it gives me plenty of convenient places to tie "stuff"
off. The boat might not capsize, but things DO get
dropped over the side, so I try to keep everything
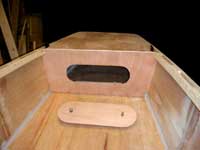
on some sort of leash.
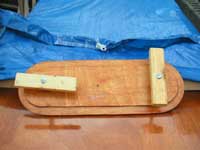
| the bow storage
with cover off |
|
|
I wanted some means of closing off the bow compartment
for storage and emergency floatation, but I didn’t
want a deck hatch. I wanted to keep that area flat
so that one of the boys could sit there while we were
fishing. When we’re under way, they both sit
on one of the seats, but they need to be separated
when we fish.
 |
back side
of hatch cover
|
|
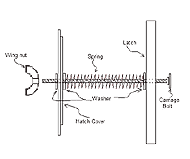
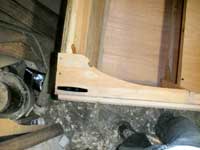
I cleaned up the cutout from the opening in bulkhead
#2, cut a larger piece from some scrap and glued them
together. I used two lengths of 1X2 for the inner
latch and mounted them with long carriage bolts and
springs. The springs place just enough pressure on
the latch to force it back away from the frame when
the wing nut is loosened. A couple of stops on the
inside of the frame align the latches in a vertical
locking position. As the wing nuts are tightened,
the latch bars rotate until they contact the stops
and then they tighten down onto the frame. Likewise,
when loosened, the bars rotate into a horizontal position
and the hatch can be moved sideways to disengage first
one side then the other for removal. It’s basically
the same type of arrangement used for the latches
on some electrical panels.
| bow storage
cover in place |
|
|
The pictures below give a closer look at exactly
how the latch system was put together.
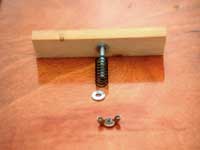 |
the latch
and hardware
|
|
| drawing of
the latch assembly |
|
|
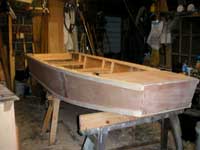
The final assembly, ready for finishing...
The first step was to get the cloth and paint on
the bottom. It really isn’t much different than
applying fiberglass to a hull. Just lay out the cloth,
smooth out the wrinkles, make any tucks and darts
needed to help the cloth fit closely around corners,
tack in place with a few staples in the chines and
then apply the paint. The first coat was thinned about
20% and applied liberally with a brush. After that
soaked in and was starting to dry, I applied two more
on top of that with a couple of hours drying time
in between.
 |
bow view
|
|
I masked the sides with newspaper to avoid the inevitable
drips falling from the chine logs and onto the sides,
only to be sanded off later to the detriment of the
luan veneer. I’ve never been accused of being
an overly neat worker; therefore, I try to avoid opportunities
for drips, spills, slashes, smears and any other type
of “mistake”.
I found that while it looks like three-ply stock,
it is actually five-ply (sort of). There are three
plies of some unidentified white wood of substantial
thickness and two paper-thin plies of luan on the
outside faces. You can see in the bow view picture
below where I sanded through that thin veneer on the
top edge of the bow transom and the resulting red
glue line.
| I sanded through
that thin veneer on the top edge of the
bow transom |
|
|
After a couple of coats, the weave of the cloth was
starting to fill up so it was time to attach the two
layers of 1X2 for the bottom runners.
Two sets of lines were laid out on the bottom with
a chalk line. The first was the centerline of the
runners. I drilled a series of pilot holes spaced
about six inches apart along this line for attaching
the first runner from the inside of the hull. It also
gave me a target for laying down the caulk. The second
set of lines, ¾” closer to the chine
on each side, served as a guide for placement of the
outboard edge of the runners to ensure that they went
on straight.
I ran a thick bead of caulking down the centerline
and carefully lined up the runner, allowing about
an inch of overhang at the bow. I drove a screw from
the outside into the bow transom framing, pulled it
down into place and clamped it at the transom. Then
I crawled underneath the hull and installed the permanent
screws from inside. The process was repeated for the
other runner and the ends were trimmed flush with
the transoms. The first four inches at the forward
end beveled to a thickness of 3/8”.
The forward end of the second layer was shifted back
four inches and beveled to match the bevel of the
first layer and screwed from the outside to make later
replacement easier. Then they got a coat of brown
to match the bottom.
The wales, quarter knees and foredeck got a coat
of stain, followed by three coats of spar urethane
along with the sides with light sanding between coats.
 |
One of
the quarter knees before finishing
|
|
I had some white interior/exterior semi-gloss latex
enamel that I used for the interior. I added a bit
of brown latex to the white enamel to help reduce
the glare that the white enamel would have produced.
I also experimented with a splatter pattern on the
interior, to break up the monotony of the flat tan
interior
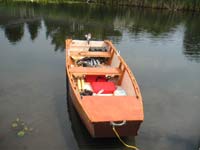
Once all the finishing was done, the hardware was
reattached and she was ready to go. The cleats
and oarlocks
were from Duckworks. The carry handles, rope and other
ground tackle came from Wal-Mart.
I also built a set of oars per Jim’s design.
I worked from a copy of his essay rather than the
Jon Jr. plans. I didn’t realize that there was
a difference until I tried rowing. The essay calls
for 7' oars while the dimensions in the plans are
for 6.5' oars. That made rowing a bit awkward, but
I managed by sliding about six inches of the square
section of the loom into the oarlocks. The nylon
locks that I got from Chuck were flexible
enough to handle it with no problem. I really only
rowed a few yards into and out of the dock area where
the water was too shallow and the plant growth too
dense to use the motor. I've since cut the original
handles off and formed new handles, shortening the
square section by about 6" and they work quite
well now.
I had hoped to launch the boat on the weekend of
June 24/25, before departing for vacation in Indiana.
But the weather here in Pennsylvania, and elsewhere
in the northeast, was just too bad for that to happen.
Although we got so much rain here that I thought I
might get to use the boat right in the street.
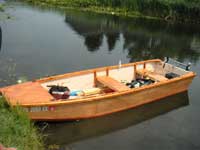
Vacation time…
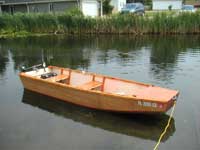
I launched my Jon Jr. on July 2 at a lake just north
of Ft Wayne, IN. The boat handled well and my kids
and I got to do a good bit of fishing over the next
week. It was also nice going out at night to fish
or just anchor and watch the stars.
| I launched
my Jon Jr. on July 2 at a lake just north
of Ft Wayne, IN. |
|
|
I only encountered one minor problem. It seems there
were a few knots (I think I mentioned them earlier)
in the seat framing that I didn't notice during construction
and the frames couldn't take the weight. I doubled
up some 1X2 scraps that I scrounged up and was back
in business. When I got back home, I made proper repairs,
adding another 1X2 across the full width of the frames
and installing vertical supports at the center of
the frames.
 |
The PA
Fish and Boat Commission rated it for
a maximum of 7.5 hp, but Jim recommends
5 hp and that should be plenty.
|
|
The PA Fish and Boat Commission rated it for a maximum
of 7.5 hp, but Jim recommends 5 hp and that should
be plenty. Besides, most of the lakes around here
are in state parks and limited to electric motors
only, so my little trolling motor will see a lot of
action.
That trolling motor got it moving at about 1.5 MPH
on “high” (according to my GPS) and 1.2
MPH on “low”. I didn't cover a large area
but it got me where I wanted to be and it’s
less work than rowing. And at that speed, I don’t
mind letting the boys have a turn at the tiller once
in a while. I'm looking for a small outboard in the
3 - 5 hp range that I can use on the local rivers.
That should get it moving at a respectable pace.
| All in all,
it’s a very nice boat and I’m
very happy with it. I literally lived in
the water for a week and showed no signs
of leaking or any other problems. |
|
|
All in all, it’s a very nice boat and I’m
very happy with it. I literally lived in the water
for a week and showed no signs of leaking or any other
problems. If you’re looking for a small boat
for fishing or just cruising around on small lakes,
you can’t go wrong with this design. I wouldn’t
hesitate to recommend it to anyone.
I’ve been keeping an eye on the classified
ads in the local paper for a “deal” on
a small outboard. I guess perseverance pays off, because
I found, not one, but TWO old outboards: an early
50’s vintage Johnson Seahorse 3 and a late 60’s
Eska 5. Now that I’ve received my copy of Max
W’s new book on maintaining old
outboards, I should be able to get them running.
And while I’m taking a break from working on
them, I can work on constructing a bimini so that
I can have some shade in the middle of the day. I’ve
already purchased the hinge
parts from Duckworks. Now all I need
is a few pieces of electrical conduit and some polytarp
and I’m in business.
Looks like it’s going to be a busy summer.
Maybe I can find time this winter to write something
up on those projects. Stay tuned…
|