David Nichols has written a new
book and has graciously consented to
let us post one of the chapters before it comes
out. It will be titled "LAPSTRAKE CANOES: Everything
You Need to Know to Build a Light, Strong, Beautiful
Boat" and will be published by Garth Battista
at Breakaway
Books, the publishers of books by Jim
Michalak and Max
Wawrzyniak.
I’ve found that there are some boat building
tasks that first time builders find very scary and
scarfing happens to be one of those tasks. If the
truth be told, I found it scary, as well. However,
after cutting a great many scarfs, it’s difficult
to see what was so intimidating.
Briefly, scarfing is nothing more than joining two
pieces of wood or plywood together to form a longer
continuous plank or bigger piece of plywood. This
generally involves cutting a matching slope on both
pieces and then gluing them together with an adhesive
such as epoxy (Figure 8-1).
 |
Figure
8-1
Scarfing is nothing more than
joining two pieces of wood or plywood together
to form a longer continuous plank or bigger
piece of plywood. |
The slope itself is expressed as a ratio like 8 to
1 (8:1) or 12 to 1 (12:1). For example an 8:1 scarf
in ¼ material would be 2 inches long or an
8:1 scarf in 4 mm (5/32) material would be 1 ¼
inches long. It should be pointed out that an 8:1
scarf is the bare minimum and will require careful
handling to keep the plank from breaking before it
is attached to the boat. Actually, any scarffed plank
should be handled with care, turning so the scarf
gets little or no stress, but an 8:1 scarf will require
having extra support on each side of the scarf as
the plank is put on and taken off the molds. This
kind of special care will lessen the chance of a snapped
plank.
I prefer to use a 12:1 scarf as the minimum length,
but will often use a scarf that is about 20:1 in thinner
material. This means a 12:1 scarf in ¼ inch
or 6 mm thick material should be 3 inches long. A
20:1 scarf in 4 mm (5/32) is 3 1/8 inches long. I’ve
found that a 20:1 slope is much less likely to have
hard spots, spots that are stiffer than the rest of
the plank, after glue up.
And for glue up it would be hard to find a better
adhesive than epoxy because the thickened epoxy can
fill the small gaps where the slope doesn’t
match perfectly. This doesn’t mean you can be
careless and sloppy, but it does give a bit of latitude
with the match. The closer the better, of course,
and the perfectly cut slope is the goal.
The quest for the perfect slope has lead to quite
a few methods for scarfing plywood and many involve
some kind of shop made jig. There is a jig for a router,
a circle saw, and one jig I have heard about, but
not seen, that involves turning a 4 X 8 sheet of plywood
on edge and cutting the scarf on a table saw. Many
of these shop-made jigs are detailed in various issues
of WoodenBoat Magazine and can be found there by those
interested.
However, shop-made jigs can be too time consuming
for the one time builder and most don’t have
a high enough ceiling in their shop to upend a sheet
of plywood. But all is not lost because there are
several jigs you can buy, one method involves a tool
you already have, and the last method doesn’t
use any tools.
 |
Figure
8-2
A scarfing jig. |
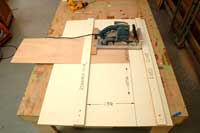
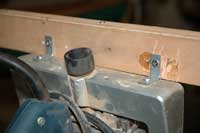
The first jig you can buy requires a slight modification
but otherwise is an out of the box jig. Figure 8-2
shows the two parts for this jig - a Bosh 1276 belt
sander and its sanding frame and the plywood base.
The plywood base is designed to capture the sander
as it moves across the edge of the plywood being scarffed
and the aluminum sanding framing raises the sander
at an angle to cut the scarf. Notice the plywood base
has two plywood guides in front and back of the sander/sanding
frame. The front guide is permanent but the back guide
is removable to allow the marine plywood to be secured
in the scarfing unit. To make reassembly easy, I’ve
drawn a line where the removable guide is refastened
each time and the other line is for the forward edge
of the plywood. This line is 13 ½ inches from
the face of the back/removable guide as indicated
in the photo.
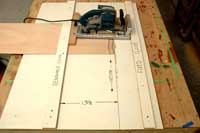
It will take a 60 X 48 inch base to scarf plywood
48 inches wide. The 60 inch width will allow enough
space on each side of the 48 inch wide plywood for
the sander frame. The base in Figure 8-2 is 48 X 30
inches and I find this works very well as I seldom
scarf a 48 inch wide piece of plywood. Also, I only
have about a 1/8 of an inch play between the sanding
frame and the two parallel guides. This seems to be
about right for the frame to move easily back and
forth without jamming.
 |
Figure
8-3
Modifying the scarfing jig. |
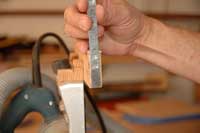
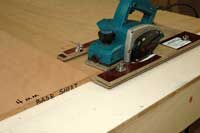
Figure 8-3 shows the only modification necessary
to the frame. I’ve used two wooden ‘L’s
to attach a ¾ X 2 X 15 ½ inch block
to the back of the sanding frame. Another option is
the small 90 degree corner braces, available at any
building supply store, shown in Figure 8-4. Making
the block about 15 ½ inches long seems to give
enough bearing to control any twist in the sander/frame
unit as it moves back and forth across the edge of
the plywood.
 |
Figure
8-4
Another option is the small
90 degree corner braces, available at any building
supply store. |
A smooth back and forth motion is necessary because
if the sander stops even for a moment, it will cut
a gouge. I use a 40 grit belt on the sander and it
will cut a scarf in 4 mm plywood in very short order.
Figure 8-5 shows a scarf cut in 4 mm plywood. Notice
that the ply lines are fairly straight and parallel.
This indicates that the slope is relatively even and
that’s something you will want to look for with
any method you use. When I first started using this
method I would take a scarf like this and epoxy it
together with its mate. It worked well but I did find
it was difficult to keep each board straight.
 |
Figure
8-5
A scarf cut in 4 mm plywood. |
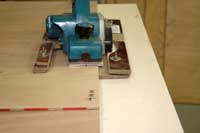
Because of this I included a couple of more steps
before glue up. In Figure 8-6 the sander has been
removed and a guide screwed down 3 1/8 inches back
from and parallel to the front edge of the plywood
(a 20:1 scarf). Now, put a block plane against the
guide and plane down about 1/32 of an inch, maybe
a little less. This creates a slight indention that
the edge of the other sheet will rest in and because
the edge of both sheets is about 1/32 inch thick,
it will be flush with the surface. This line is also
a visual reference for aligning and keeping both sheets
square during the glue up process (Figure 8-7).
 |
Figure
8-6
The sander has been removed
and a guide screwed down 3 1/8 inches back from
and parallel to the front edge of the plywood |
I’ve used this system for a number of years
and it has always worked very well. I keep the jig
in a corner of my shop and bring it out when needed.
However, in the beginning, with the addition of another
accessory, I used the sander as an upright stationary
sander. This helped because I didn’t have an
expensive tool sitting idle a good deal of the time.
 |
Figure
8-7
The slight indention that the
edge of the other sheet will rest in. |
One off-the-shelf scarfing unit may be the least
expensive; particularly if you already have a 7 ½
inch circle saw. The 875 Scarffer, made and sold by
West System Epoxies, bolts directly on most circle
saws. It requires that holes be drilled in the base
so the two pieces of aluminum can be bolted on and
removed easily. If you decide to purchase this unit,
you will want to check with West System to be sure
your circle saw is compatible with the unit.
I’ve used this scarfing attachment and it
does the job. Certainly for the builder that already
has a circle saw it is a good option. The attachment
will allow plywood up to 3/8 of an inch thick to be
scarffed with an 8:1 scarf. I find that the saw blade
leaves a somewhat rough surface but this is a minor
issue. This is a small jig that can store in a drawer
when off the circle saw and that’s a real plus
in a very small space.
 |
Figure
8-8
The base sheet has been temporarily
fastened to the table and a piece of 4 mm plywood
tacked to the base sheet. |
If you want to build the shop made version of this
jig get WoodenBoat issue 175. Bill Thomas wrote a
great article on how to construct both the jig and
its integral hold down system.
While the 875 Scarffer and the shop made jig by
Bill Thomas use a circle saw, the John Henry scarfer-planer
uses a power plane. This unit has a rigid frame that
screws to the bottom of a Makita 1900B 3 ¼
inch power planer or the larger unit that screws to
a Makita 1911B 4 3/8 inch power planer. The 1900B
will scarf material up 3/8 of an inch thick and is
more than adequate for any of the boats in this book.
 |
Figure
8-9
The planer with the guide runner
(left side) pushed against the base sheet and
positioned at the edge of the plywood to be
scarfed. |
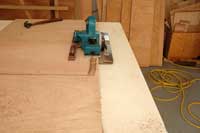
In addition to the rigid frame, this system also
uses a base sheet much like the sander scarfing uses.
In Figure 8–8 the base sheet has been temporarily
fastened to the table and a piece of 4 mm plywood
tacked to the base sheet. Figure 8-9 shows the planer
with the guide runner (left side) pushed against the
base sheet and positioned at the edge of the plywood
to be scarfed. I’ve added a spacer to the guide
runner and removed all the spaces from free side (right
side) runner.
 |
Figure
8-10
The base sheet needs to just
touch the attachment plate for the depth of
the cut to be correct. |
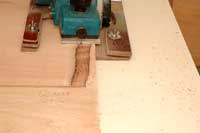
The purpose of the spacers is to fine tune the angle
of the cut and the depth of the cut. The base sheet
needs to just touch the attachment plate for the depth
of the cut to be correct (Figure 8-10). If the cut
is too deep you’ll get an edge that looks like
Figure 8-11.
 |
Figure
8-11
If the cut is too deep you’ll
get an edge that looks like this. |
I had to add an additional thin cardboard shim to
get the depth of cut just right. The runner guide
comes set for a 9 mm base sheet but I was using a
12 mm base sheet. Because of that I added a spacer
to the guide runner but I still needed to add two
more thin shims. Also I pulled the spacer from the
free side (right side) runner because I wanted a scarf
with a ratio greater than the 8:1 factory setting.
 |
Figure
8-12
For the first few tests I was
getting a snipe at the end of the run. |
For the first few tests I was getting a snipe at
the end of the run (Figure 8-12). I corrected this
by adding a piece of scrap on that end for a few practice
scarfs. In short order I was able to get consistent
18:1 scarfs like Figure 8-13 without using the scrap
at the end of the planer run. The snipe seemed to
be caused by how the planer was held and how pressure
was applied rather than something out of adjustment.
 |
Figure
8-13
In short order I was able
to get consistent 18:1 scarfs. |
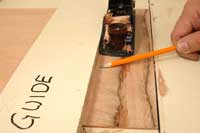
I did add one last step before glue up, however.
In Figure 8-14, a guide for a block plane was added
2 ¾ inches back from the edge of the scarf.
This gave a nice clean line and recess for the edge
of the opposite scarf. The drill and driver point
to the line (Figure 8-15). It also served as a reference
line to keep the two pieces square and straight.
 |
Figure
8-14
Here, a guide for a block
plane was added 2 ¾ inches back from
the edge of the scarf. |
The addition of the last step is purely a personal
preference and is not necessary for the planer to
cut good scarfs. In fact, any of the three over the
counter scarfing units do a good job. Are they worth
the money to buy them? Absolutely, but for the one
time builder the expense may not be justified.
 |
Figure
8-15
The drill and driver point
to the line. |
So if all of the over the counter scarfing jigs
seem like too much money and the shop-made jigs too
much trouble, then turn to your tool box and pick
up your ready to go scarfing unit – the plane.
That’s right, either a block plane, which I
like best, or a 9 to 10 inch bench plane. I use a
Bailey #3 and a Record #4 that both belonged to my
father and either a Stanley low angle or Buck block
plane.
 |
Figure
8-16
The 4 mm plywood has been
staggered back 1 ¼ inches from the edge
of the sheet below and the scarf is then cut. |
Before you start to think how impossible it would
be to cut a sloping scarf by hand, let me say that
a good many boat builders cut scarfs just that way
and by choice. I had a conversation with a British
boat builder a number of years back and he felt it
was so easy and fast there was no reason for him to
go to the trouble of building a scarfing jig. He explained
that he could cut the scarfs in the time it took to
set up the jigs.
 |
Figure
8-17
It takes a little practice
but acceptable scarfs can be achieved after
just a few practice runs. |
I’m not sure that I really believed him until
I cut a few with a block plane. And sure enough, it
was fast and easy. However, your plane must be sharp,
very sharp or it will not go smoothly or quickly.
A few strokes on a stone between scarfs will do wonders
for the quality of the scarfs.
 |
Figure
8-18
4 mm, flush with edge of the
table and strike a line 2 inches back from the
edge for 12:1 scarf. |
Most builders seem to prefer stacking the plywood
and cutting several scarfs at a time. One, it’s
faster and two, because the stack forms a ramp that
helps cut the angle. In Figure 8-16 the 4 mm plywood
has been staggered back 1 ¼ inches from the
edge of the sheet below and the scarf is then cut.
A pencil line at 1 ¼ inches will help keep
the slope matching its mates. Notice the bottom sheet
is flush with the table underneath. This is important
- otherwise the plane can’t stay at the correct
angle. It takes a little practice but acceptable scarfs
can be achieved after just a few practice runs (Figure
8-17).
 |
Figure
8-19
Plane the forward edge down
and work the slope back to the pencil line. |
The stacking technique seems to work best if the
ratio is 8:1. I haven’t had a great deal of
success cutting a 12:1 scarf by stacking and I cut
these one at a time. Place a piece of plywood, in
this case 4 mm, flush with edge of the table and strike
a line 2 inches back from the edge for 12:1 scarf
(Figure 8-18). Then plane the forward edge down and
work the slope back to the pencil line (Figure 8-19).
At this point, I screw a guide down a 1/8 of an inch
behind the pencil line and place the plane against
the guide to clean up the slope (Figure 8-20). The
finished scarf should look like Figure 8-21.
 |
Figure
8-20
I screw a guide down 1/8 of
an inch behind the pencil line and place the
plane against the guide to clean up the slope. |
I’m always pleasantly surprised by how easy
it is to cut scarfs this way but allow yourself some
time to practice on scrap plywood. Don’t expect
to get a perfect scarf with the first try; it always
takes a while to learn a new skill. Be patient and
after a bit you will be able to use the plane to cut
scarfs. As you work, just think about the money you
will save by learning this skill.
 |
Figure
8-21
The finished scarf should
look like this. |
However, the rewards go way beyond the money you
saved by cutting the scarfs by hand. There is a satisfaction
that comes from mastering a task that has no monetary
value and this is one of the great joys of building
a boat.
There is one other way to join plywood together
to make a long plank out of two shorter pieces and
it doesn’t require any monetary outlay either.
I first read about this method in an article written
by Dynamite Payson for the now out of print, Small
Boat Journal. Payson just butted the ends of two pieces
of plywood together and put fiberglass cloth or tape
across both sides for support. Unlike Payson, who
suggests using polyester resin; I recommend that you
saturate the fiberglass cloth in epoxy. Also, you’ll
want to use a small amount of peanut butter thick
epoxy between the edges.
 |
Figure
8-22
A butt splice with peanut
butter epoxy between the two edges and a layer
of fiberglass cloth before being saturated with
epoxy. |
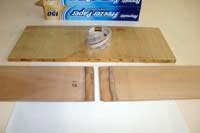
Figure 8-22 shows a butt splice with peanut butter
epoxy between the two edges and a layer of fiberglass
cloth before being saturated with epoxy. If you choose
this method use as light a cloth as you can, like
4 ounce or 6 ounce cloth, and sand the edges of the
cloth smooth once the epoxy has cures. Be sure to
put freezer paper under the butt joint so the epoxy
and the plywood don’t become a permanent part
of the table.
You will have to put the cloth on one side and then
when the epoxy cures, apply the cloth to the opposite
side. Be careful as you turn the splice over because
the unsupported side will allow the splice to break.
There are those who swear by this method, but I’m
not one of them. Given how easy it is to cut a scarf
by hand and the excellent jigs available over the
counter it’s hard to justify using this method
and I would counsel against it. I put it in as a fall
back plan, a disaster plan to be used in case all
else fails, nothing more.
Once you settle on the scarfing method you will
use; hopefully a method other than the disaster plan,
the next step will be to cut the 4 X 8 sheets of plywood
into smaller pieces or blanks. Ripping the sheets
into smaller pieces or blanks allows the long pieces
to be easily handled as they are taken on and off
the boat for fitting. It also helps cut down on waste.
 |
Figure
8-23
Rip the sheets of 4 mm used
for the planks and the 6 mm for the bottom for
Little Princess. |
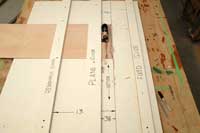
Each boat has a different set of blanks and Figure
8-23 shows how to rip the sheets of 4 mm used for
the planks and the 6 mm for the bottom for Little
Princess. The blank layout for the 14 foot and 16
foot canoes are in the appendix with the plans.
 |
Figure
8-24
The individual pieces have
been placed on freezer paper to keep the plywood
from becoming permanently bonded to the table
or surface underneath. |
When the 4 mm blanks and the 6 mm bottom are ripped
and scarffed it will be time to glue up the short
pieces to make the full length blanks. In Figure 8-24,
the individual pieces have been placed on freezer
paper to keep the plywood from becoming permanently
bonded to the table or surface underneath. Also, clear
packing tape has been applied to each piece where
the scarf starts and in Figure 8-25 clear tape has
been applied to the opposite sides. This is an important
step because the tape helps protect the plywood from
the epoxy squeeze out. The epoxy is much harder than
the plywood when it cures and having it peel off with
the tape is much better that trying to sand it off.
 |
Figure
8-25
Clear packing tape has been
applied to each piece where the scarf starts. |
The next step is to mix up a small batch of epoxy,
about two ounces of resin should do it, stir the recommended
90 seconds, and brush on the epoxy with a disposable
brush (Figure 8-26). Next add a small amount of silica
and wood flour until a heavy cream/running catsup
consistency is reached and brush a light coat on each
side (Figure 8-27).
 |
Figure
8-26
Brush on the epoxy with a
disposable brush. |
I like to use a heavy cream epoxy rather than a thicker
mixture when scarfing because I found the thicker
epoxy created a hard spot in the plank. The heavy
cream mixture comes closer to matching stiffness of
the glue between the plies.
Also, it wouldn’t hurt to take some of the
practice scarfs you cut and glue them up before you
start on the blanks. This will give you a good idea
of how much epoxy to put on and be a good test of
your clamping technique.
 |
Figure
8-27
Use the line created by the
plane as a reference to square both pieces. |
Once both sides have a light coat of heavy cream
epoxy just flip one piece over on top of the other.
I like to move the top piece around a bit to spread
the epoxy. Then use the line created by the plane
(see Figure 8-7) as a reference to square both pieces.
 |
Figure
8-28
Be sure to wipe up the excess
squeeze out with paper towel. |
Be sure to wipe up the excess squeeze out with paper
towel (Figure 8-28), check to be sure the pieces are
square to each other and then screw down a 1 X 8 or
scrap plywood as a clamp (Figure 8-29). However, don’t
forget to put a non-stick barrier between the plywood
clamp and the scarf.
 |
Figure
8-29
Check to be sure the pieces
are square to each other and then screw down
a 1 X 8 or scrap plywood as a clamp. |
I think you’ll find that 6 X 1 5/8 inch course
thread dry wall screws can apply an amazing amount
of clamping pressure. On wide pieces, like the bottom,
I’ll put several dry wall screws spread across
the center to distribute the clamping pressure. It’s
better to have a few holes in the center of the plank
and get good even clamping pressure across the entire
plank because any holes created by these dry walls
can be filled later with thickened epoxy.
 |
Figure
8-30
This photo shows just how
much squeeze out can be pulled up with the tape.
|
You’ll want to allow a minimum of twenty four
hours, in colder weather allow more time, before you
remove the clamp and work on the plank. The first
job will be to remove the clear tape and as much squeeze
out as possible. Figure 8-30 shows just how much squeeze
out can be pulled up with the tape.
Once you’ve removed the majority of squeeze
out take a random orbital sander with 100 grit paper
and finish cleaning up the scarf (Figure 8-31). Exercise
a bit of care with this task because the sander can
cut through the top ply fairly quickly. Should this
happen don’t worry because it won’t be
a problem unless you plan to varnish the entire boat
and I would recommend you not do that anyway.
 |
Figure
8-31
Take a random orbital sander
with 100 grit paper and finish cleaning up the
scarf. |
Just be sure to support the scarf on each side by
spreading your hands out a good twelve inches on either
side of the scarf when picking up the blank. Turning
the blank on edge will help lessen the stress on the
scarf. Use another person, if possible, to help handle
what now resembles big limber noodles.
Also, this will be a good time to coat the entire
blank with unthickened epoxy and sand it smooth. It
may seem unnecessary at this point but this will save
time later. It is much easier to coat and sand the
blanks while they are flat on a table or floor than
on the boat.
Actually, I’ve found that the hour or so spent
coating and sanding a blank smooth now will save about
two hours of labor when putting the final finish on.
Then you’ll really be glad you did because you’ll
be in a hurry to launch the boat.
So take the time and coat each blank with a layer
of epoxy, let it cure, sand it smooth, apply another
coat and sand smooth. As each blank is finished and
sanded, store it in a safe out of the way place until
you’re ready for them.

Addendum to Chapter 8
First let me say I was impressed enough with the
John Henry Scarffing attachment that I used in Chapter
8 to buy one. It is light weight and fast to use but
what makes it a good choice in my view is the ability
to scarf an 8 foot long piece of plywood. This wouldn’t
be important on a small boat or canoe but on a large
boat where the sides might come out of a 6 foot wide
by 20 foot long piece of plywood this makes fast work
of those scarfs.
So for those looking for a good over the counter
scarffing jig the John Henry Planer/Scarffer is an
excellent choice.
Contact:
John Henry, Inc.
PO Box 7473
Spanish Fort, AL 36577
(251) 626-2288
More columns by David Nichols
|