Without the subtitle it almost sounds like I’m talking about some kind of 12-step program for those of us who have a tool…uh…”problem”. Don’t worry. I’m strictly an enabler. A whole lot of nice power tools get thrown away simply because people don’t know anything about how to keep them running. Fortunately, it really isn’t rocket science.
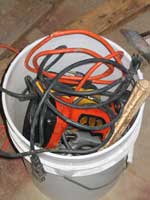
Here’s a case in point. My friend Greg is a professional trim carpenter. He also doesn’t know a thing about electric motors and is too busy turning oak into picture perfect home interiors to mess with them. So every time a tool fails, he buys a new one. He cleaned out his garage and gave me some cool stuff.
 click images for larger views
 |
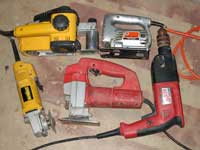
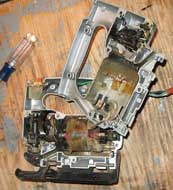
Pictured are:
- DeWalt 431 belt sander
- Milwaukee 5378-02 ½” hammer drill
- DeWalt 402 angle grinder
- Milwaukee 6256 jigsaw
- Black & Decker 7517 jigsaw
- Craftsman belt sander
The good stuff came from Greg and the cheap stuff (Craftsman, Black & Decker) was mine.
Candidates for Rehabilitation
Not every tool is a good candidate for repair. I once complete took apart a Black & Decker belt sander to replace the bearings, only to find that the bearings were not replaceable – they were integrally cast into the plastic frame! Yet older tools above by the same manufacturer are designed to be serviced.
It used to be that all power tools were considered professional grade, and were built accordingly. Recently, however, we have endured a tidal wave of cheap, disposable (mostly Chinese) tools. Some are indeed very disposable. One of the cheap Tool Shop brand jigsaws that didn’t even make it to 100 lineal feet of cutting before it literally burst into flames in my hand. No kidding! This is an extreme example, but I think the lesson is that only tools that start out at a pretty high level of quality are worth repairing.
But this can be tricky when manufacturers have a “consumer grade” line, or have moved their entire line in that direction over the years. Black & Decker is a good example of this, but they are hardly alone. These manufacturers cut a few corners here and there so they can keep selling at Wal-Mart, and next thing you know they’re only selling you a name attached to a useless lump of plastic. (Yes indeedy, I’m naming names! One of the benefits of writing for DW.) Milwaukee Electric is the only nameplate I can think of that is only on tools that are designed to be serviced.
Case fasteners are a clue as to whether you are holding a tool that is meant to be repaired. A tool with obvious, simple fasteners holding the case together is probably repairable. If you have to pry open any one-way plastic tabs you are probably wasting your time.
The next thing is to look at the bearings once you have it apart. If they are high quality replaceable sealed bearings, it is probably a good tool and worth working on. If the bearings are not replaceable I would scavenge anything that looks useful and pitch the rest. In particular, I keep any switch that might fit another tool.
Motor Testing
Most decent tools fail because of the switch. But these switches will set you back around $20, so you don’t want to buy one until you can be sure the motor is OK. So we need to know something about motors.
Big tools like the compressor can use any one of several kinds of motor, and you can read all about all of these types HERE. But that article has more than you need to know. Hand-held power tools are nearly always a “universal” motor. These are small, noisy and can run on AC or DC. Such motors generally have four leads – two for the field coils and two for the armature. But sometimes there are six leads because there are two field coils. And sometimes only two leads because the armature is in series with the fields. Confused? HERE is a good reference.
The field coils are just electromagnets that need power to get the motor to run. The armature is the assembly of electromagnets that spins around. Electricity is transferred to the armature through “brushes”, which are little chunks of black graphite held in contact with the armature by springs. This is why such motors are noisy.
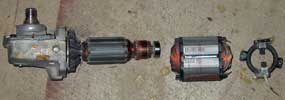
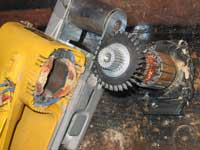
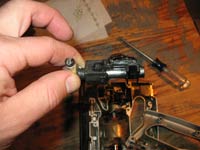
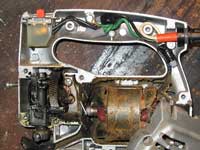
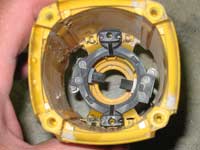
Above are the parts of the DeWalt grinder, left to right: gearbox and bearing attached to armature; field coils that fit around armature; brush assembly that contacts the commutator (the skinny part of the armature).
The first thing you need to know is which leads are which. You will need an ohm meter or test lamp for this. A $3 continuity light will do fine. On one pair of leads the light will change as you slowly turn the motor. This is the armature, since the brushes will be changing their point of contact as the motor turns. The other pair of leads is the field coil and will not change.
But there’s a wrinkle here. The field coils are often very low resistance. So low you might think it’s a short. High current would melt things if they were powered up with no other resistance. So this sort of field coil is wired in series with the armature. This complicates figuring things out with the test light, and often physical disassembly is the only good way to determine what’s what. Try to find an exploded diagram online so you don’t break something.
Now that you know which coil is which, here’s how reverse works. If you reverse the leads to the field and the armature, nothing changes. If you reverse the leads to the field or the armature, you reverse the motor. The switch might do it either way.
I guess I’d better offer the customary idiot-proofing disclaimer here. This is electricity. This is your brain on electricity. Fizzzzz! Seriously, this stuff is not complicated, and I frequently work with much higher voltages that these. Just remember that anything connected between the wires and ground is fair game. Wear rubber soled shoes and stand on dry wood, not wet concrete. Make sure that wires are safely fastened to something non-conductive, and that hands and tools are clear before applying power. You’ll be fine as long as you don’t let yourself or anyone else become part of the circuit. If you do, it ain’t my fault!
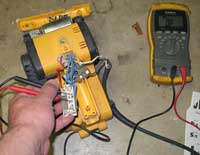
So let’s test a motor and make sure it’s just the switch. Here we need some lamp cord, some wire nuts and a plug. Insulated alligator clips are nice too. Whatever you do, be sure to wire all this to a plug so you can power up your test with the insulated switch on a power strip. This also gives you a circuit breaker, which you will need if you wire it wrong. The idea is to duplicate what you think the switch is doing. This is an educated guess based on what it looks like the mechanical operation of the switch is, and how motors work.
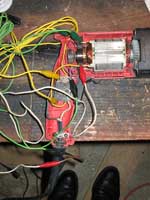
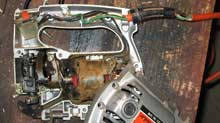
Here you see the hammer drill with the switch bypassed. (Note that you see one of my feet on a piece of scrap wood and leather shoes. I was home for lunch when I took the photo, but when applying power I would have on dry sneakers and be standing on both scraps of dry wood.) At the bottom of the photo you see a brown lamp cord connected to the black and red clips (clip color, not wire color). You can see the red connect to the lower end of the top field coil. I couldn’t reach the terminal on the bottom field coil, so the black connects to it by clipping onto its wire at the switch. The green connects the other end of the top field coil to the upper brush, and the yellow connects the other end of the lower field coil to the lower brush.
To test I plugged the lamp cord into a power strip and briefly switched it on. The motor ran forward. Don’t leave it running too long – there’s nothing holding the bearings in place! Reversing green and yellow gave me reverse. Be sure to unplug while moving wires around – we are doing this because switches are fallible.
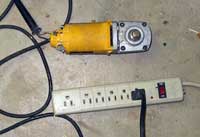
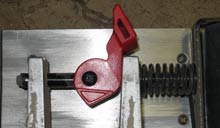
On the grinder it was even simpler. The spade terminals that attached to the switch could attach equally well to the motor terminals! I had to put a foot on this one before plugging it in, though, since its high torque would send it writhing across the floor.
By the way, use some caution in reverse. While universal motors run happily in reverse, the gearing attached to them might not. The drill was obviously meant to do this, but I wouldn’t count on an angle grinder or jigsaw being engineered to run well in both directions. Maybe. But maybe not. Besides, we only really care about testing the direction we need.
In any case, these two tools clearly needed switches.
Parts Suppliers
The internet has made it easy to find parts. The ones that had what I needed were www.toolpartsdirect.com and www.ereplacementparts.com. But before you click “buy”, write down the prices and call your local industrial tool suppliers. You might get a better price ordering through one of them, since you probably won’t have to pay shipping.
Speed control problems
The DeWalt belt sander also had a switch problem, but a different kind. I assumed it was the switch, of course, but the switch tested fine. The problem was the thumbwheel speed control. This is actually sort of a stupid idea, since potentiometers don’t like dust and they put one on a tool whose job is to make lots of dust! My remedy was to remove the speed control, turning the sander into a one-speed tool. I can’t remember the last time I wanted a sander on slow anyhow.
I should mention that this was one of those where I had to take the whole thing apart to figure out how it was wired. This was unfortunate because the disassembly was unintuitive and involved left-handed threads. The wiring was ultimately simple – two fields, each in series with one of the brushes. I probably should have been able to figure it out with the meter.
Luck of the draw
Sometimes you just get lucky. The Milwaukee jigsaw worked fine as far as I can tell! If there’s an intermittent problem, I’ll tackle it when I find it. But so far, so good!
Bearings
This Black & Decker jigsaw was my dad’s when he worked as a carpenter around the time I was born (1971). I don’t think he bought it new. But like I said, this was back when all tools were built to last. You can tell just by looking at the sturdy all-metal frame and readily accessible brushes. The slow setting for cutting metal is also a clue that it is intended for real work.
And check out these easily-accessible and monstrously oversized brushes. Nice.
This jigsaw is still going strong, but it was getting hot in use. Too hot to hold after a while! The cause was obvious and grim – worn out bearings on the reciprocating shaft. I could tell by grabbing the blade and wiggling that there was far too much play. But let’s see what we can do about it.
Getting into this machine is simple. Regular screws and most of them are identical.
The central problem seems to be that this old soldier fought on too long without being oiled. (My dad is like that, I’m afraid.) Had it been the rotating bearings, they’re easy to replace. But they were fine. The reciprocating surfaces were simply worn down.
I redistributed the balled-up grease and oiled the bearings, but it looks like there’s no real cure other than some new parts. This machine is far too old for them to be readily available. So I’ll be using it for short-durations until it gives up all the way. Unless of course I find another use for the motor.
Power cords
You will almost never need new cords – we just replace the ends when the insulation starts cracking at these highly-stressed points.
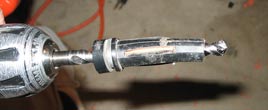
I don’t think we need to belabor this simple operation, though it often takes a bit of struggle to get the wire through an old rubber grommet. Use a little dish soap and keep at it. Also, I sometimes need to drill out the old insulation when it’s fused to the grommet. It seems to work best to run the drill in reverse to push it loose, then forward to auger the waste out. All at low rpm!
While you’re at it, consider getting rid of the long cord. I think this saves a lot of trouble. On circular saws long cords are especially maddening. How many times have you gotten halfway down a sheet of plywood and had the power connector trip on the edge and unplug itself. Or worse, tug on the saw and mess up the cut? This goes away if you only have 6” of cord and the extension cord joins the tool almost directly.
Greg (remember Greg?) also likes this for those dumb moments when you cut through the power cord. I think every pro carpenter who’s been at it a while has done this once. Some will even admit it. It’s much nicer to simply grab another extension and keep on working.
Another benefit leads me to apply this to other tools. It is very fast to put a tool back in the case without having to mess with coiling a cord. This means I actually bother to put them in the cases, which keeps them much cleaner and safer. It also means that when I carry a bucket of tools out to a boat, it doesn’t instantly become a tangled mess.
I think the only reason not to do this is if you routinely use multiple tools at the same time, all plugged into one power strip. Even then I think I’d rather have three or four six-foot cords for the few times this is useful.
I don’t generally like to pay $3 for a new plug end for the sole purpose of shortening the cord. But if you have the tool open anyway, you can always shorten it the other way – pull cord through the grommet, cut off, and reattach to the switch. And if you’re replacing the end anyway it’s a good time to consider it.
Here’s the old jigsaw with the wires reconnected. I used wire nuts because it was simpler than finding the correct spade connectors. The electrical tape might be overkill, but I certainly don’t want the hot lead vibrating loose inside a tool with a metal case!
You would be surprised how much less fuss it is to stick this tool into a drawer, bucket, milk crate, or case.
Mechanical Parts
The craftsman belt sander suffered a broken tension lever. This is largely because this machine is really not meant for heavy use, further demonstrated by the fact that the platen spring would no longer stay flat. This would normally relegate a tool to the “to be fixed if I ever really need it” box. But Sears is surprisingly good about replacement parts. For about $8 including shipping I got a new lever and platen.
Disassembly and replacement was completely straightforward, following the exploded diagram on Sears.com. After installing the parts it is good as new. However it does make me wonder about casting an aluminum copy of the lever. But I fear that strengthening this part might cause something more expensive to break.
I guess that bottom line on Sears is that, while Craftsman might not always be a tough-as-nails “lifetime tool” anymore, at least you can get the parts to keep it patched together. So maybe it is a different kind of lifetime tool. At least until they run out of parts for that model.
Glue Spill Recovery
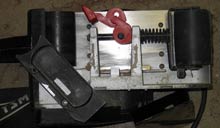
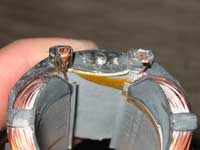
The DeWalt angle grinder was an interesting case. Greg had a jug of glue tip over on a high shelf. The angle grinder got glue through the vents and the motor was immobilized. I didn’t take “before” pictures because I hadn’t yet realized this topic would be an article. Suffice it to say that getting it all out required a complete disassembly and several hours of very careful work with a chisel and chip carving knife. Good thing it wasn’t epoxy! Here’s a photo of the brush assembly where you can see a little of the remaining glue inside the case.
There was one wrinkle, though. The field terminals were encased in glue and the only way to get to them was removing the field assembly. This meant banging the case against the vice to hammer the coil out. Unfortunately, this broke one of the connectors.
 
Of course I could buy a new field assembly for $33 plus shipping, but where’s the fun in that? So I pried open the old crimp very carefully with a knife and needle nose pliers. Then I reversed the terminal so I could make the remaining wire reach and re-crimped with the pliers.
After reassembly the motor worked perfectly, though the tool still needed a new switch, as seen above. So it sits in the “waiting for winter” bin.
Cheap Thrills
The moral of this story is that you can save a whole lot of money if you’re not afraid to dig in and replace a switch now and then. Feel free to mention that to your wife when she’s looking embarrassed while you peruse the contents of a dumpster. Mine hasn’t said a word about it since I found a working pressure washer. I wish you similar good fortune!
Rob Rohde-Szudy
Madison, Wisconsin, USA
robrohdeszudy@yahoo.com
Click Here for a List of Articles and Columns by Rob Rohde-Szudy |