Mention the words “Grumman Canoe” and most people
familiar with small craft will envision the 17’, heavy
duty, aluminum canoe that they paddled about in at scout camp
or the boat they rented from a canoe livery to paddle down a
river for the day. Using WWII era aircraft technology, they
were well built, relatively stable, zero to low maintenance
and well suited for the post war population who wanted to get
into boating with a minimum of fuss and expense. William Hoffman,
a vice president at Grumman Aircraft Corp. and canoe enthusiast,
is credited with coming up with the original design concept,
and the first boats went on the market in the mid-1940s. They
ranged in length from 13’ to 19’ and many of these
boats are still going strong fifty or sixty years later. The
hulls were constructed of thin aluminum sheets that were stretched
to shape over male molds and then assembled with hundreds of
rivets that attached the two halves of the hull to an extruded
aluminum keel. Aluminum seats, ribs, thwarts and bow and stern
flotation tanks finished off the construction. The “standard”
models were not all that light, and with all the rivets did
cause a fair amount of drag when being paddled. That said, the
hulls bordered on indestructible and were the canoe of choice
for camps and rental liveries. I paddled many Grumman canoes
as a youth, and later owned a 13’ lightweight model. They
could be stored outside and uncovered all year and any dings,
leaks or popped rivets could be easily repaired with hand tools.
I live close to the Marathon, NY plant where Grumman boats were
manufactured for several decades, and during a factory tour,
I was surprised at how lo-tech the construction was. Rivet holes
were hand drilled with electric power drills, and once the hull
sections were fabricated, trimmed and drilled, assembly was
simply a matter of aligning the component parts with rubber
gaskets and riveting them all together. Boats came off the assembly
line in a continuous stream and from nearby Interstate 81, drivers
could see scores of hulls stockpiled in the storage lot adjacent
to the plant awaiting transport to dealers around the world.
All in all, this was a very successful design, and thousands
of the hulls were manufactured for 60+ years. Over 300,000 boats
were built in the three decades leading up to the mid-1970s
and production peaked in 1974 with production of 33,000 hulls.)
(Striegel, 2007)
 |
From nearby Interstate
81, drivers could see scores of hulls stockpiled in the
storage lot adjacent to the plant awaiting transport to
dealers around the world. |
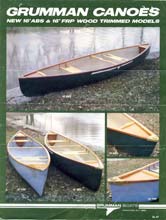
In the early 1960s, Grumman bought a controlling interest in
Pearson Yachts Company in Bristol, RI and in a bid to expand
into the lucrative fiberglass boat market, and somewhere in
the late 1970’s, they came out with a 16’ Grumman
brand canoe in both fiberglass and Royalex. I happened to see
one of the fiberglass hulls at a dealer’s shop, and it
was love at first sight. The 16 foot hull was truly a thing
of beauty. It was light, stiff with a fine entry at the bow
and long flat run aft and no keel. The quality of the fiberglass
work was extraordinary, and it was finished off with mahogany
gunnels, ash carry yoke amidships and caned ash seats. About
the only thing I didn’t like about the boat were the gunnels
that looked unnecessarily heavy and overbuilt, but it was the
nicest fiberglass canoe I had seen to date. I had to have one,
but the price tag at over $1,000 was prohibitive at the time,
so my boat-lust dream of owning one went into hiatus.
| It was the nicest fiberglass canoe I had
seen to date. I had to have one, but the price tag at over
$1,000 was prohibitive at the time, so my boat-lust dream
of owning one went into hiatus. |
|
Time marched on, and the Coleman Company came out with their
very successful line of Royalex type canoes that sold for $300
or less at K-marts across the country. With their aluminum tube
frame and plastic seats, these boats were not going to win any
beauty contests, but they were rugged, functional and certainly
affordable. I still lusted after the Grumman fiberglass model
but found that they were no longer commercially available, and
I have to believe that they got priced out of the market by
the far less expensive Coleman canoes and clones from other
companies. It began to look like a Grumman fiberglass canoe
was not to be in my future.
Again, time marched on, and in the fall of 1980, I found myself
at the Sail Locker, a little hole-in-the wall sailboat shop
in Binghamton, NY. The Sail Locker was owned by Chuck Durgin
whose real passion was sailing canoes, and in the back of his
store there was a stack of bare, unfinished fiberglass canoe
hulls nested together. Closer inspection showed that they were
Grumman hulls (be still my heart!) and based on the Hull Identification
Numbers, they were built in 1979. I inquired, and Chuck told
me that Grumman had discontinued the manufacture and sale of
their fiberglass canoes, and he was able to buy up a batch of
the bare hulls and components (ash carry yoke/thwart and ready
to install caned seats). He had plans to convert one or more
of them to “C” class sailing canoes but, yes, he
would sell me one! I came back the following week, and for $200
picked up a light blue bare hull, thwart and seats.
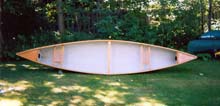
The hull was fresh out of the mold. When the hull was laid
up at the Pearson plant, the fiberglass mat and resin overlapped
the top of the mold and formed a right angle flange that I would
eventually have to trim off, but this flange helped to maintain
the shape of the hull until wood gunnels could be attached.
The sidewalls of the hull were thin, but the bottom of the hull
appeared to have a half inch or so of foam or balsa wood for
stiffness and flotation, and the hull was light, stiff and beautiful
to look at. To finish the boat off, I would need to fabricate
and install gunnels, flotation tanks at the bow and stern, and
install the seats and thwart.
 |
The sidewalls of the hull
were thin, but the bottom of the hull appeared to have
a half inch or so of foam or balsa wood for stiffness
and flotation, and the hull was light, stiff and beautiful
to look at. |
White ash (Fraxinus americana) would be the best wood
for the gunnels. Well seasoned ash is an excellent material
for gunnels and would match the ash seats and thwart, but none
of the lumber yards in the area carried ash in the 17’
length that I needed, and I did not want to scarf shorter pieces
together. Finally I located a man in the area who restored old
canoes as a hobby and he said he has some ash boards that he
would be willing to part with. I visited his shop near Cato,
NY and ended up buying one 18’ white ash plank. It was
just what I wanted but it had just been cut and rough sawed
a few weeks before I bought it, and it was as green as the beer
on St. Patrick’s Day. Undaunted, I carted it home. At
the time, I had access to a nice wood hobby shop at the college
where I work, and I planned the plank down to ¾”
thickness and then ripped the planned plank into 7/8”
pieces. I got eight pieces out of the plank and figured that
planned and ripped, they would season faster with air exposure
to all four sides of each piece. I was amazed at how flexible
these 18’ long pieces were, and I stowed them in the rafters
of my garage and waited for the better part of a year before
I could move to the next phase. The cost of the plank was $20,
so I was still in bargain budget mode.
When the wood was sufficiently air cured, I inspected each
piece carefully. I had to reject a few of the eight pieces owing
to twists, warps and other imperfections, and at least two of
the rejects ended up as high priced tomato stakes in the following
summer’s garden. The others were flawless with no knots,
burrs or punky areas and ready to go.
The original Grumman gunnel design was almost flat and looked
a bit like a racer with a minimum of freeboard. I liked this
look, but decided to modify it slightly by curving the gunnels
up slightly at the bow and stern. As there was plenty of spare
freeboard that came with in the bare hull, I also added an estimated
inch of freeboard compared to the original specifications. To
position the outer gunnels, I simply laid one against the bare
hull the then “C” clamped in at intervals and made
adjustments by eye until I arrived at the desired shape. When
I was happy with the shape, I scribed a line the gelcoat of
the hull and removed the clamped gunnel section. The next step
was to mask up the area below the scribed line with 2 inch masking
tape (to catch the epoxy resin run-out.) I then carefully sanded
the blue gelcoat off the inch or so above the line to get a
better resin bond and then glued the oversized ash gunnel section
to the topsides with WEST epoxy resin thickened with chopped
cotton thickener to about runny peanut butter consistency. “C”
clamps at about 16” intervals held the gunnel outwall
in place. To insure a good bond, I then drilled small holes
at about 6” intervals from the inside of the hull and
into the gunnel section and inserted ¾” long temporary
pan head screws. With the clamps and temporary screws, I got
a nice even resin run-out top and bottom, and I carefully wiped
up the resin on the bottom to make sure it didn’t end
up staining the gelcoated topsides. When the resin was partially
cured, I removed the masking tape and cleaned the area with
a rag dipped in acetone to remove any remaining resin or tape
residue.
| To position the outer gunnels, I simply
laid one against the bare hull the then “C”
clamped in at intervals and made adjustments by eye until
I arrived at the desired shape. |
|
When the cure was complete, I transposed the dimensions at
12” intervals along the other topside, laid the next gunnel
section on these hash marks, scribed a line and installed the
second outer gunnel the same fashion described above. When both
outer gunnels were installed and the resin was completely cured,
I then rough sawed off the scrap fiberglass and flange off the
topsides about ¼” above he top of the gunnels and
removed all of the temporary pan head screws.
Installation of the inner gunnel section was easier, but the
sections had to be pre-cut carefully and beveled at the ends
so they formed a mitered joint at the bow and stern where the
starboard and port inner gunnels met. Once the sections were
cut to final shape, I dry fitted them on the inside of the hull
and drilled holes at 12” intervals from the outer gunnel,
through the fiberglass shell and slightly into the inner gunnel
sections. I then countersunk the holes and again dry screwed
the inner sections in place with flat head brass wood screws.
When everything fit properly, I masked up the inside of the
hull, attached the gunnel sections with thickened epoxy and
screwed the assembly together using the wood screws as clamps.
Using a plug cutter, I then made plugs from a piece of scrap
ash, and drove the plugs into the countersunk holes with a little
unthickened epoxy. The last step was to clean off the excess
resin run out on the bottom with acetone solvent.
When all the epoxy had cured, I belt sanded the top of the
gunnels with a 100 grit belt so the fiberglass edge was sandwiched
between the outer and inner gunnels and then rounded over the
edges of the gunnels with a router and 1/4” diameter round
over bit. I left the inner gunnel square on the bottom, but
with a sharp block plane, I beveled the underside of the outer
gunnel so it was full sized where it joined the fiberglass hull
but a little thinner on the outer edge. This bevel reduced the
weight a little and was esthetically pleasing. Hand sanding
down to 220 grit sandpaper finished off the gunnels. With the
finished gunnels in place, I was amazed at how stiff the topside
of the hull became.
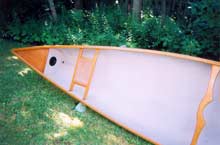
Installing the thwart and seats came next. I cut the thwart
to size and bolted it onto the underside of the inner gunnel
exactly amidships. I used two flat head 3/16” stainless
steel flat head bolts without epoxy. Canoe thwarts are easily
broken (mostly through clumsy moves in the cockpit!) and I figured
if I ever had to replace it, not having it glued in place would
make the retrofit easier. Also not gluing the thwart to the
gunnels allowed for a little flex without the risk of cracking
the gunnels or the thwart.
 |
Installing the thwart
and seats came next. I cut the thwart to size and bolted
it onto the underside of the inner gunnel exactly amidships.
I used two flat head 3/16” stainless steel flat
head bolts without epoxy. |
The caned seat assemblies that came with the purchase were
wider then the inside of the hull, and before fitting them,
I had to determine where I wanted them positioned fore and aft.
I scaled the locations from an advertising brochure photo and
a friend’s 16’ canoe. I then sawed the seat frames
to the proper width and installed them using 3/16” flat
head stainless steel bolts with 3/16” inside diameter
copper tubing as spacers. Again, I looked at the advertising
brochure photo to get an idea how deep each seat needed to be
set into the hull knowing that I could always use longer or
shorter bolts if it turned out that the seats needed to be higher
or lower. As luck would have it, the location of the seats seemed
good right from the start and no adjustments were necessary.
Now the only remaining fabrication that remained was making
the flotation tanks in the bow and stern. Again, looking at
the advertising brochure photo, I scaled the approximate size
of the tanks and made them out of metric (about 3/16”
thick) marine mahogany plywood. To get the right shape for the
vertical and horizontal panels I made cardboard templates and
kept trimming then until I got the right shapes. I epoxied the
horizontal panel to the underside of the “v” in
the gunnels and then covered the top of the panel with 3 oz.
fiberglass cloth and WEST epoxy resin. This added strength and
helped to insure a water tight fit. I then fabricated a ¾”
by ¾” piece of mahogany with rabbets and limber
holes to join the horizontal panel to the vertical panel. I
attached the vertical panel to the sides of the hull with epoxy
resin and 2” fiberglass tape, and then covered the panel
with epoxy resin and fiberglass cloth. As a final step, I installed
a drain plug in the bottom of each tank and a 5” inspection
port on the vertical panels and then placed a plastic bag inside
each tank filled with Styrofoam packaging “peanuts”
just to make sure the flotation tanks would function even if
damaged or holed.
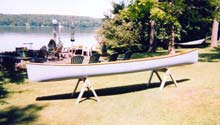
I finished the bare wood with Interlux spar varnish and painted
the bare fiberglass interior and new vertical tank panels with
Pettit two-part, grey epoxy paint. The combination of the light
blue hull exterior and grey interior went well with the blond
ash wood and mahogany components.
The boat finished out at about 65 lbs., not ultralight by canoe
standards but lighter than most 16 footers and yet heavy enough
not to be blown all around in a brisk cross wind. True to my
predictions, the boat had good manners and paddled easily in
the flat water conditions it was designed for. It also adapted
well to the subsequent addition of an outboard motor mount and
my little 1.2 h.p. outboard motor. I still think about adding
a “C” class sailing rig with leeboards and a Laser
style sail but maybe that will be another story for another
time.