Until now our Bolger Micro has lived on its trailer either in our yard, or in the garage. Starting this summer, the boat will be [we hope] sitting at a dock on the local lake, ready to sail at the drop of a yachty hat. Anyway, sitting moored to a dock means a few changes will be necessary. We'll need to leave the boat closed up for long periods, since it will not be under a watchful eye. Nor will it be free to swing around to face what breezes there might be, and that means that the usually effective through flow ventilation will perhaps not operate as intended.
| UFO: useful fan object. |
 |
I was pondering these things when I realised that Duckworks was now selling solar powered vents. A quick email to Chuck and Sandra and one was on its way to us in the frozen northlands. What arrived was a sturdy cardboard carton containing a bag of fasteners, a sheet of instructions, and these:
 |
The solar fan module at the heart of the vent, here seen upside down to show the fan blades [with the solar cell facing the table]. |
The fan module has the solar panel wired directly to the fan motor; there is no battery involved, so the fan runs only when light hits the cell. At first I thought that might be a shortcoming, but on reflection I prefer the direct approach. This kind of fan is designed to keep air moving through an otherwise closed up boat. For one thing, if we want more air when we are sleeping aboard we can open the hatches. The solar cell turns the fan under pretty 'low light conditions' too. Carrying the module out to the 'boatshop', I had it facing the ground under the eaves on the north side of a building in winter, and the light reflected from the snowy ground in the yard had the blades spinning merrily.
| A mounting plate with an O-ring gasket, and a 'trim ring' to dress the inside of the hole through the deck. |
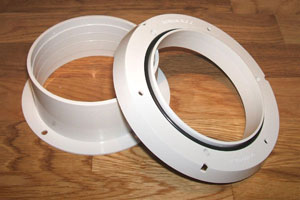 |
The mounting plate with its gasket is one part of the baffle system preventing water splashing in through the installed vent, and the instruction sheet includes an actual size template for the required four inch diameter hole through the deck. The lip on the mounting plate is 3 and 7/8 inches in diameter, so if you cut the 4 inch hole suggested then seal the edge of the cut against water intrusion and paint it, things will be a pretty neat fit.
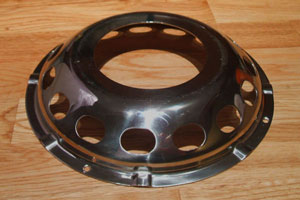 |
A stainless steel outer cover. The fan module and the outer steel cover form the other two baffle components. It looks as though no amount of splashing will result in water getting below. |
I was surprised by the robust gauge of the stainless steel cover. Somewhere I had picked up the idea that these were really intended only to protect the vents from UV damage to the plastic but this part is of a substantial gauge - although the theory is untested, I suspect the installed cover would support my not inconsiderable weight without bending.
There are two things which should perhaps be pointed out about the mountings. First, the vent cover is a full eight inches in diameter, and is designed to be installed onto a flat section of deck [remember that robust outer steel cover?]. A coachhouse or cabin roof with a significant curvature would probably prevent the cover from being drawn down securely into position. Secondly, the minimum total deck thicknesss required is three quarters of an inch, since that is the amount that the fan blades stick down below the outer mounting plate.
| The fan module and its mounting are designed to offer a low profile above deck. |
 |
In the mock-up shown above, the fan blades can be seen protruding down below the 'deck' through a plywood collar. The picture shows a 3/8 inch 'deck' and a 5/8 inch collar, which is more than is strictly necessary. The total thickness required is 3/4 of an inch.
 |
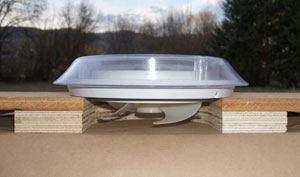
A mock-up with the fan raised above deck level to minimise intrusion into headspace below decks. |
The outer plywood plate does a couple of things; it gives a flat surface for the steel cover to rest on and with a fillet of epoxy around its outer diameter it will only help to shed water running across the deck. The 5/8 inch plate shown looks clumsy; With a three-eighths deck and a three-eighths plate the installed fan will be flush with the inside of the cabin roof, yet look unobtrusive from the outside. Thicker deck sections would present no problem - the supplied inner mounting ring is both an inch and a half in depth and easily cut down.
All that remains is deciding where on the boat to install the vent. I wanted a location which would maximise exposure to light, minimise potential for immersion, and not be in the way underfoot at any point. Eventually I decided to fit the vent to the sliding hatch into the cabin.
| Installed on the companionway hatch, off centre to clear a central beam on the hatch underside. |
 |
Perhaps all the measuring and mocking up shown here has made this simple installation seem more complicated than it really is. If your boat has an area of deck space 8 inches in diameter then half an hour's work or so will see you with a fitted solar vent. If the deck where you wish to install the vent is less than 3/4 of an inch thick then make up a local packing piece to suit. If bug screening is a concern then it might be worth noting that the vent area open inside the boat can be conveniently covered by the grill salvaged from an old computer fan. Roll on Summer! |