The Lake of Constance is a beautiful lake surrounded by three countries, Germany, Switzerland and Austria. Most recreational sailors are using 30-footers on weekends, but the conditions are those of a big mill pond, with 0-2 Bft. in summer most of the time. They are motoring more than sailing, and they spend their nights in well-equipped but expensive marinas.
After calculating costs of a co-ownership of one of these yachts, I decided that a sailing/rowing dinghy would have a much better cost/fun ratio. In our continental climate, steady wind is in short supply, so she had to be an excellent drifter as well as a good rowboat. This requirement ruled out the small ubiquitous neglected GRP racing sailboats, and pointed towards a one-off.
 |
It is amazing how fast a good tack-and-tape design comes together.
click images to enlarge |
I am living about only 700 m away from the shore. So, the easiest option is to walk the boat on a garden trailer to a public spot on the shore, take it over the shoulder and assemble and rig it in knee-deep water. The idea of a nesting dinghy with the advantage that the hull halves are easily carried by a single person intrigued me, so I looked for plans. I found two very good designs: Danny Greene’s Chameleon, which is slightly biased towards rowing, and B&B’s Spindrift series, slightly biased towards sailing. And I found a lot of good advice from builders and contributors on this page.
I choose the B&B Spindrift 11 N, built the boat within one year and had to learn that building a nesting hull is nearly as much work as building two dinghys. An attempt to cruise the whole lake and down the Rhine river to Schaffhausen in 2007 was hampered by bad health of the skipper –who had a flu- and the bad shape of the boat, which was not built exactly to the specifications of the designer.
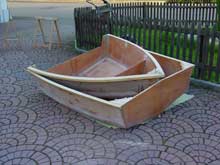
An important building step is to saw the boat into two nesting halves. |
 |
I also miscalculated the height of a bridge, underestimated the current below it and had to throw the full rig overboard in less than five seconds to avoid capsize and dismasting… the boat escaped the pillars with some scratches, and the skipper escaped slightly scared.
 |
The adventure is beginning just beyond my door, and it´s beginning now. |
Well, I corrected my building mistakes, made lots of shakedown cruises in spring 2008 and tried the same tour this summer. After a week of camp cruising, I am very impressed with the handling and the performance of the boat. She is exhilarating to sail and nice to row. In light wind, bigger raceboats can not easily shake her off, but in a fair breeze, the waterline limits her speed. Empty, she is light enough to plane in gusts (well, sort of… remember the short waterline), but she won’t do that loaded with lots of cruising gear or a second passenger.
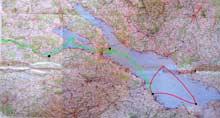
This is the tour around the Lake of Constance, with the camping grounds in black. The Bridge Over Troubles Water with lots of commercial and recreational traffic is right at Constance, in the middle. |
 |
The cruise first took me to Austria, where I had to look for shelter in a small thunderstorm, and enjoyed some calms on the way back where I rowed a couple of hours. A nice day with a small breeze to Constance was followed by some nice gusts on the lower part of the lake, and a drift on the river to Schaffhausen.
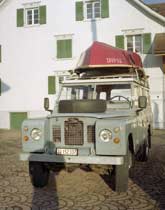 |
No way to row against the strong current of the Rhine river, from Schaffhausen back home. I used an old roof rack and cartopped her. |
It was a very lucky decision to enlarge the luff of the sail, to be able to drift in light winds. Dead calms are to be expected here for some hours of each day, so you should be able to lower and hoist the sail on the water. Instead of the luff sleeve, I feel a lacing system would have been better for easy sail handling.
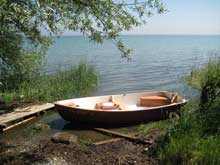
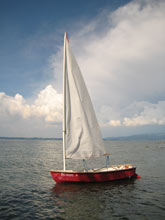
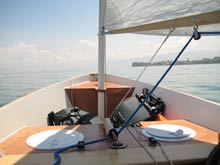
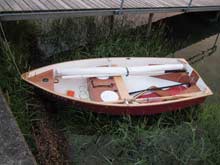
| The Spindrift is waiting while the skipper takes a dip in the water. The extemely light braided floating mainsheet was purchased from B&B. |
 |
My boat is adapted for camp cruising. Another lucky decision was to add watertight storage, which makes the difference between contentment and misery on a wet day, and helps to keep the boat organised. Watertight storage bags, however, are also a lightweight option. (This storage idea was borrowed from Garry Prater’s Spindrift 11. Garry also designed a clever system to attach the two hull halves).
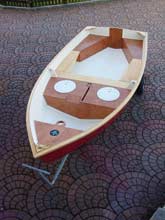 |
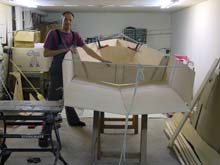
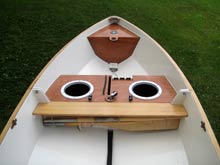
Near completion. The central watertight compartments were not shown on the plans. I like them, because they keep the gear dry and help to organize the boat. They add weight, though, and watertight bags might work as well.
The side benches were also not shown on the plans. They were abandoned later, because I could not design supporting cleats that worked without trouble. |
The trim of the rig is easily adjusted with halyard, boom vang and reef line in cam cleats on the deck, but I am not sure whether this neat-but-expensive system is of much advantage in a cruising boat. Maybe this is just the habit of an old dinghy racer who needs some rope ends to play with. As an ex-Laser sailor, I also need the hiking strap, made from an old car belt, and slightly beefed-up gunwhales, to make sitting on them more comfortable.
| The first day, direction Arbon. Note the cleats for halyard and boom vang on the deck near the centreboard. The plans show some easier options. |
 |
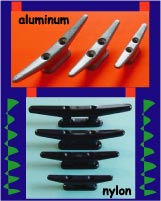
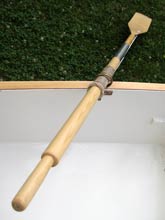
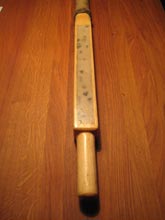
The divided oars are stored below the thwart. In my part of the word, I did not find suitable ferrules, so I bought some stainless steel tubes and worked them down to exact diameter with a lathe. The pushpin was made from a bolt, a small spring, a washer and a nut, and installed in a hole inside the oar shaft. Due to the high price of stainless steel tubing, this is for sure the most expensive item on the boat.
 |
Oars should be stored in a way not to interfere with sailing. This was the best and the easiest system I could design. Closed bronze rowlocks came from Duckworks. |
I adapted an idea from John Welsford for small lines which adjust the oar length to wind and wave conditions, and discovered with the help of them the zen of rowing, with a straight track and good continuous speed for more than an hour if you adjust the oar length precisely to wave and wind. Sailing in light winds, you might often be able to add some speed with the help of the oars, and in this case, you need a long luff oar and a short lee oar.
The blades were constructed according to an idea of Michael Storer's. I played with the dimensions until they had just the right pushing force.
| Learn to love your oars. The easiest option to prevent chafe on the shaft is to use rope lashing. Any rope will do if it is coated with clear varnish. The lanyard adjusts the shaft position in the rowlock. It is held with a lightweight tent rope adjuster. A turk´s head keeps oars and oarlocks together. Nice handle grips are missing yet. |
 |
The rest of the boat is pretty standard. I did not bother with inspection holes in the buoyancy chambers, because she is a garage boat, where condensation is only a minor nuisance.
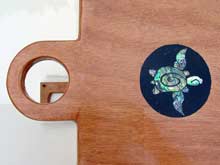 |
Some paua shells, a spoon full of black sand, and clear polyester make a nice eye-catcher on the foredeck. |
I also did some goofs, and I write about those that you steer clear of them. The mast shoe was screwed, not epoxy-glued into the hull, so I thought it could be changed when and if it would rot. However, the wind and the waves used the long mast as a lever, and eventually rattled the screws out long before the shoe had even a tendency to rot. Bad idea.
I also counter-weighed the looms of the 71/2 ft oars with chopped car weights, laid inside the looms with thickened epoxy. My short oars, however, feel much better if they are light, and adding some weight will just make them dive if they fall into the water. Ask me why I know that.
This was the prototype of my counterweighted oar shaft, which was a bad idea. It might, however, be beneficial to counter-weigh some very long oars; say with more than 10´ length. |
 |
Overall, the boat is designed and built as light as I would dare; nothing is overbuilt, everything is functional. Sometimes I feel it would be nice if I could sleep inside. It would be possible to add a cockpit sole which could be raised to the height of the deck, but this would increase weight and clutter.
 |
Sails, three-part mast & boom, rudder and centreboard, oars and the bailing bucket make for an annoying amount of clutter in the boat. Just add camping gear, food and yourself. |
It is disgusting to see how much clutter is needed for sailing and rowing, but the only idea to reduce that would be to build a totally other boat… maybe a sailing canoe? I feel I will build one in the next few years, just to investigate if canoe sailing is just more fun at even less cost and hassle.
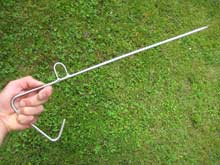
In most grounds, the holding force of a small commercial folding anchor is not convincing. When I am rigging the boat in knee-deep water, I use this lightweight ground nail. It only took some stainless steel scrap rod and some minutes of welding to make it. |
 |
|