 |
"Elmajoja"
click images to enlarge |
Introduction
Yes, another Puddle Duck Racer builder report. I couldn’t resist. I liked the design, concept, and fun the moment that I first read about PDR’s on Duckworks. My single favorite part is that it’s simple, the plans are free, the class rules are basic, and it’s easy to build. Wait, that’s four things! Many thanks to Shorty for starting the whole thing and continuing to support the fleet with the PDR website. Besides I live in the Seattle area and was compelled by the PDR World Championships being only one state away this year.
Materials
- Tite-Bond III waterproof glue
- PL polyurethane window/door sealant
- Hull and bulkheads – ¼” ACX plywood, fir
- Deck – 5 mm plywood, lauan
- Chines and air-box framing – ¾” hemlock of various width
- Mast – standard 8’ building stud
- Yard – hemlock closet pole, 12’
- Empennage – ½” BCX plywood, pine
- Sail – white poly-tarp from Polysail (Gray)
- Hull – McLendon’s exterior, satin latex, Naples Yellow
- Deck, empennage – Sikkens Cetol SRD “Natural”
Methods – Hull
I started by cutting out the side panels to the profile specified to be class legal. Hannu has a comment about using a handsaw to cut long curves and this really works great. I’ve tried using a saber saw in the past, but get an uneven line due to sideways wandering. Actually, I ended up doing most of my cuts for the whole build with a hand saw including ripping full sheet of plywood and felt it worked out well – it might be slower, but for me it was more controlled and consistent.
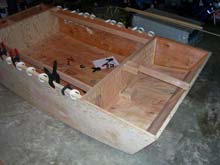
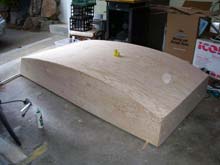
Next I glued the chines on with TB3 and a million clamps. I glued the bow and stern in place, and then bent the bottom skin in place, again with glue and a few screws and nails to keep it in place while the glue dried. I had a hard time getting the chine and the bottom skin to conform to the flat spot in the middle of the PDR profile. I checked all my measurements again after the hull came together, and I met the profile give or take an eighth.
| I glued the bow and stern in place, and then bent the bottom skin in place. |
 |
I chose not to overlap either the side or bottom plywood at the joints. Instead, the plywood was brought to the edge of the chine leaving an “L” channel which I filled with PL polyurethane window/door sealant. I was not willing to trust just ¾” of TB3 to keep the boat watertight given the rough state of plywood these days and elected not to tape the seams or sheath the bottom (I read somewhere that the Navy book of materials does not recommend the encapsulation of plywood). I’m sure others have done something similar:
I glued all the framing in place for the bulkheads and mast step prior to putting on the deck.
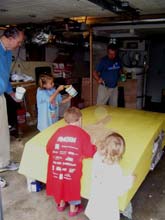 |
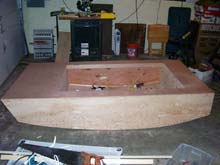
My wife came up with the idea that our two-year-old daughter and her four and six year old cousins could help me paint. I initially panicked, remembered that it was just a Puddle Duck, and we all ended up having a lot of fun. Grandpa Jim got in on the act too. The boat’s name, Elmajoja hails from this event – it’s a collection of the first two letters of the paint crews’ names. Or perhaps it’s a Mexican drug cartel?
I used latex exterior house paint in a satin finish (Jones) on bare wood. I could have used primer or oil based paint, but enough builders seem to support latex that I tried it out. Time will tell. |
Methods – Rigging
After much consternation, a million drawings and calculations, and way too much thought (including reading the majority of Sail Performance (Marchaj) which is the equivalent of taking a graduate level course in differential equations to get a handle on 2+2), I decided on Rig #20, Lateen (Bolger).
The mast is cut from a standard 2 x 4 stud. The yard is a 12’ closet pole reinforced at the hardware end with fiberglass tape set in epoxy. I wrapped the bottom 4” of yard with fiberglass tape set in epoxy to strengthen the area where the eyebolt goes in. I used the Saran wrap trick that I read about on Duckworks with great success and a beautiful smooth finish. I pretty much did the rigging empirically by setting everything up and finagling everything into place. A 3” metal ring allows the yard to rotate about the mast. |
|
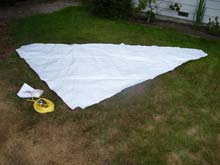 |
I cut the sail from a white polytarp that I bought from Dave Gray about 5 years ago now. I followed his advice on basic polytarp sail. I used carpet tape for the edges and didn’t bother to sew. Hopefully this will work out, if not I can always redo it. The square footage came out at about 48 which is light for a PDR. |
For the sail numbers, I typed out “231” in Word, increased the font size to 750, and selected outline under font options. The result was a nice number, 7.5” high, that I could trace on the sail with a permanent marker. I know that the numbers are supposed to be a minimum of 10” high, but 7.5” was the biggest that would print on a single sheet of paper using Arial font. My wife helped out with the tracing and filling in. I think it came out pretty well and it was really cheap.
The BIG DAY
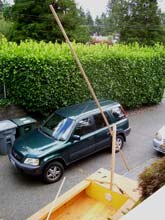
I originally planned to car-top my boat, however the final hull weight came in at 90 pounds which starts to get a little challenging to lift over head and onto the roof of the CRV. Instead I bought a cheap, utility trailer kit from Northern Tool. If I’d known this ahead of time I would have used 3/8” plywood for the bottom skin instead of ¼” just for the added stiffness and safety margin.
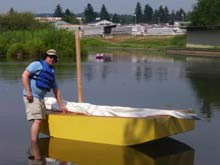
I should mention before I go any further that my wife has a 20’ rule, which is to say she won’t get in a boat less than 20 feet in length. I understand this rule and respect it which is why I bought her a life-preserver and demanded that she participate in the launching, and bring the children too. Seriously. Well, I did do a brief solo test before the whole family climbed in! |
|
 |
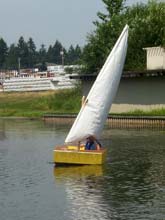
Elmajoja sailed well. The breeze was light and fluky, but I managed a few reaches out and back in the channel. The site was the Sammamish Slough at the north end of Lake Washington near Seattle, Washington. |
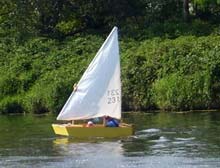
The sail has too much body. Either I need to move the sheeting point aft off the end of the vessel or cut the sail a little smaller. The sail would have been better if I had cut a perfect triangle instead of using a 3” curve along the yard edge. There is enough natural “sag” in the tarp material to form plenty of camber. Windward progress was a bit of a challenge with the big curve, but beam, broad, and running points were fine.
We all did get in the boat for a short paddle – me, my wife, our 2 year old, and our 3 month old. I’m not kidding. The littlest gave up first and let it be known through choice of vocabulary and volume that he’d had enough. My daughter made it 10 minutes longer than her younger brother before reporting, “I wanna go hooome!”
Lessons Learned
I’m not admitting that I did anything wrong, but if theoretically I had, here’s what might have happened:
- Even if you measure the centerline seventeen times before gluing the mast step in place, it may still end up off center. I recommend that critical eighteenth measurement check prior to committing!
- 30 minute epoxy actually sets in about 9.4 minutes, at least on the day I was using it.
- When measuring for the polytarp sail, make sure to calculate double the carpet tape width because the tab needs to fold back on itself. If you only add one tape width to your measurements, things won’t end up working out. Especially if you come to this realization after the cuts have been made.
- Just because the can of paint says “red” on the label and the sample dot of paint on the shelf is red doesn’t actually mean the can will have red paint in it.
- Measuring and cutting a sail on a soft, cushy surface like a front lawn is a really bad idea. Any movement, such as stretching the tape measure, or marking with a pen distorts the shape of the tarp. The cat running over it really didn’t improve the situation either.
- Never ever show your wife the video on UTube of the puddle duck/high wind/mast breaking event if you expect her to be a willing passenger in your boat!
Kudos
I would like to acknowledge Phil Bolger for pioneering the box-boat concept on which the Puddle Duck Racer is founded, what a wonderful innovator. I also really like Jones. I have several of his books and he provides clear, concise, and practical advice on many subjects from coatings, to prismatic coefficients, to real world sailing experience. I would also like to thank my wife for her supportive, understanding encouragement and being gracious about all the hours I spent puttering in the garage. She also gets credit for the nice launch day photos.
On to Oregon for the PDR World Pan-Galactic Championship!
References
***** |