With winter at its harshest, one’s thoughts naturally turns to…surfing! Item number 86 on every surfer’s list of “things to do before you die” is to make one’s own board. Most of these end up being lumpy, ugly foam creations with misshapen rails and a fin that hums (because it doesn’t know the words). I decided to go a different route. Having built a wooden boat - albeit a simple flat-bottomed outrigger canoe – I had all the tools and most of the knowledge required to build a wooden surfboard.
A hollow wooden surfboard is composed of an interior frame made up of a longitudinal stringer and transverse frames every 8 inches or so. I bought my frame pre-made from the good folks at Grain Surfboards in Maine, although it is easy enough to make one, particularly if you have a surfboard to take measurements from. The frame is made of marine ply, and most builders will likely have enough stock in the scrap bin to make it. The stringer is first lofted with the appropriate amount of nose and tail rocker and cut out. If necessary, more than one piece can be used with butt or scarph joints. The transverse frames are a little harder to make, since most modern boards have a bottom contour that goes from slightly concave in the nose to flat in the middle and a little vee in the tail. The frames and stringer are notched and joined with epoxy or titebond.
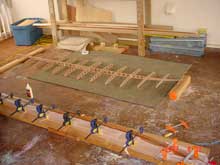 |
Fig. 1: The internal frame assembled. The holes are for reducing weight as well as ensuring there are no pockets of pressure inside the board.
click images to enlarge |
The rest of the board is standard boatbuilding. A “rocker table” – think of it as a modified strongback -is built, which will be used for gluing up the deck and bottom, and later built up to match the board’s rocker. The deck and bottom are essentially carvel planked, and the rails (sides of the board) are strip planked.
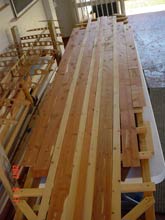
For the bottom, I used closet-liner cedar, cutting scarph joints on my table saw with a home-made jig. The wood itself was beautiful; my scarph joints were not. I used redwood and fir for contrast between the cedar planks. For the deck, I ripped long, clear lengths of fir and redwood. Once the strips are all cut, they are glued together on the rocker table to make a single sheet large enough to fit over the frame with some overlap.
| Fig. 2: Planks ready for joining. This is the bottom, with cedar, fir and redwood. |
 |
The rocker table is then modified to match the frame’s rocker by building up the crossmembers at each station to match the stringer. The idea is to have perfect contact with each transverse frame. Once this is complete the bottom panel is laid down and the frame placed on top of it. Once it is marked to ensure that it is centered, the frame can be glued up with titebond, set on the bottom panel and clamped to the rocker table.
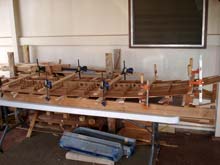 |
Fig. 3: The rocker table is built up to match the curve of the board. The bottom planks, now joined into a sheet, are laid on the table, and the frame is glued and clamped to the bottom. |
Stripping the rails is a simple procedure. A single square redwood strip is first set in notches cut into the bottom edge of each frame to make a proper chine. Then strips of ¼” fir are glued into place. This requires the use of many clamps. The strips can be routed bead-and-cove style for an easy fit; mine were plain square stock which required a bit of beveling with a small plane in order to get a good fit. The strips follow the contour of the frame until they are nearly horizontal, and the topmost strips are planed and sanded to blend into the frame. This will provide a solid glue joint when the deck is joined.
| Fig. 4: The rails are built up with strips of ¼” fir. |
 |
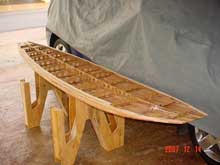 |
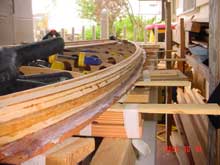
Fig. 5: The railing is complete. |
Before attaching the deck, the excess wood from the bottom panel is trimmed to size. The nose and tail of the board can be left rough, as they will be trimmed after the deck is on. Hardwood nose and tail blocks will be added later. Joining the deck to the rest of the board is probably the most critical part of the job. Good adhesion is essential so there are no areas where the deck is “floating” above a frame. The deck is lined up with the stringer and marked, and a bead of titebond is set on the frame and the rail edges where the deck will join. The top is clamped down with strips of wood. Wedges and shims ensure even pressure across the deck- in particular where it curves to meet the rails. Once dry, the excess of the deck is trimmed, and it is ready to be shaped.
| Fig. 6: The top is glued and clamped to the completed bottom/frame/rails. |
 |
The shape of the rails is probably the most significant factor in determining how the board will handle. There are many texts, websites and forums that cover this topic in detail. Suffice to say that in general, a harder, more squared-off rail is used in the tail, generally getting softer and more tucked as it progresses towards the nose. I am a big fan of 60’s style “50-50” rails (symmetrical in cross-section) so I made this boards’ rails very soft throughout, but still with a modern down-turned profile.
The nose and tail blocks were fashioned out of wood chosen more for their appearance than any other factor; people will look at the nose and tail first when they see a unique board. A simple lamination of contrasting woods provides a classy look. I went with a squash tail in the back, and a traditional rounded longboard nose up front. I used a pull saw to trim the nose and tail. A block plane got it nice and true. The wood blocks were glued into place and sanded fair.
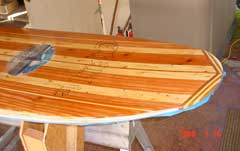
If a proper job is done, then the board can go right to final sanding. I needed to fix a few areas. There were some gaps where the deck met the rails that had to be filled. Likewise a few of the plank seams needed to be planed fair. The cedar on the bottom was full of knots which had spider cracks in them, so I used some grain filler to close those up. The whole board was sanded with a DA sander and then a fairing board. This went on for a few cycles – finding flaws, fixing, sanding – before I decided I was done.
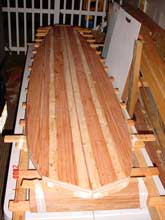 |
Fig. 7: The “blank” with nose and tail blocks added. |
The graphics were done using an inkjet printer on rice paper. They were glued to the board with regular white glue prior to glassing, although with epoxy it’s possible to just lay them in place and glass over them. I added a personal touch with a woodburning iron, giving it a classic look.
I had problems in the past with outgassing when laying up fiberglass cloth over wood with epoxy resin. In order to minimize this problem, the entire board was covered with a thin coat of epoxy (no cloth). Once set it was sanded smooth. The board was essentially sealed, so the cloth could be laid up without worrying about air bubbles from outgassing. It worked well. The bottom got one layer of 6 oz cloth and a fill coat; the top got two layers of cloth and a fill coat. Both top and bottom overlapped on the rails, so they essentially got 3 layers of glass – important since most dings occur on the rails.
| Fig. 8: “Skim coating” with epoxy. Note the masking tape “skirt” used to divert epoxy drips away from the bottom. |
 |
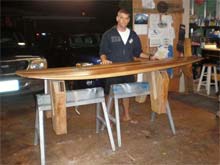
Since it is hollow, it is necessary to ensure a method of relieving internal pressure from heating/cooling. To achieve this I set a stainless insert into the deck prior to glassing. Even with the moderate temperature change (about 10 degrees) the board hissed and blew as I drilled through the glass covering the insert! The leash plug was set with epoxy into a hardwood block which was fastened to the underside of the deck prior to joining. I routed a cavity on the bottom for the fin box and fixed it into place using thickened epoxy. Finally, it was sprayed the with several coats of UV-protectant spar varnish. It was polished to a nice shine, and at that point I called it done.
Like most wooden boat builders, when looking at the finished result I see the flaws and imperfections first, and immediately plan on what I’ll do different next time. There are many variations on the construction technique – all one needs to do is perform an internet search for “wood surfboard building” to find a variety of information sources. I was fortunate to receive help from the folks at Grain Surfboards, whose kits come with a thorough instruction manual which covers the building process in great detail. Jack Young has a PDF book on hollow board construction which provides all the info in great detail for building a number of designs. Boat builder Gary Dierking has a book on building sailing canoes (available in the Duckworks store - click here) that is a must-have for anyone interested in boatbuilding. All three of these sources took my questions via e-mail and responded with essential info, and deserve thanks and credit for the success of this project.
So go through that scrap bin – you’ve likely enough material, tools and knowledge to make one of these already. If you don’t surf, make a 12-footer that you can stand-up-paddle around your lake. Or better yet, get down to the beach, jump in the water and learn to surf! (wetsuit may be required for those not living in the tropics).
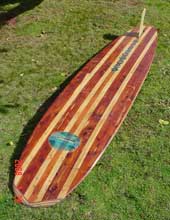
Figs. 9-10. Ready to ride…almost too nice to put wax on it!
|
 |
Charles Loiselle
See Charles' building blog |