-or-
The Tale of The Twisted Plywood
Built in 2006 by Pat Johnson and Jeremy Herrin
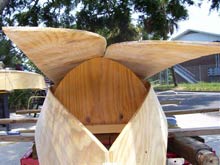 |
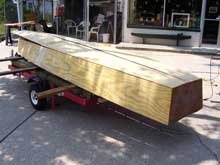
All went well till we got to the front 6 feet of the boat where the plywood had to twist from horizontal to nearly vertical. . That’s where Jeremy started to freak out.
click images to enlarge |
Jeremy, a fellow homebrewer & wanna-be boat builder, came to me a couple years ago and expressed an interest in boat building. I’m always trying to get folks to build their own boats so I encouraged him to just do it. We talked about building a very simple sharpie hull for the sake of ease & cost of construction. I generally try to get folks to build something easy the first time so they don’t get burnt-out on the project before they master the technique. After a pretty long discussion into why the first boat should be a simple one I figured Jeremy would build a Bolger Brick or a one sheet dinghy and I told him I’d give him a hand in the construction. I guess I should have gotten all the details worked out before opening my big mouth. As usual, I got involved in another project that I hadn’t planned on. While I thought we were just going to pull a simple pointy-boat-plan out of our posterior, Jeremy had begun looking on the internet for plans. I didn’t know he was even looking at plans until he bought a set of plans for a “Swift Canoe” off the Bateau website and brought them to my shop. Well, he was a buddy so I agreed the Swift Canoe would be a great boat to build.
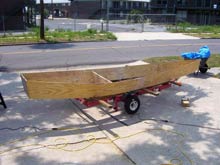
I told Jeremy I was in the process of building another D-4 Dinghy (it’s in the background in the picture above) but would assist him at the same time. Of course it worked out that I spent about as much time on the Swift Canoe as I did on the Dinghy. In fact I spent a lot of time on it when Jeremy wasn’t even there. I just can’t stand to see a partially complete boat building project left unattended. That’s why I try to limit the co-projects I obligate myself to.
The Plywood was bought and quickly cut out according to the plans. The standard prep-work was done to the plywood and the sides and bottom were butt-joined by applying 3 layers of fiberglass tape to the inside and 2 on the outside of each joint. We staggered the tape to form a kind of stair step to make fairing the joint easier. Each layer of tape covered the joint but only one was directly centered on it. The stern was completed and then we stitched the sides at the bow and to the stern. Then we inserted the frames and stitched them in with more electrical ties. Some of the frames would be used for the vertical part of the seats. Once the frames were installed it was time for the two bottom pieces. We had loosely stitched the bottom two pieces together so they could be unfolded over the frames and sides of the boat. Then we began to stitch the bottom to the sides from the rear. All went well till we got to the front 6 feet of the boat where the plywood had to twist from horizontal to nearly vertical. . That’s where Jeremy started to freak out.
| With epoxy you don’t have to be a master carpenter you just have to know how to use your sanders. There is absolutely no situation you can’t resolve in some way with more epoxy. |
 |
Having built a couple boats I had seen that bottom as a potential problem from the beginning but Jeremy hadn’t had any experience in boatbuilding and didn’t know that plywood doesn’t like to twist. You can bend plywood from side to side or from end to end pretty easily but when you try to twist it there is a lot of resistance (the key words being “A LOT”). The resistance was so great the electrical ties we were using kept stripping out. We’d put several ties in loosely locked and then slowly cinch them up a little at a time. The bottom and sides would get closer and closer and then with a loud BANG they’d spring back to horizontal when the ties broke. The first time it happened it was unexpected and surprised both of us. The 4th or 5th time was no surprise but Jeremy had that worried look in his eye. I told Jeremy to get us a homebrew and as we sat down to wet our whistle I explained that we had more tricks in our bag to fix the bottom. I went on to say that if all else failed we could pour a crap-load of epoxy into the general area and then use a belt sander to shape it into the bow we wanted! That’s the beauty of working with stitch & glue with epoxy you don’t have to be a master carpenter you just have to know how to use your sanders. There is absolutely no situation you can’t resolve in some way with more epoxy. In the end, we screwed a couple of temporary 1X2s along the edge of the sides and while one of us held the bottom down the other screwed the bottom to the 1X2. It wasn’t perfect but it didn’t require a “crap-load” of epoxy to fill in the void either.
 |
The plans called for standard seats with space under them but Jeremy intended to store the boat upside down so we decided to close/box them in and have the floatation. |
The plans called for standard seats with space under them but Jeremy intended to store the boat upside down so we decided to close/box them in and have the floatation since Jeremy would be using the boat in the large Pensacola Bay a lot. So while the boat has no drainage (limber holes) it does have an extraordinarily large amount of flotation. Limber holes are only good when you’re storing the boat and wouldn’t have benefited Jeremy as much as the flotation would.
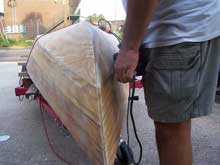
We finished up the basic boat and then began to doll her up. We laminated some thin strips of Brazilian Cherry on the top of the bow in a herring-bone patterns that really looked sharp. Jeremy bought some cleats and a bow-eye which we had installed pretty quickly.
| So while the boat has no drainage (limber holes) it does have an extraordinarily large amount of flotation. |
 |
OK, it was time for sea trials. We hadn’t painted the boat yet so even though Jeremy had gotten the title & registration we didn’t want to stick on permanent decal numbers. We just got out the black electrical tape and made stuck on some “Barney Rubble” numbers for the sea trials. We hung Jeremy’s 5hp Mercury on the transom and slid her into the water down the street from my shop. After firing up the motor we got in and slowly motored around the general vicinity of the dock while getting accustomed to the boat’s personality. She was actually pretty stable for a long narrow boat and she sliced though the water with great ease making very little wake as she did so. It was early morning and the bay was slick so we figured we might as well open her up and go for a ride. I had my hand held GPS so we could measure her speed and with two large adults she was planning at 10mph and with me laying in a flying superman position on the long bow seat she would do almost 15mph. Definitely fast for a 5hp outboard and 2 large adults.
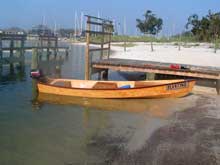 |
We hadn’t painted the boat yet so even though Jeremy had gotten the title & registration we didn’t want to stick on permanent decal numbers. We just got out the black electrical tape and made stuck on some “Barney Rubble” numbers for the sea trials. |
It only took a few minutes to cross the bay to a sand bar where we got out for a minute and adjusted the motor trim to see if it would coax even more speed out of her. It didn’t seem to make any difference and the top speed was recorded at just less than 15mph.
| It only took a few minutes to cross the bay to a sand bar where we got out for a minute and adjusted the motor trim to see if it would coax even more speed out of her. |
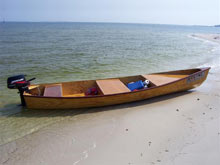 |
When we got back to the dock I got out and let Jeremy take her out by himself. His weight in the back of the 16ft boat made the bow ride too high and the little 5hp didn’t have enough ummph to get her up on a plane. I waved Jeremy back in and we attached a tiller extension to the outboard allowing Jeremy to steer from the mid-seat where his weight would provide a more balanced ballast and the boat looked to be in good trim.
 |
When we got back to the dock I got out and let Jeremy take her out by himself. His weight in the back of the 16ft boat made the bow ride too high and the little 5hp didn’t have enough ummph to get her up on a plane. |
Jeremy tried standing while under way and while it looked pretty cool it didn’t look too safe to me. Still the “Swift Canoe” seemed like she would make an excellent river boat and would move with such ease that only the smallest motor would be needed. I was pretty impressed with the boat’s performance. Jeremy was proud as a peacock of his first hand made boat and always tells the tale of the twisted plywood when describing its construction!
| I was pretty impressed with the boat’s performance. Jeremy was proud as a peacock of his first hand made boat and always tells the tale of the twisted plywood when describing its construction! |
 |
+++++
About the author….Pat Johnson builds boats as a hobby and has built about 25 odd boats to date. All of the boats are less than 16ft and about half are power and the others are sail or row boats. Pat enjoys helping others get started building boats and offers to show people how it’s done if asked. Pat lives in Pensacola Florida and often sails in Pensacola Bay and surrounding rivers and lakes. Pat’s most common advise to people thinking about building a boat is to start small and start now!
+++++
More Articles by Pat Johnson
|