click images to enlarge
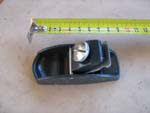
90MM of hand plane - A good size for one handed use
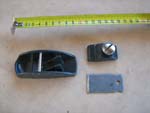
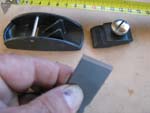
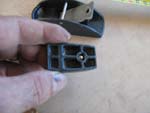
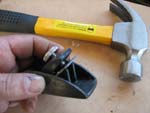
Stripped for inspection - Only four pieces and that includes the retaining screw
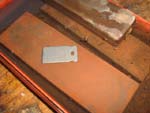
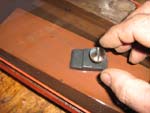
On the waterstone - An oilstone works almost as well but in either case makesure that it's dead flat
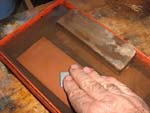
Working the blade back and forth to flatten the edged face - You dont need to touch the other face
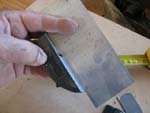
I've put a very narrow sharp edge on with the stone - The angle is about 5 ° more than the main bevel. The ground flat area covers the full width of the cutting edge here. That's enough to do the job, this metal is HARD.
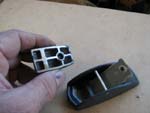
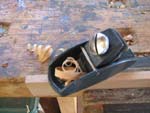
Checking out the sole - In this case it's within tolerance so there is no work required.
The cap is pretty rough underneath and needs to be flat and straight.
Back to the waterstone.
Almost right - Just a little more work on the stone.
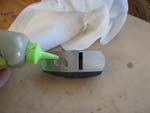
A wipe with an oily rag prevents the fresh ground surfaces from rusting.
Assemble the tool - Do the retaining screw up medium form and tap the backof the blade with a hammer to set it. Then do the screw up tight.
The cut's a little heavy but it's working well.
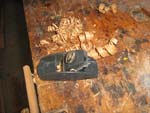
Perfect!
|
My current day job is Warehouse Manager and Salesman at a machinery importer and seller. We handle mostly Asian sourced product, some from other parts of the world but price dictates that we do our best to be competitive. That does not mean that we sell rubbish, far from it. The company sends senior staff over to China and Taiwan on a regular basis to tour factories and check out product and manufacturing standards. For my part I’m responsible for woodworking tools and machinery, and often have company representatives calling with samples in hand.
I enjoy reading their catalogues. It’s handy to be familiar with them so I can source specially ordered items that we don’t carry in stock, and so it was with interest that I took the Patience and Nicholson catalogue off into the staff room at lunchtime the other day.
We sell a few of their Kincrome brand tools, and I’d bought a pocket toolkit type pocketknife of that brand for my 17 yr old. I’d been pleasantly surprise by the quality, and when I saw that they had wood chisels and planes at very modest prices I ordered the smallest (cheapest) one to bring home and test run.
I note that Kincrome are available in many parts of the world, and suspect that these woodworking planes are also available under other brand names so figured that others might like to hear how useful or otherwise they are.
What I have here, is the Kincrome 90mm block plane part number KK06993. It’s cheap, no frills, no adjuster screw, no moveable frog (blade mount) or even a proper cap iron. In fact there are only four parts.
- The body: a substantial cast iron thing, it has a ground sole which when checked was well within tolerance for true and flat.
- The blade: stamped from a piece of sheet metal and post hardened, with a bevel edge ground on the working end.
- The cap: used for retaining and tensioning the blade, another solid little casting and reasonably true.
- The adjustment screw: a big diameter knurled knob that tensions up the blade retaining “cap”.
On stripping it, I found that the blade was not flat, the bevel, while at the right angle and square was very rough, and the mouth of the body was not ground straight. The cap fitted properly (if the cap fits, wear it!) but was very rough and not holding the blade down perfectly, so there was a bit of work to do.
I got my Japanese waterstone down, filled the plastic tray with water then went off and made a mug of tea while the stone soaked itself full of water.
Back at the bench, I stripped it - that’s only a few seconds work. The blade was placed face down on the stone (that’s with the bevel upwards). It was then worked quietly back and forth until I had ground the blade flat across the full width of the cutting edge and knocked the worst of the bumps off the rest of the blades back. This needs a fine stone or you won’t be able to get a good sharp edge.
I then looked at the sole, checked it with the edge of a brand new cabinet scraper that I’d checked for true on a surface plate. The sole was nice and straight both lengthwise and across.
Next was the mouth, and I wanted to true up the back face of this where the blade seats, an area which was just rough cast and painted. I slipped a thin fine flat file through, held it at the angle that the blade would sit and carefully filed the seat flat and square. The filed flat area needs to extend right to the sole as it supports the blade and prevents it from chattering as its driven through the wood.
Having achieved a blade that was flat, and a seat for it to rest against, I checked the blade to see that the bevel was square across (yes) turned the blade over and used the 800 grit waterstone to put a very narrow mini edge on the bevel; the difference in angle being only about 5deg, just enough to allow a 1mm wide edge to be formed on the rough ground bevel. I stropped the faint wire edge off on a piece of hard cotton canvas and put it aside.
With all else being ok, I addressed the underside of the cap. Like the seat in the mouth of the plane body now filed flat and true, this needs to be flat in order to hold the blade down firmly. In fact it’s only the lower edge that touches, but it’s easier to flatten and true the whole underside so it was back to the stone again.
A few minutes later it was done; the plane was lightly oiled and assembled, and ready for setting. To do this without a screw adjuster is easy, slide the blade down until the edge is just above the sole, do the retaining screw up medium firm and then GENTLY tap the back of the blade with a hammer. If you need to use force then undo the retaining screw a little.
Push the blade through until just showing when you sight along the sole, do up the screw hard, and try it. You’ll soon see if it’s right and after practice you’ll get it perfect in seconds.
Ready to go!
In use the little plane is fine, you’ll understand that this is not one of those incredibly expensive limited edition tools for which you’d need to extend your mortgage, or even a professional grade mass produced tool. It’s a cheapie with absolutely no frills. But in spite of that the hardened carbon steel blade holds its edge well, once seated flat in the plane it cuts accurately and well, the body of the plane is comfortable to use and great for small work where you can use it with one hand only, and does its job well enough.
The work described above is well worthwhile, it makes a big difference to how it does its job, it does not take long, and in this case my cup of tea was still hot enough to be drinkable when the job was finished.
Downsides: the blade is quiet a lot narrower than the mouth, so accumulates shavings in the “corners”, the mouth is not adjustable as a normal plane would be by moving the blade mount (frog) forward or back, and it’s a little fiddly to adjust until you have had some practice.
But as I said, for a cheap tool it’s effective and very good value for money. If you are going to build but one small boat, or one every few years (it’s addictive) this is a quite adequate tool.
John Welsford
Designer |