The pushpole doesn’t get a whole lot of attention, except in certain circles of backwoods canoeists and saltwater flats fishermen. For them the pole is a sexy thing, well worth some expensive carbon fiber. Most of the rest of us view it as an afterthought if we know about it at all.
Well, listen up everyone in the Great Plains states of North America. We have a lot of shallow water, just like those guys do on the Florida coast, so we can learn a bit from them.
Ever try to get upstream without a motor? It is hard to push enough water with a paddle or oars. Pushing on the bottom is a whole different deal. It is like propelling yourself with an anchor. Notice that when a big sailboat runs aground they seldom get off with engine power? Pushing on the bottom is far more positive, so they row their anchor out as far as they can and drop it. Then they can winch off.
Similarly, a pushpole can push you into the wind in a way that shoving on water can’t. This can be a big deal when you’re trying to sail out of a shallow area, but can’t put the board or rudder down. Rather than cursing in impotent rage, you could be calmly dropping your sail and poling to deeper water. I once helped out a sailboat in this predicament towing them while poling. I’ll bet they never went out without a pole again. I sure wish I had one when I had to go wading to drag the schooner back to the ramp.
The pole
The pole itself is a truly simple implement—a roundish piece of wood 11-12 feet long and around 1.25” diameter. But the devil is in the details. You want truly clear wood or it is easy to snap it at a knot. (Ask me how I know…) This is something you don’t want to do when pushing hard on it, or it will launch you overboard. I wouldn’t go over the top like the carbon fiber crowd does, but it is worth finding the best wood you can and laminating two layers of 1x lumber to help support any weak spots. More layers would probably be better, but two is immensely better than one.
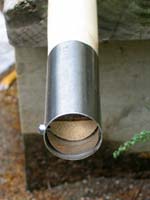
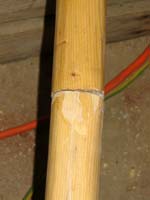
At the business end you need something to keep the wood from splitting or fraying. Most folks use a piece of copper pipe. You can pin it in place with a nail, but you don’t actually need to because once the end starts fraying, the pipe will be locked more or less in place. In a pinch, I’m pretty sure you could wrap the end tightly with wire using a Clamp-Tite tool, which would obviate the need to file the end to fit your pipe. Just don’t get carried away and use a big chunk of steel pipe or you’ll make your pole tip-heavy and unwieldy. You might even sink the pole.
You might also want a spike if you’re in rocky water. This is simply a lag screw installed in the end of the pole (after the copper ferrule is added). Then you cut off the head and sharpen it. Conversely, those with deep, soft mud might want a foot for their pole. Without one, you push forward and the pole sinks into the mud, then you pull the boat backward trying to get the pole unstuck. Inconvenient! The foot can be anything that makes it wider so it doesn’t sink into the mud. I suppose something like the bottom of a ski pole would be ideal. Try to keep it light, though. Or you can buy a mud foot from the people who make the carbon fiber poles.
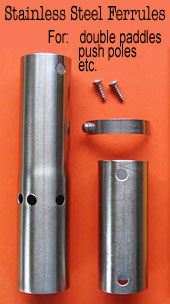
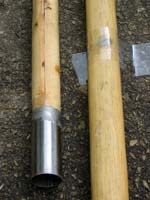
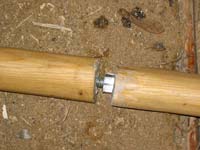
Finally, you might need to joint your pole so you can store it in the boat. Finding a place for a 12’ pole is not easy. I jointed my “good” pole with a stainless steel kayak paddle ferrule. Fitting it takes some time, but storage really is a lot easier.
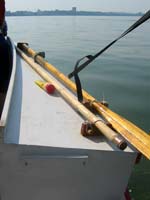
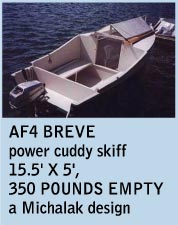
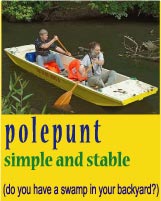
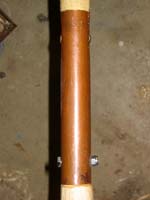
Before I entered the jointed era, my poles were terribly in the way. On the light schooner it used up the side deck on one side and made sitting uncomfortable. It was worse in my AF4B, demanding centerline space and most of the inhabitable length of the boat! There I was constantly tripping over it. Paradoxically it was almost worst in Polepunt. It would fit diagonally in the long cockpit—only slightly inconvenient for immobile adults, but the kids and dog were obliged to constantly climb over it. Even without the fancy chocks seen above, the jointed version lays happily out of the way along almost any chine. The joint does sacrifice some strength, but I think it’s worthwhile. A stronger pole doesn’t do any good if I leave it at home because I have no good place for it.
Let’s take a brief walk through the construction of that pole.
Ferrule-Jointed Pole
I dug through my scrap pile until I found a combination that would let me rip four 6-foot 1x2s (with reasonably small knots). These strips were then planed smooth on one surface and laminated.
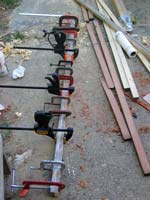
The tablesaw helps dress these to square and rip down to a slightly fat 1.25”. Then I set the blade to 45 degrees and the fence to make an octagon. You’ll have to play with this a little to get it just right. From there I hand planed by eye to smooth the octagon, then 16-side the poles. Finally a sanding belt turned inside out smoothes the surface. 80-grit is plenty smooth for this, and you don’t need to be too picky about perfect roundness. In fact I think a pole is more comfortable to use if it’s not quite round.
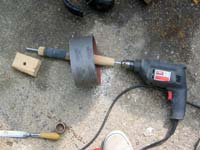
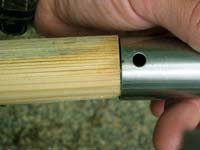
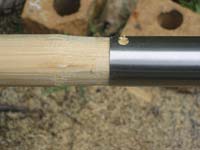
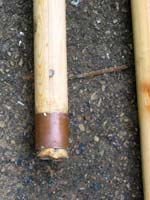
Now we need to fit the center ferrule and end ferrules, which is a simple matter of filing away the wood we don’t want. I would not try this with the sanding belt. It’s too fast and too hard to see what you’re doing. First we shave the end down so the ferrule can just barely slip on. I think it is easiest to do this by filing two flats on opposite sides to get close to the thickness that would slip in.
I got the pole a little crooked in that photo, but I think you can tell how I’m holding the ferrule up to the pole to see if it might fit in that dimension. Turn the pole 90 degrees and repeat the process. Eight-side and round by eye and you’ll be pretty close. Then just turn and file until the ferrule slips on.
Here’s the trick for finishing it. Jam the ferrule on hard. It won’t go on, but it will mark the wood where its edge was hitting.
File where it was hitting and it will slide on a little further and make a new mark. Repeat until it fits.
This process took me less than two hours for both parts of the center ferrule and a copper ferrule at each end.
I glued them in place with epoxy since I had a few knot holes to fill anyway. They can also be screwed in place.
Finally, seal surfaces and end grain. I used thinned, boiled linseed oil, but there may be better things. I would avoid anything too glossy, though.
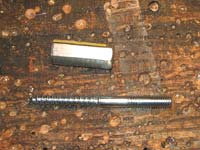
And finally, for those with rocks we’ll add a spike. Bore a hole and screw in a lag screw. I used 3/8”. Then cut off the head and grind it sharp. I’d show you pictures, but I don’t have that kind of rock to contend with. I think you get the idea.
El Cheapo Joints
If that $20 worth of hardware needs to be spent elsewhere, I feel your pain. I experimented with some el cheapo approaches on my less-nice, non-laminated pole.
My first approach was to try a screw joint, like on a pool cue. I used a 3/8” dowel screw and a coupler nut.
One is a threaded sleeve and the other is half woodscrew thread and half bolt thread. Obviously the installation of these is not hard. You drill holes and epoxy them in, wiping up excess.
But the devil is in the details. You almost need a lathe to get the holes bored straight enough, and get the mating surface cleaned up. Mine didn’t meet especially gracefully.
Worse, the leverage of using the pole was more than enough to easily pop the nut out of the epoxy.
Clearly the better approach is to join the pole on the outside, so my second el cheapo approach was to simply use some of the copper pipe I had been using for end ferrules. The removable part is just bare wood, pinned in place with a ¼” bolt and nylon insert stop nut. I riveted the other side with brass rod, but that’s only because I was short a bolt and wanted it done.
This version isn’t any harder to make than the version with the stainless ferrule, but has a couple disadvantages. First, it’s slower to assemble and requires tools, so you have to plan further ahead. Second, the wood can swell and prevent assembly. And third, it might not even be cheaper unless you can scrounge the pipe!
Using a pole
I think a lot of people get frustrated with the pole because the “right” way isn’t always the best way. Typically we try pushing from the stern, but this doesn’t always make the most sense. In the typical planing powerboat, the bow sweeps well clear of the water and the stern has a pretty good grip on the water. This means the boat will tend to pivot around the stern. You push on one side and it turns the boat. Then you push on the other side and turn it back. You try to push in the middle, but the motor is in the way. So you shove and then use the pole like a huge rudder to correct the steering before the next stroke. No matter what you do, it seems that the bow is swinging around with a mind of its own and it is a constant chore to correct fast enough.
This works well enough much of the time, but let’s analyze it. The big pain in the butt here is that the bow shifts sideways too easily, and the stern not easily enough. So what if we pole the boat backwards? Now the stern leads, and doesn’t easily or quickly get shoved aside where we don’t want it. We’re standing in the bow, which we can easily move sideways to make adjustments. Better yet, a pointy bow allows more space to position the pole at more angles without a big, blocky stern getting in the way. You can actually get a good left or right push without switching sides. This is even better if you have a slot top cabin, as you can lean securely against the slot and push quite vigorously with no worry of falling overboard. Remember to twist that pole, however, or the mud will take it away from you!
As with all things, there are caveats. I expect that poling from the bow will do less good in a sailboat hull or low-speed power boat hull, since there will be less resistance side to side at the transom. But it certainly is worth a try. Also, the stronger the wind or current you’re fighting, the harder it is to stay on track.
Poles have a couple more tricks up their sleeve.
Paddling
The pole can also be used as a giant single or double paddle. This will come naturally when you run into water too deep to touch bottom. It can also come in handy for maneuvering.
Spud Anchoring
Riverboats in the old days anchored in shallow water by setting a post (the spud) into the sand or mud of the bottom through a well in the hull. We can do much the same. This is easiest with two poles on the downstream side. You tie them at the gunwale and the water pressure holds them against the hull. But be careful here—a strong current or wind can break poles or capsize the boat. Also, waves or wind against the current can unseat your poles.
For temporary use one pole on the upstream side is fine, but you need to use the same rope as above and also lean against the upper part of the pole. It is safer because it can drag without damage, but it’s less handy.
You will undoubtedly think of other applications that suit your own boat and situation. After all, the whole idea of the pushpole is expedience, so whatever works is good.
Rob Rohde-Szudy
Madison, Wisconsin, USA
robrohdeszudy@yahoo.com
|