This article started with a short email to Chuck saying how much I loved Duckworks and that because of that I had returned to boat building. I then ran on for a bit describing my project(s). Chuck suggested I turn that email into an article so here we go.
I have always been a boat noodler, in fact I took this obsession so far as to enrol with the Westlawn School of Yacht Design. It was when I realized that they were interested in making designers of production boats I came to the understanding that this was not for me. By then I'd learned a lot and the noodling continued somewhat more informed.
I have a significant library of boatbuilding books acquired over many years and over many complaints about the cost thereof and I've built several boats, some more successful than others, but none in the last twenty five years. I've been a subscriber to Woodenboat almost from the first edition, my collection starts with issue 10 in May of 1976. But it was when I stumbled upon Duckworks that the old obsession returned and dreaming started to become reality.
Phil Bolger has always been something of a hero to me, I have four of his books, (I just found out what they're worth, I may have to invest in a safe) and many of my designs over the years owe a lot to his vision. In particular I liked the series of square boats he, it seemed to me, designed with the backyard builder in mind. So that conception informed my more recent attempts and most of the old ones as well.
 |
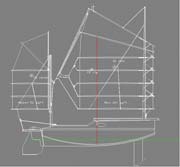
This is my design of a 25 foot displacement cruiser ala Bolger, never built mind you except in my mind.
click images for larger views |
Through Duckworks, thank you Chuck, I discovered Jim Michalak, not so square, the boats that is, and also designing for the backyard builder. In two nights I read everything he had written and published on the web and then I bought his book. (I told you it was an obsession).
| So in July of this year I decided that it was time to build a boat. But first came the design. I went through a lot of false starts. I called this one Microplus: 16' LOA; 6'6” beam, |
 |
 |
and even went so far as to do a color version, But the triple keel didn't look right so onto the second try. |
The next one I called long micro only because I couldn't think of a better name, same concept, same beam, but a foot and a half longer. Not right either and any way it was already designed and built by someone else.
| The current design is a cross between long micro and a chinese junk. I found a picture on the Cheap Pages of a junk hull that showed a large sliding rudder balancing a large dagger board which was fitted just ahead the mast. |
 |
In another picture, on another site, the dagger board was again forward of the main mast, between that and the forward mast. So I thought why not? No keel to get in the way when grounding and no great lumps of leeboard to knock off on the dock.
 |
This was the first go around, |
but the thought of that high stern and the forward daggerboard made me think that perhaps there just might be to much weather helm or that I might have to double the size of the rudder.
So back to AutoCad for another try. I used to use a drawing board in the past, in fact all of my Westlawn stuff was drawn by hand, but I've got real good at manipulating the computer (you just have to believe Jim).
| The second try was better, at least I think so. The cabin height is reduced and the cabin lengthened. As with the Micro and Jim's boats the center of the cabin is left open to the mast step so you can walk forward without actually leaving the cockpit. |
 |
The main mast is set in a tabernacle but the mizzen just lifts out.
The daggerboard and the rudder are kick up using Michael Storer's bungee cord set up.
I may change the sheer line and fiddle with the flare of the sides, at the moment it doesn't have any, but I'm fairly satisfied witht the concept and size.
I've been toying with the idea of water ballast and I've thought up various schemes to control flooding and draining the tanks, some of which are a bit far fetched. However I soon realized you don't need plugs if you make two tanks one either side of the centerline and have the inlet holes outboard close to the chine it doesn't matter if air gets into the tank after its filled. When you heel you may lose a little bit of ballast but the inlet hole is soon above the waterline of the ballast and nothing more is lost and the tank refills on the other tack.
On the other hand the ball from a computer mouse hung on a string inside a short length of PVC with a tapered neck through hull will plug the hole, let air out of the tank when filling, be easily removable and won't dislodge unless you go right over in which case it really doesn't matter. I digress.
Just so you understand the concept take an empty plastic pop bottle cut a hole in the bottom large enough to drop the ball through and then submerge the bottle in a five gallon bucket of water, neck down, with the ball in the neck opening. Don't let the water get in the hole in the bottom. The ball will stay in place to a depth of nine inches (maybe more) and withstand the water pressure. If you tip the bottle on its side the ball doesn't move. Only if you go beyond ninety degrees does the ball come out of the neck. A useful and cheap throughhull plug and you don't get your hands wet or have large holes between the tank and inboard.
Back to the boat. I think I'm going to have another go at the design to make it more junk like, we'll see how that turns out.
Jim Michalak's writings had turned my mind to stitch and glue for the hull. Then I realized I had no idea how to develop the panels. All my building in the past had been the old way, frames, stem, transom then stringers. Scribing was the way to develop side and bottom planking.
Much thought ensued but I finally came up with a solution and no the web was not helpful. To test it out I got some 1/32“ basswood, printed the developed panels and glued the print to the basswood. I cut the panels out and made a model. Ha, it worked, what do you know about that. But then there were second thoughts. Five bucks worth of basswood is one thing four hundred dollars worth of plywood entirely another. More indecision. So I designed a small dinghy just to test everything out. It's just a small, two sheet, pram style dinghy based on the sampan but it has become my test bed and yes the panel development did work full size.
I follow Bolger's idea that the curve of the chine in profile should match the curve in plan. With Autocad this is easy, once you've drawn the profile you just mirror the curve in plan, anchor one end and rotate/move the line to get your beam, bow and stern width. The curve is always fair because you can spline through as many points as you like.
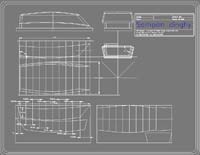 |
I wasn't overly concerned with displacement as the purpose was really to try out various schemes but with these square boats you can get a quick estimate by calculating the area of the immersed hull in profile and multiplying that by 85% of the max beam. In this case it works out to around 350 lbs. |
So on to the stitch and glue. I used zap straps for the ties, which worked really well, unless you tug on them too hard, and then came the glue part.
I didn't have any epoxy and I really didn't want to get any at this stage but I do have lots of carpenters glue so all I needed was a filler and some way to make the joints waterproof. Enter PolycementTM, fiberglass drywall tape and rocker panel spray. The former, when mixed with yellow glue, makes a great fillet material. The drywall tape is two inches wide and sets nicely into the cement strengthening the joint. A second coat of the cement mix hides the tape and the whole works can be smoothed out using a wet sponge. It hardens, well, like cement but it can be sanded and shaped with a Surform scraper if need be. It also won't come off your clothes even if they're washed (more complaints).
The boat was together and the inside joints done in a day. I turned it over and started on the bottom and outside joints using the same material as inside.
I went one step further, I coated the bottom with glue and then pulled an old polyester bedsheet over the bottom pulling it tight and stapling the edges. I put on another coat of glue and let it dry. The sheet was firmly attached to the bottom. So then I coated the staples and material edge with more cement glue mixture and faired it into the bottom and sides
But what about the rocker panel spray you ask? That's the waterproof part, after the joint is finished spray on the panel coating. It's rubberized, goes on easily and smoothly, does not bleed through paint and is totally waterproof. Sticks like glue to your clothes, see cement above.
To test out the waterproof bit I sprayed the inside of a cardboard beer flat, after it dried I filled it with water and left it in the downstairs shower (more complaints). The cardboard remained dry and the water just evaporated away in a week or so.
Just to be absolutely certain that the joints would remain waterproof I sprayed the entire bottom as well.
The gunwales and inwales were fitted, you can never have to many clamps, and a small prow and sculling notch. Breasthooks formed, broken, reformed, all cut and try and try and try.
The rowing seat and the after seat are made and sitting in the shop. I want to paint the inside and the underside of the seats before fitting them. I hate painting upside down and I'm a very bad painter in any case.
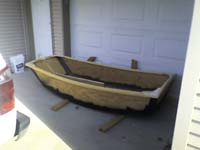
The hull is now complete, I have all the paint to do the paint work but no time at the moment so building has come to a short halt. Also the rainy season has started so I can't work outside much and my shop is filled with other projects (I have a grandson who needs stuff or so his Nana says). So here is where I've got to:
| The bit you can see that looks like a centreboard case is actually the base for the seat, ¼ “ ply on a 1” frame filled with spray foam. When the can says high expansion believe it, strong too and sticky. |
 |
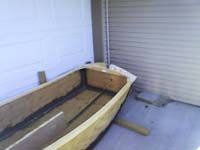 |
Another shot from the bow end, |
The white stuff is Poly-Filla™ and glue mixed to a putty consistency, very useful for hiding the mistakes, covering screw heads etc.
I found out that the rocker panel spray comes in other colors so I can spray the inside a nice tan color.
As finishing progresses I'll keep you posted if Chuck will let me and maybe we'll have a whole nuther story about building the junk.
Kevin McNeill
Experience starts when you begin - R.D. Culler (I've got his book too)
PS – I've gone off stitch and glue for large hulls after I counted how many times I had to roll the hull, once to glue the inside joints, once to glue the outside and fit the skeg, once to fit the gunwales, breast hooks, bow and transom mouldings, once to paint the bottom and once more to paint inside and finish. I probably could have got it down to three times versus five if I'd been thinking ahead but even three is once too many at my age.
***** |