Rob Rhode-Szudy’s recent column about his electrical system for his Bolger Light Scooner struck a chord. I had done a similar evolution on our 20-foot Frolic2 design, starting with simple dry-cell run electrics, advancing to a 12-volt system, and then regressing (progressing?) to the disposable batteries again.
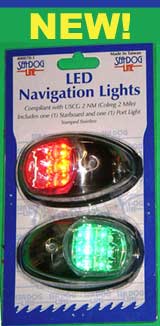
Part of the reason for going to a small 12-volt battery was to have the convenience of throwing a switch and having the running lights come on, which saved the discomfort of leaning out from the cabin over the foredeck to attach the otherwise commendable Tektite LED running lights to the forward cleat. It also allowed for such niceties as a cabin fan and some interior lights, plus a night light for the compass.
It was nice, but for the last Everglades Challenge, I wanted to save the weight of the 31 amp-hour battery. Moving the Tektites to the side of the deck, just forward of the cockpit in separate clip mounts, addressed the convenience problem. Using AAA battery-run stick-up LED lights in the cabin provided plenty of illumination. The fan could be foregone in March, even in Florida. The concern was the compass light, perhaps the most important electrical function in the boat.
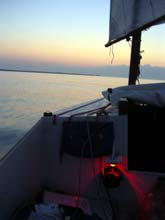 |
A compass light is a good thing to have for an all night sail! |
Shining a flashlight on the compass all night is a poor substitute for a good, red light.
The compass is illuminated by a 12-volt, 3-LED waterproof light mounted over the globe (the built in light failed due to a wiring problem). It requires very little battery power.
The solution is not original; I first heard of it from Doug Cameron and Michael Collins, veteran Everglades Challenge participants. To power their GPS, they linked together 8 D-cell batteries in a waterproof box, wired to the battery cord of the GPS. They didn’t do exact power calculations but said they never lacked for power leaving their unit for the entire 3-4 days of a challenge.
I figured a similar arrangement would work for the compass light, and my calculations showed that AA batteries should be sufficient for the low-current-draw fixture.
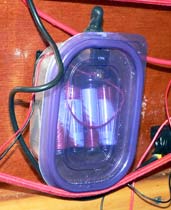
The main question was what type of container to use. There are some fairly pricey waterproof boxes available at marine and sporting goods stores with seals and fancy latches. I opted to go the cheap route and used an inexpensive food storage box, with a snap on lid. (My battery box lives in a cabin; if it were more exposed and subject to flooding, I might use the more expensive container.)
| A low-cost, water-tight food storage container makes a good fit for for 8 AA batteries to power a red LED light for the compass. If the switch, wire connections, and box stay watertight, this system would run underwater! |
 |
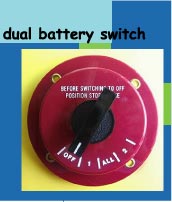
My box also has a switch because the lights need to be turned on and off. If it were for a GPS, a switch might not be needed because the unit could simply be turned off or unplugged. The toggle switch is made by Seachoice, and has an optional rubberized, "universal toggle boot seal" (yes, it looks like a switch condom) that is advertised to make the switch water resistant. (The boot is made by Marpac.)
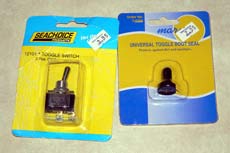 |
Here’s how the switch and cover are sold. |
The only other part needed is a battery holder from Radio Shack, which holds 8 AA batteries. It has a terminal on top that looks like the connectors on a 9-volt battery, so a plug to fit that was needed, too. Total cost for all the parts was around $15, with the switch and cover accounting for about half of that.
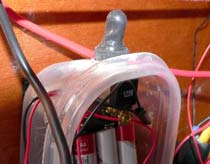
| The switch has a rubberized cover that makes it at least water resistant. Both the switch and wire are caulked where they leave the box. |
 |
Construction is easy. Drill a hole (½-inch as I recall) for the switch and a smaller hole for the wires to the light. Connect the wiring from the batteries to the switch and light. Include a fuse holder if you’re so inclined. Make sure that the holes where the switch and wiring go through the box are well caulked.
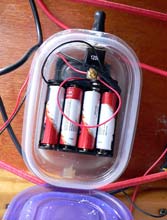 |
The inside of the box shows the simple wiring. |
Because the AA batteries are relatively light, my battery box sits on a 1 ½-inch beam, held to the bulkhead with velcro. Shock cord that holds other lightweight items to the bulkhead also passes over the box. Assembly time is 30-60 minutes, probably less time than it takes to run around and get the parts.
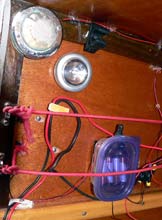
| The inside cabin bulkhead on our Frolic2. The light at the upper left is a built in, waterproof 12-volt LED. It works only when the 12-volt battery is installed in the boat. The next light is an AAA battery-powered LED light, similar to one sold by Duckworks. No built in electrical system required. Then, of course, there’s the battery box that supplies power for the compass light. |
 |
I suppose the built-in LED running lights (as opposed to the Tektites) could be hooked to such a system, using two switches and a box with 8 D-cells to power the compass and running lights (or perhaps a GPS). But that’s about as complex as I’d go with an arrangement powered by dry cells. Anything more and I’d go back to a 12-volt battery and regular wiring.
However, building this box did suggest a logical extension for small boaters where the switch box might be exposed. A bit over a year ago, we capsized and swamped our boat, while it had the previous 12-volt system installed. Amazingly, the 31 AH AGM battery survived the salt water immersion and seems to be functioning without a problem or diminished capacity. But the traditional switch and fuse panel had heavy corrosion in its copper contacts and was destroyed.
When I reinstall the 12-volt system, I’m going to make a custom switch box, using the Seachoice or other waterproof switches, with fuse holders inside the box. For this, I will use one of the more expensive waterproof boxes (maybe we can get Chuck to carry them through Duckworks!), preferably with a clear lid so all the internal connections are visible. If the holes for the wiring are carefully caulked, it should be able to withstand constant spray and at least short term immersion.
Anyway, consider these a couple of ideas for, as Rob put it, getting away with as little electrical system as you can.
*****
Other articles by Gary Blankenship & Helen Snell:
|