Working with the jib on the bow of my 26’ trimaran on windy days in the chop of Northumberland Strait (Prince Edward Island, Canada) convinced me that something had to be done to avoid unplanned swimming. The trimaran came to me with almost no deck safety fixtures—I expect the design goal was speed rather than taking a large group out on a fine day, but my most common use is to take up to 10 college kids and families out on a Sunday afternoon. There is lots of room on the broad deck of the trimaran, but as the captain and owner I worried about the safety issues.
Lifelines and Posts
The first step was to mount lifelines. The choice was to get stainless tubing (7/8” from the local supplier, Stright-MacKay, who primarily supplies for commercial fisherman of the area).
 |
Working with the jib on the bow of my 26’ trimaran on windy days convinced me that something had to be done to avoid unplanned swimming. |
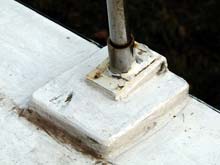
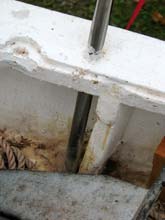
In addition the supplier stocks stainless end fittings which can screw to the deck and lock to the tubing with set screws. The big challenge was to get a good way to fasten the base fittings to the deck since it was virtually inaccessible from below, and lifeline posts surely need secure fastening if they are to resist heavy shocks. The solution was to cut good sized blocks of ¾” plywood, grind the deck spots clear, and epoxy the blocks to the deck on top. Then, using the advice from the Gougeon Bros, on epoxy setting fasteners, I made enlarged holes for each of the 4 screws and then mounted the base with the screws put down into the oversized, epoxy-filled holes. From the picture you will notice there are small wedges under the base fittings—there were only choices of 90 degrees or 60 degrees from the deck and I did not want the lifelines sticking out and hitting against a pier. Incidentally, if you look closely at the first picture you will see the black rub-rail that was added just below the deck at the widest part of the hull—I got tired of having the wharf rub against the fibreglass coating when the fenders failed. It is also handy when coming up to a dock briefly to take on passengers without bothering with fenders.
| There are small wedges under the base fittings - I did not want the lifelines sticking out and hitting against a pier. |
 |
The final step was to cut the tubing into 24” lengths (20’ total of tubing) (the local distributor was willing to make the cuts with their grinder/chop saw. Then I had to drill holes for the lines to pass through. A friend had a drill press but the stainless tubing was not easy to drill. The lines are vinyl-covered clothes line—I think the inner wire is about 1/8”. Whatever, it was rated for something like 1000 pounds—there were 3 grades of clothesline available. The line was held with wire clamps that formed loops and one end had turnbuckles to adjust tension. The turnbuckles were the weakest part in that they were aluminium with plated ends and have rusted badly in the saltwater environment. Even some of the screws seem to be rusting—the inside ones are stainless but the outside ones are deck screws in order to get the length where I know there is more wood to grab under the deck.
 |
Frequently passengers sit up against the lines with their legs overboard to catch the waves and there has never been any concern. |
The lifelines have been on for three years and seem to be holding up well. We have never had a full-grown man washed up against the lines to test in extreme conditions, but frequently passengers sit up against the lines with their legs overboard to catch the waves and there has never been any concern.
Bow Pulpit
Seeing all the pictures of yachts with bow railings, I pursued an estimate to fabricate one for me. The number was about $600 included welded stainless connections and polishing. Since that exceeded my budget for the whole year, I looked further and discovered Rob Rohde-Szudy's article on bending pipe on his porch. He was bending aluminium, but the principle looked the same for stainless tubing. Not wanting to nail to my porch, I used a scrap piece of OSB and cut some guide pieces to nail down and make a half circle.
| I used a scrap piece of OSB and cut some guide pieces to nail down and make a half circle. |
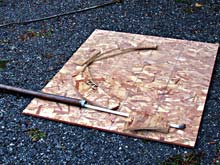 |
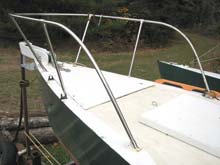
You can’t get the scale from the picture, but I made the diameter about 30”—about the curve I guessed would fit my bow. The unadorned bow is in the next picture, taken several years ago in the planning phases.
 |
The unadorned bow is in this picture, taken several years ago in the planning phases. |
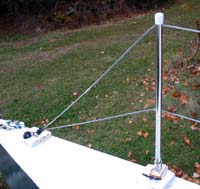
Guessing on the dimensions was scary—I was looking at a $60 piece of 7/8” stainless tubing rather than some inexpensive aluminium! When the overall dimensions were guessed, I came up with a 12’ run of pipe for the main railing with 4 2’ pieces as the verticals. Since the trimaran has open areas on both sides of the central hull, I wanted to make the pulpit fairly long—it does not connect to the lifelines out on the outside hulls. As you can see from the next picture, the arrangement comes down to the deck in the rear but has no support at the centre—it has to clear the anchor roller and the forestays.
| The arrangement comes down to the deck in the rear but has no support at the centre—it has to clear the anchor roller and the forestays. |
 |
There is no going back once you start! I was nervous enough to fill the tubing with sand for fear it would collapse rather than bend, but subsequent experience suggests it was not necessary. As you can see from the next picture (fakes because I don’t have any 12’ stainless tubing sitting around), you use a larger diameter pipe to make the bend occur right at the wood circle. A 3’ pipe gave enough leverage and I worked around from the right to left, bending right at the circle. Because of the curve, you could never go back to the first part of the bend. I went around to a little less than 180 degrees since the pulpit would need to be wider toward the rear. The bend started well along the tubing so the halfway point would be at the middle of the tubing. The result was a pipe with straight ends and almost a 180 degree bend right at the middle.
 |
Use a larger diameter pipe to make the bend occur right at the wood circle. A 3’ pipe gave enough leverage and I worked around from the right to left, bending right at the circle. |
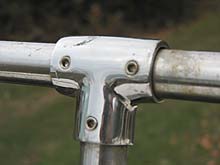
Before making the rear bends that would go down to the deck, I slid on the right-angle couplings. They hold with setscrews the same as the base fittings.
| Before making the rear bends that would go down to the deck, I slid on the right-angle couplings. |
 |
Then I made partial bends at the ends at almost right angles to the central bend using the same 30’ guide. The goal was to meet 60 degree base fittings at the ends.
 |
I made partial bends at the ends at almost right angles to the central bend using the same 30’ guide. The goal was to meet 60 degree base fittings at the ends. |
Then the vertical pipes were cut off the remainder of the 20’ tubing—about 24” each. The forward verticals came out at an angle off the 60 degree feet. Mounting was done with oversized holes and epoxy, much like the lifeline bases.
| Mounting was done with oversized holes and epoxy, much like the lifeline bases. |
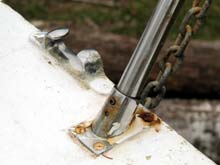 |
The intermediate verticals didn’t fit any of the available angles so I set them in holes in the deck, using epoxy and benefiting from the lower level of the new anchor well to provide more stiffness.
 |
The intermediate verticals didn’t fit any of the available angles so I set them in holes in the deck |
I forgot to mention that a disturbing aspect of the bending is the springiness of the tubing. In the end the 30” guide produced a 36” diameter bend. The entire fitting to the deck involved a lot of guessing and then springing of the rail to get it to match the bow. You can imagine that the final product was not exactly as planned but, as someone said, “You’ll never see it from the road.” The final product looks quite smooth and “professional” with a total cost of about $100. It is quite solid and gives anyone working at the bow a sense of security even when the bow is going up and down in the short waves we get here in the Strait.
| As long as I don’t tell people I did it myself, they never think to question its appropriateness. |
 |
The bow pulpit has survived two seasons and given no problems at all. As long as I don’t tell people I did it myself, they never think to question its appropriateness.
Tom Schultz
*****
Addendum:
I got a good comment from CaptLarryN referring me to this article. Whether vinyl-covered “clothesline” is sufficient for lifelines depends on the loads and conditions expected and whether the interior wire is galvanized, I think. While all my sailing is likely to be in sheltered waters, close to shore where I can get away from the big storms, I’m sure offshore racing has tougher requirements! I am reminded of a drawing (copied here) in Jim Brown’s The Case for the Cruising Trimaran where he describes a boat that endured 70 knot winds and confused seas for 30 hours and stove in in several places. The picture of the Japanese crewman hanging on the rigging suggests a serious need for strength. I do like the idea of changing the wires every 5-10 years, but the ruggedness demanded in the web article comes with a serious price tag—the stanchion bases cost $70 and the pipes list for $60 each in West Marine‘s catalog!

Tom Schultz
|