Well, happy New Year! For me it has been quite
a year. 2009 saw my fourth anniversary with Duckworks and my first
appearance in glossy print, presenting Michalak’s AF4 in
Woodenboat’s “Small Boats”. I also moved. While
not directly boat related, moving most certainly affects how boat
projects get done.
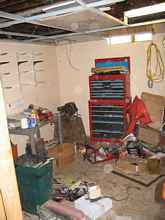
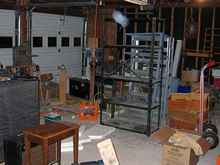
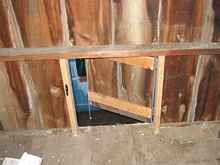
It’s always a bittersweet moment, leaving the old shop
where so much was accomplished. Here is the old shop being disemboweled
to move.
It’s not very big, and there’s a narrow door and
a step down to get in, which are both highly inconvenient. But
it was nice having it in a walk-out basement so it is sort of
heated. I’ll have to be more careful about changing lower
unit oil after each season now.
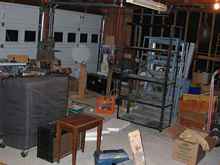
And here’s the new shop. It’s not really a mess –
I strategically placed all that junk for scale.
It’s a 29.5 x 23 foot, three car garage. The trick, of
course, is how not to put any of the cars in it. Unplugging the
remote door opener is a start, and I had an excuse because someone
else’s remote kept opening it. Probably something I could
deal with by changing the security code, but my tools are worth
a lot more than my junky cars, so unplugging might be better.
The motorboat would actually fit inside a bay, but I think we
both know I’m not using up shop space for that. With those
dimensions the light schooner or a similar-sized boat could be
built inside if there were an overhead door on the end. Hmm…
Even without modification it is a nice improvement to have heavy
things (like Hammond organs, foundry equipment and outboard motors)
right near an overhead door.
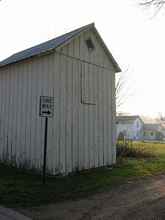
Here’s the exterior view, and the really cool part.
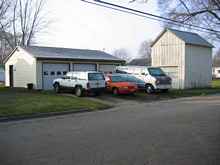 |
Garage & barn |
That barn is the original from the 19th century. The part with
the overhead door is 11’6” x 17’9” and
has a concrete floor. Above it is a loft. Here’s the door
on the back for getting lumber in there for storage. How awesome
is that?
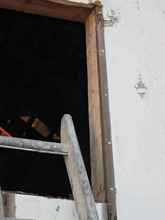
Well, not quite awesome enough, since carrying lumber around
the barn is a pain. I knew this would be a pain, so right away
I added a smaller door on the side facing the garage. This is
easy with board and batten construction. Drill holes from the
inside to mark the corners, and screw on planks to hold the door
together.
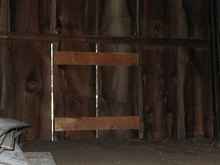 |
Barndoor |
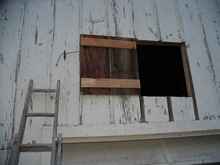
Then cut the battens away and cut the door free. It is a good
idea to add some studs to reinforce the opening.
|
Then cut the battens away and cut the door free |
Then final touches are cleats and rope to fasten the door both
open and closed. You want to be able to hold it open if you are
trying to put lumber in on a windy day. I might get around to
putting the battens back on when it gets warmer.
The loft could still use some lumber racks, but that will be
a while. I need to figure out how much weight I can even expect
the walls to hold up, and it doesn’t look like much.
OK, back to the tour. Here’s the boat parking area behind
the garage. Yes, I know it’s not mowed. I’m trying
to set the neighbors’ expectations low.
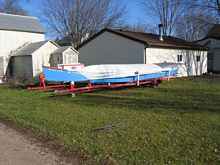
And with the boats tucked in with their wheels removed for the
winter. (It's a lot colder than it looks in that photo!)
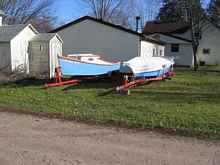 |
Wheels removed. |
Plenty of space for more boats, right? Indeed, it’s a
double lot to fit all that, and yes that’s the original
outhouse!
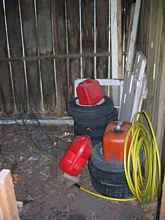
Between outhouse and barn is the old chicken coop. It is a veritable
wasp haven with a dirt floor and no electricity, but it is a good
place to store trailer wheels and camping gear in the winter.
Finally my tires can stop taking a beating from the sunlight all
year round.
And guess what? I hear there’s a house too!
Well, needless to say I have some setup to finish.
Setting up shop
This is probably one of the more satisfying things a handy person
can do. It doesn’t really accomplish anything in itself,
but it sure does feel good to set up a shop for all those future
projects, without actually dealing with their complications and
frustrations.
I knew right away that I wanted the table saw near a door. That
way I can rip across the garage when it is too cold to open the
door, but drag it outside and not deal with as much sawdust when
it is warm enough.
I think I lost battle on keeping a car inside, but I think I
have it limited to only one bay to keep oil leaks localized. I
guess that is the place to work on outboards too. Perhaps an oil-absorbing
mat.
The rest of the floor will be open for project layout and get
messed up with paint and glue. I will never understand why some
people go out of their way to keep their garage floors free of
paint and glue. Of course I will also never understand the allure
of the monoculture lawn. I’m trying to figure out how to
quickly propagate violets, clover and gill over the ground (Glechoma
hedera) so it looks better when I don’t mow it. If you happen
to be one of these fastidious sorts and you’re moving to
Mazomanie, let me know and I’ll point out where you probably
don’t want to buy a house. Like next to me.
Yet you’ll notice I did care about the floor getting oily.
This seems like a contradiction, but it’s not. If I want
to lay out sails in the garage, oil is a problem. Dried paint
is not.
That brings us to a bit of strategy.
Keeping space available
It is a real fight to keep space open for big projects like sailmaking.
You always have more stuff trying to claim that space, and if
you’re married you have four times as much stuff doing the
same. This is where strategy comes in – put stuff there
that makes the space look full, but that is really easy to move
when you need to.
The first part of this strategy was backing down on putting a
car in the garage. A car is easy to move and ensures one bay will
stay free of junk. One down, two to go.
The far bay will contain the bicycles, sitting flat on pavement
and spaced apart far enough to hop on and ride. This is nice because
we will use them more often that way. Also it takes up a lot of
space that is easily cleared. The bikes don’t quite convincingly
fill the bay, so two lawnmowers and a wheel barrow round out the
easily-moved stuff. The key to making this work is having hooks
to hang the bikes on and space in the barn to move the mowers
and wheelbarrow to. (She doesn’t ever seem to check the
barn unless I ask her to pass lumber up to me in the loft.)
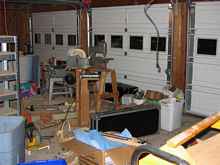
The middle bay is trickier. I had the table saw right at the
door so I can move it outside to control sawdust, but I decided
it looked fuller if I moved the saw to the middle of the bay and
positioned sawhorses and outfeed rollers. It is also pretty convenient
for anything that isn’t long enough to need to open the
overhead door. I can also turn it sideways when needed, of course.
Still the middle bay looks a little bare, though the large trash
cans and recycling bins help. I’m planning to always have
parts of a project I’m doing for her taking up space there
with paint or glue apparently curing. Moving into an older, bigger
place dramatically increases the length of the honey-do list,
which can be a powerful argument for unencumbered shop space,
particularly when evidence of its use is strategically left in
view. I really need to start setting up the props.
I passed lightly over the question of all my junk.
Efficiency and organization
As I said before, I kept all the shelves and cabinets around
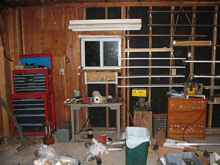
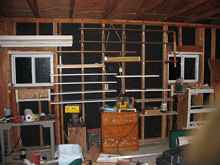
the perimeter, for the most part. Here’s how it is set up.
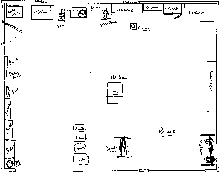 |
New shop layout |
This is all well and good, but it doesn’t work without
the barn. I was only able to keep this as bare as it is by having
a loft for lumber and a barn for bulky and infrequently used equipment
like the foundry. I’m also considering a lean-to on the
back of the garage so things like grills and scrap/fire wood can
move out of the barn. Maybe the foundry too.
Another big deal is shelves.
I don't know that they are perfectly thought out as they should
be, but at least I can start getting junk off the floor.
Heat
This move is rapidly turning me into an expert on kerosene heaters.
An unheated shop in Wisconsin is less useful than one might wish.
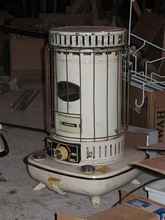
I had an old Reddy Heater that had been sitting in a barn for
years, half buried in dirt. Such a machine puts out a lot of heat,
but they are finicky about dirt. This one looks like a project
in itself, so it might have to wait a while.
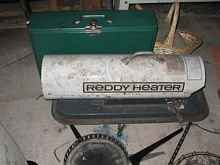 |
Ready heater |
A perusal of Craigslist netted me a kerosene convection heater
for $15. This was a real find, since it was close to me and they
normally for for $40-50. The wick was visibly dirty and it burned
with a greasy, sooty flicker. It got a lot better when I rinsed
the tank clean of what looked like rotten old diesel fuel, burned
the wick dry and put in some clean fuel. (Burning it dry gets
rid of all the gunk on the wick.) The striker doesn’t work,
but lighting it with a torch is easy enough through the little
side door.
(By the way, those combustible materials are nowhere as close
to the heater as the photo makes them appear.)
The trouble with a convection heater is that it heats the air.
There is a lot of air in that shop and it takes a long time to
heat it, especially since it is constantly losing heat through
its uninsulated walls and ceiling! This is fine on the weekend,
but it doesn’t lend itself to going out there for an hour
after work. In that case the better tool is a radiant heater.
With these you get heat almost immediately.
I found a well-cared-for radiant heater (also on Craigslist)
for $50, which is a bit under half the price of a new one. I didn’t
bother putting in batteries and lit it with a lighter, which worked
fine. However, it heated the chimney to red slowly and incompletely,
and made quite a bit of smoke on start-up. Something wasn’t
quite right. The first step was to empty the red-dyed kerosene
and burn the wick dry. In the USA kerosene is dyed red so it will
be obvious if anyone tries to use it in a diesel vehicle –
the road tax has not been paid on this fuel. Unfortunately, some
kerosene heaters don’t like the dye.
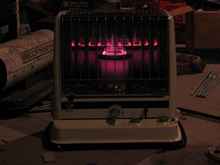 |
Radiant heater |
I found “water clear” kerosene in the solvent section
at the hardware store, and it is (hold onto your hat) $9/gal!
The stuff from the pump at the farmer's co-op costs “only”
$3.50/gallon. It is not quite “water-clear”, but it
it pretty close.
I decided I'd better try it with the co-op kerosene, since I
had the feeling that at $9/gal, electric would be more economical.
When I did the math I found I was right. Let's look at an average
small kerosene space heater that produces 1760 watts / 6000 btu/hr.
At 12 cents per kw-h, it takes 21 cents to run an electric heater
of this power for an hour. Kerosene contains around 135,000 btus
per gallon, so a similar-sized kerosene heater will burn around
0.044 gallons per hour, assuming perfect combustion efficiency.
(They are pretty efficient when tweaked.) Knowing the burn rate
we can see that we'll spend 16 cents per hour using the cheaper
kerosene and 40 cents per hour with the fancy clear stuff. This
is a no-brainer, since electric is easier to use. If co-op kero
doesn't work, my only use for kerosene is emergency heat in a
power failure. Fortunately, it seems the co-op kerosene is up
to the challenge. Both heaters now burn nice and clean. The chimney
of the radiant heater still doesn’t turn red all the way
to the bottom, but it burns clean, so I guess I won’t fuss
about it.
Even though kerosene is cheaper than electric, it is not a lot
cheaper. So I felt it would be useful to have an electric heater
at table height so I could take gloves off when working on something
fiddly. I happened to have what we call a milk house heater in
these parts. I think I got it at an auction years ago for a few
bucks. It does the job.
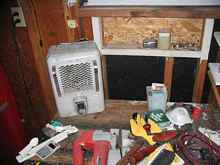 |
Electric heater |
It is a shame to waste such a highly refined form of energy as
electricity to make simple heat, but I don’t ever use it
for a very long time. This heater is also nice after a shower
in an old house.
Changing hardware stores
This is another important issue with changing shop location that
is easy to overlook…until you need something. The True Value
I used to go to is one of the best when it comes to odd fasteners.
Unfortunately, my best shot to get there is right after work,
and during rush hour my way is blocked by gridlock traffic worthy
of Chicago. Worse, I have to travel the same route to get to Farm
& Fleet, which is where I normally get larger hardware and
welding supplies! This seems like a minor concern, but it isn’t
if I need to waste an entire evening just to get supplies.
Fortunately, there is another True Value on my way home. It seems
about the same as the one I left behind, which is nice.
Better yet, one block away from the new place is a Hardware Hank.
This seems to cater a bit more to farmer, which is good for me.
Their stock of welding supplies and things like barn hinges are
a little cheaper and more extensive, which is an improvement except
for when I need an odd fastener. This Hank is pretty good on the
fasteners too. I have never seen so many subtly different sizes
of screw eyes in one place, for example.
I also noticed another option. When I went to the farmer’s
co-op for kerosene, I realized they have a Do-It Best. I had no
idea. They are not surprisingly even more farm oriented, with
better prices on barn hinges and welding supplies. This co-op
will be my new source for a number of things I used to get at
Farm & Fleet, I think.
I was sort of worried about leaving the True Value that had been
home for four years, and the source of a great many projects.
But it looks like I’ll be OK.
I’m hoping to get back to articles on building things by
next month. Until then, don’t do anything I wouldn’t
do. If you can think of anything like that. In the meantime, I'll
be unpacking. At least the kitchen is finally starting to look
homey.
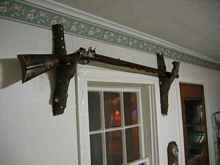 |
Flintlock kitchen |
Now my mother can’t try to foist frilly curtains on my
kitchen. She has a thing about curtains. The best part is she
can't say much about it because her brother built the rifle! Yeah,
I thought it was ingenious too.
Rob Rohde-Szudy
Madison, Wisconsin, USA
robrohdeszudy@yahoo.com

|