|
To Part Two
To Part Three
Among the Instant Boat crowd, there seems to be a feeling that
edge tool use is reserved for taciturn bearded dudes from Maine.
You know…them reeeeeeal “craftsmen”. The rest
of us must content ourselves with substituting the screaming noise
and choking dust of power tools, even when a sharp hand tool is
better suited to the job.
I don’t think we can afford for these edge tool skills
to fade into oblivion. A little edge tool skill can go a long
way in opening up the mysteries of traditional woodworking. Best
of all, it makes you better at using the power tools because you
think more about what is really happening. After all, even power
tools are a bunch of little edge tools moving really fast.
But how to get started?
A couple of tools
I’m going to buck tradition here. Everyone seems to start
off talking about planes, since they are the darlings of the traditional
wooden boat crowd. But planes are complicated and we need to gain
some more basic knowledge first. So let’s start with the
two basic blades – the knife and the chisel. Since the plane
is just a chisel with a jig, we can better understand what’s
going on by figuring it out with the chisel.
These are also cheap. A decent hardware store can furnish a passable
chisel for under $10. Get a narrow blade for now. Maybe 3/8”
to 1/2”. You probably have one already, but get a sharp
one. For the knife, a common utility knife and some blades will
do for now. You probably already have one of those too.
Safety
I shouldn’t need to say this, but I guess I do since I
still manage to cut myself. Think before every cut. What will
get cut if you slip? Eventually, you will slip. Gloves don’t
help with really sharp tools, so treat these things like the weapons
they can easily be. Above all, clamp the work firmly and use both
hands on the tool! No, actually above all, don’t try to
do this stuff when you’re tired. That’s when I always
end up getting yelled at because my wife thought I should get
stitches. Now don’t blame me when you’re bleeding
and cursing. Enough said.
Cutting technique
The first step is to get a bit of feel for how these edge tools
work. Without some appreciation for their capabilities, it is
hard to imagine someone going to the trouble of learning to properly
sharpen them.
So find some scrap wood. Let’s use softwood for now. I
used a 1x4.
First, strike a line on your scrap wood and saw close to it.
Use a handsaw or jigsaw so you have saw marks to remove. Don’t
obliterate the line, though.
Now let’s try to smooth this edge down to the line. This
will probably be easiest by making “paring” cuts across
the grain. Cutting with the grain, the blade tries to follow the
grain rather than where you want it to go. This is why there’s
less tearout when planing diagonally.
If you try cutting with the grain, you’ll probably find
that one direction cuts OK, and the other direction pulls the
blade down into the wood. This would be tearout with a plane,
and can be a deep gouge with a chisel. Avoid cutting in that direction.
You might find yourself sliding one forefinger of your fingers
along the surface of the wood to help maintain the correct cutting
angle. Take note of this, because you have just turned your hands
into a kind of plane! The main difference is that the alignment
is not so rigid with your hands, so you will probably take shorter
strokes. (We’ll get to the other differences in another
article.) If the wood is wide, you’ll probably cut to the
line first on the side where the line is drawn, then finish the
smoothing with the aid of a square.
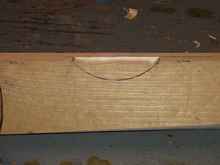
Cutting a Rabbet
Use a soup can as a stencil and trace a concave curve onto the
wide surface of your scrap. Now mark a line at half the thickness
of your scrap. We’re going to cut along the curved line,
down to half the thickness. Most folks would be reaching for the
router about now, but that’s only easier when it’s
a uniform depth. If that bottom surface were slanted it would
probably be easier by hand. If you can’t do it by hand,
you’re stuck building jigs to make a router do it, which
is probably a waste of time for a one-off part.
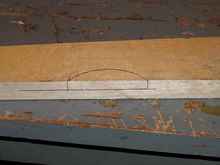 |
Curved lines |
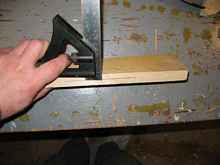
Note that an adjustable combination square can be used as a
depth gauge for marking this.
 |
Depth gauge |
First use the knife to cut lightly along all the lines to avoid
grain tearout. This shouldn’t be necessary if you never
make mistakes but…well…we do. Then we’ll cut
a little deeper on the “depth line”, which allows
us to cut/split out the first slice of wood. Actually, we want
to stay a little above the depth line, since it’s easier
to take more wood off than add it.
Now with the chisel we’ll make a shallow cut along the
curved line, then “scoop” to continue the cut across
and remove waste.
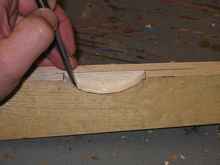
Again, one direction will tend to make the blade follow the grain
and dive, and in the other direction it will cut well. I like
to make a notch on the diving side. That way if the cut coming
from the opposite direction turns into a split, it can’t
split all the way into the stock I want to keep.
 |
Anti-split notch |
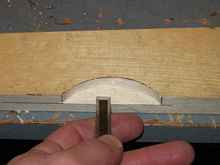
We repeat this process until our cavity is rough cut.
 |
Cavity rough cut |
For final shaping we can measure our depth by running a straightedge
across the top and measuring down. I find it most convenient to
use a barbecue skewer and mark where it intersects the straightedge,
then measure. A tape measure isn’t terribly accurate for
direct measuring this kind of thing.
Paring cuts with the chisel are the easiest way to finish to
the line.
 |
Paring bottom cut |
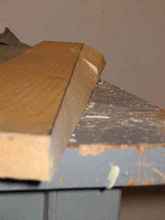
Congratulations! With what you’ve just done you can make
this fancy(ish) banjo neck joint. The whole neck was made exactly
this way, with only the addition of a bandsaw and a spokeshave,
which is comparatively easy to use.
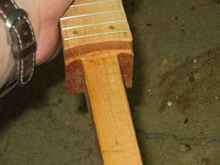 |
Banjo neck |
Yeah, I know it’s not part of a boat, but it gives you
an idea what you can do with a sharp chisel when you put your
mind to it.
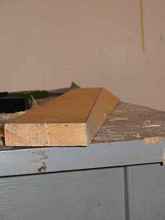
Rolling bevel
Now let’s add something a little more boat-like. At one
end of a 1x4, mark the top edge 1” in from the edge. At
the other end, mark the top 1/8” in from the edge. Now flip
it over. Mark each end 1/8” from that same edge. Connect
these marks with a straightedge. You should have a parallel line
on one side and a crooked line on the other. We’re going
to create a flat plane between them.
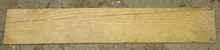 |
Bevel marked |
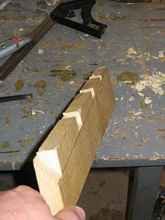
First we’re going to chisel some “notches”
down to the correct plane. Begin by using the knife to cut through
the outer grain. This keeps from splitting out the grain. In fact,
it is not bad to saw down close to the final line.
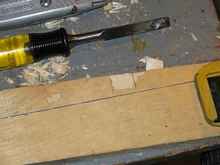 |
Outer grain cut |
Then we “pare” across the grain with the chisel.
Leave about 1/16” of wood outside the lines. We’ll
trim that last bit a little later. Don’t try to cut straight
toward the line on the other side. Instead leave a lump of wood
to be removed. With the line established on both sides, it’s
not hard to pare off the lump in between. Here are the finished
notches.
Once you’ve done this at both ends and at several points
between, you can start “planing” down to the pared
notches. Don’t try to use the utility knife like a drawknife.
It is a poorly controlled cut and likely to slip and cut you.
Both hands should always control the cut. Most of the time I find
that the right hand is positioning the knife, and the left is
resting on the work with its thumb propelling the blade. There
the back of the blade meets the left thumb helps control cutting
angle. This makes for short cuts, but that’s OK.
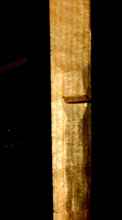
Here is a view of the work with part of the waste cut away. You
can see that the next section is cut to (near) the line on both
sides and the “lump” in the middle is waste. It is
easy to cut this out accurately. The shaving should come from
the middle. When it just barely touches both edges at once, your
cut is level. (I had to crank up the contrast on that photo to
let you see the lump.)
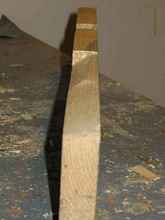
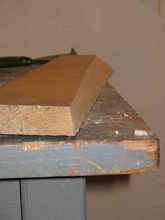
When the notches disappear, sight the surface to see that it’s
in plane.
The last 1/16” of wood is used to get it smooth and in
plane. This is best done with a plane, but we’re well within
range for sandpaper. For that matter we’re well within range
for epoxy. Here it is smoothed a bit.
Congratulations, you’re ready for traditional lapstrake,
if you have the time. You just cut the “rolling bevel”
that so mystifies the instant boat crowd. Curves are the only
difference between our rolling bevel and those on boats. We used
a straightedge where a batten would be used in boat work.
Your tools are probably starting to get dull now. Next time we’ll
look at sharpening.
Rob Rohde-Szudy
Madison, Wisconsin, USA
robrohdeszudy@yahoo.com

|