|
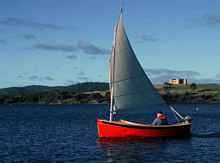 |
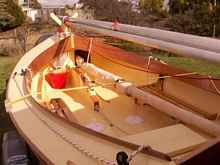
”Dexterity” sailing in the late
afternoon light of an autumn day on Blackman Bay Tasmania. |
Having been brought up in various houses close to the water in
Sydney Australia, I have always had a great affinity with boats.
From mucking around in canoes and rowing boats, in my teens I
moved on to racing dinghies. Marriage came next, family life and
other interests took me away from actively carrying on with sailing.
Since my youth I have always kept a great interest in small boat
design and sailing in general. A collection of Wooden Boat and
Australian Amateur Boatbuilder magazines and a library of sailing
books attests to this.
My youthful sailing experiences led me to the desire to build
a boat. Heading toward my mid 60’s and retirement I thought
“I have to do something about this boat build”. Anything
over 20 feet was too big. Keelboats are too big a build time,
financial and maintenance commitment for me. So it had to be a
centreboard dinghy, next thought “I only have another 10
years of dinghy sailing left in me, I had better hurry up!”
What design and what size?
My house has a 5.4 metre long, lock up, double garage that I
wanted to build in and then keep the results on her trailer. This
limited her length to less than 5 metres. The other design parameter
was a single hander, but with space for occasional family sails.
Much searching of the internet ensued. Then I came upon John
Welsford’s
designs. As an artist all my life and a full time self supporting
potter for the last 25 years, I have developed an eye for forms,
proportion, curves, balance, practicality and function. John’s
boats have these qualities. My sailing conditions in Tasmania
are similar to John’s New Zealand, as we both can experience
windy weather and rough water. I am near the bottom of Tasmania
where the swells from the Great Southern Ocean roll in, so no
flat water boat for me. Some of John’s bigger dinghies are
capable of limited coastal cruising. As a builder of his own designs,
John has the amateur builder in mind with his simplified construction
methods.
At 4.1 metres (13’ 2”) long and a 1.8m (5’10”)
beam the JW Houdini
was the biggest that would fit in my garage. John has done some
limited coastal cruising in one. She is readily single handed,
yet has room for 4 adults and maybe a couple of anklebiters, in
reasonable comfort. Her jaunty looks, high freeboard, built-in
buoyancy, practical reefing sailing rig and facility for mounting
a small outboard ticked the boxes for me.
|
Lovely Welsford sheerline. |
Getting the plans and building instructions in the mail was
very exciting! A first time boat build was no problem for me as
I have been doing some furniture building, house renovations,
shed building, pottery equipment/ tool making, kiln building,
carpentry, joinery, welding, sheet metal work etc, for ages. Thousands
of pots made and sold. Even a racing car build thrown in there!
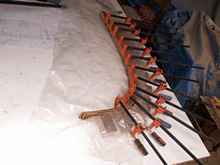 |
Inner stem being laminated up. |
Never having built to plans before (I had designed everything
myself), I found the Houdini plans needed quite a bit of interpretation.
Logical and forward thinking, as well as the wonderful help from
the John Welsford builder’s forum https://groups.yahoo.com/group/jwbuilders/
kept me going.
 |
Frames and centreboard made, bottom panel scarf
being glued up. |
Boat building for me was a fascinating and absorbing time as
firstly; parts like centreboard and case, frames, stem and transom
were made. Then the building jig, profiles for the curve then
the bottom panel (she is built upright), keelson, assembling frames
on to the bottom panel, saw the boat’s shape gradually grow.
When the two planks up each side were in place I had this wonderful
“boaty” looking creation! For me it was important
to enjoy every stage of the build, as you need it to carry you
through, maintaining your enthusiasm. I tried to regularly stand
back, look and take pride, satisfaction and pleasure in my achievements.
This gets you through the trials and tribulations, mistakes to
set right, problem solving, thinking ahead, insects in wet paint,
cut fingers, epoxy slow going off in cool weather, heaps of sanding,
is the paint finish good enough? The list goes on and on!
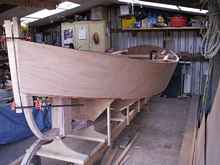 |
A boat taking shape. |
 |
Fitting the tiller. |
It was a great reason for me to tool up! I now could justify
to myself why had to have new saws, hand planes, cordless drills,
router, belt and finishing sanders, power plane, jigsaw and clamps.
I could go through the hardware store and say to myself “I
am going to need this for the boat!” My Japanese
pull saw is my favourite hand tool; I used it so
much I went onto a replacement blade. My Bosch 18v Li-ion battery,
cordless drill is my favourite power tool; 10 times the battery
charge life of a Ni-Cad and no self discharging.
John Welsford seems to me to be unique among designers in that
he accepts that builders alter his designs by putting their own
interpretations or ideas, into the details of his designs. I have
seen where he has written that no two Houdinis are the same! I
have taken the liberty of deviating from the plans in a number
of areas in my build. Looking at other Houdini builds on the internet
I have picked up good ideas. In looking at other designers such
as Iain Oughtred I have seen different detail design. My sailmaker
didn’t like the idea of a roach and battens in the sail,
as it made it difficult to roll up around the yard for transporting.
So he made the sail with a hollow cut leach and a taller head
to make up for the sail area loss.
 |
First hoist of the sail. |
Other main areas of change were in the transom, with no outboard
mount cut out in it. The tiller to rudder head connection is Oughtred.
There is no anchor well in the foredeck and the Danforth is mounted
securely on a bracket on the front bulkhead. The side seating
was my idea as it gives room for two crew to sit and be able to
get up easily and move over when tacking (I don’t get up
as well as I used to when I was younger!). They still swing up
out of the way for two airbeds to be laid down either side of
the centreboard case for overnight on board camping under a boom
tent. The system of holding the yard to the mast with the halyard
is from Michael Storer, who says it was used that way, over 100
years ago.
 |
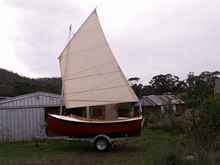
All set to drive down to the launching ramp. |
|
For getting back in. The nameplate was made
by printing out in Word on the computer onto an A4 sticky
back label, then cutting out the letters and using it as a
template. |
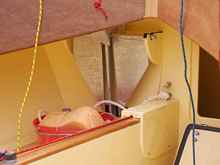 |
Danforth mount. The end of the anchor shaft
is pinned in by a removable wooden peg and it can’t
lift up off its hanging bracket. |
 |
Foredeck detail. |
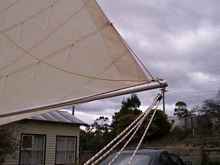 |
Slab reefing line is red. Spare halyard used
as a topping lift is yellow. |
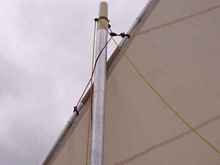 |
Masthead main halyard detail. |
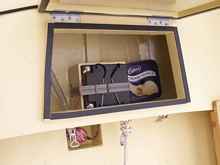 |
Pump and battery. |
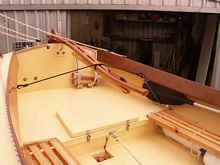 |
Bungy cord tiller lashing, tiller extension
detail, rope from sternsheets to the aft end of the centreboard
case is for hooking my feet under when hiking out off the
side deck in good breeze. |
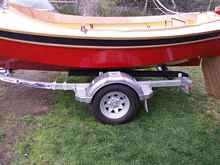 |
The trailer chine support beds are angled down
at the rear of the trailer, so that when launching she slides
down the rollers on her skeg and doesn’t contact the
beds. The two lengths of rope under the partially extended
pivoting, weighted centreboard, are to take the strain off
the lifting tackle and securing cleats, when bouncing down
the road on her trailer. |
Then there are smaller detail ideas that I have snuck in there,
like the extended outer stem with its abstract wave form extension
at the top. The tiller extension attachment is with a length of
spectra and a vee jam cleat, instead of a stainless steel universal
joint. The bungy cord around the tiller holds it steady in light
winds or when under power, so I can pour a coffee out of the Thermos.
A rope ladder over the transom will help me get back on board
should I go for an unintentional swim. A Rule 500gph electric
bilge pump in a sump in the cockpit floor and a 26 amp hour AGM
battery under the sternsheets, will get rid of a considerable
amount of water should do the unthinkable and capsize her.
The build was with good quality materials and a lot of care,
as I wanted to build a long lasting (50 year?) boat. I wanted
to end up with a good looking boat so I put a lot of thought into
paint schemes, what I was going to finish bright and fit out details.
I used Gaboon ply, 9mm for the bottom and 6mm for the sides of
the hull. All other parts such as stringers, skeg, keelson, gunwales,
centreboard, rudder etc., were from eucalyptus from the sawmill
at the top of my road. This was bought as larger stock, then broken
down to size on a table saw. Smaller parts such as side seating,
tiller and centrecase cap were made from reclaimed Tasmanian timbers
such as Huon, King William and Celery Top Pines. It was important
to me to have some uniquely Tasmanian timber content in the boat
and to show it off by finishing it bright. In the same way I have
included some unique Hobart content, by having the cleats and
fairleads cast in bronze by a local foundry.
Aluminium alloy spars were retained from the plans as they are
lighter and more functional than timber spars. There is no varnish
to get worn or chipped. An epoxied-in wooden plug in all the ends
provides some floatation.
Everything was epoxy coated inside and out before painting or
varnishing. The paint used was International Brightside one pack
polyurethane, Fire Red hull and Flag Blue sheer stripe, with Cream
interior. Red is my favourite colour and I looked extensively
among the marine paints for the right shade of red. Then the blue
and cream were picked as the complementary colours. A dark sheer
stripe lessens the apparent bulk of her high freeboard. The tapering
of the sheer stripe towards the bow and transom is pleasing to
the eye. International Yacht Primer and Prekote (undercoat), both
one pack, were used under the Brightside. I used marine grade
paints as I wanted the best paint for the boat. I could have saved
myself around $100 by using enamel or acrylic house paint. But
as a proportion of the cost of the whole build, this is an insignificant
amount.
The outboard chosen was a new 2 hp Honda 4 stroke long shaft,
mounted on a swing down alloy bracket. This is an air cooled motor
and only weighs 13 kg. It has a centrifugal clutch and pivots
through 180 degrees for reverse. Normally the motor pivot friction
mount is screwed tight so the motor is fixed dead ahead and steering
is done with the rudder. The throttle can also be locked, so a
half throttle economy cruise speed of 5 knots can be maintained.
When sailing the motor and bracket can be swung up, with the prop
about half out of the water; then tilted forward to completely
clear the prop from the water.
A build time of 18 months of a not quite full time leisurely
build, led to a launch in May this year, the end of our autumn.
Half a dozen day sails before the cold of winter set in have given
me a favourable impression of her sailing and motoring qualities,
as well as her practical launching/retrieving abilities. It takes
me a relaxed 30 minutes from driving into the car park, to rig,
back the trailer into the water to launch, tie up to the jetty,
drive the car back to the car park, get back in the boat cast
off and go sailing.
Not having dinghy sailed for 45 years gave me some trepidation
about heading out with this (to me), strange standing lugsail
rig. But it is a bit like bicycle riding; you never forget and
before long the unease vanished with the pleasure of sailing in
a boat I built myself! Everything worked as planned! I am getting
the hang of setting the sail. It is very adjustable, with the
tack downhaul tensioning the luff by pulling down against the
halyard. Then the flatness of the sail can be adjusted with the
sprit boom outhaul (snotter). These can be tweaked for the right
tension and then cleated off on the foredeck. The halyard is attached
to the yard around 1/3 back from the luff, to get the leach tension
against the pull of the mainsheet. It will take me a few more
sails, with experimenting and experience to get the tuning right.
I have had 5.9 knots on my Garmin eTrex GPS, sailing un-reefed
in around 20 knots of wind. This was on the limit sailing, hanging
off the side deck and feathering the sail. I was only a couple
of hundred metres away from the launch ramp so didn’t stop
to put a reef in. To my mind this is pretty good for a little
13 and a bit foot, non-planing cruising dinghy, probably over
hull speed. I put 66kg of lead ballast in 4 boxes fixed under
the cockpit sole, so this steadies her a little. In very light
winds she slips along at 1 or 2 knots surprisingly well.
My home is in Dunalley, 50 minutes drive south east of Hobart.
Have a look on Google Earth if you can; we have lots of sheltered
water cruising from nearby launching ramps. Trailering the boat
an hour or so to other launching ramps opens up many more lovely
sailing areas. This will be enough for me and I will respectfully
decline (to King Neptune) to go single handed open water coastal
cruising in a centreboard dinghy at my age! When the weather warms
up I hope to take her out for day sails at least once a week to
enjoy the “simply messing about in boats”.
*****

|