|
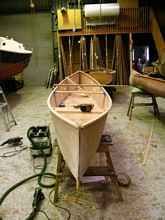
I tried to see how much of the Quick
Canoe I could get done in one day - and quickly found
out that slow glue drying determines more about the boatbuilding
speed than the design.
So the below is probably largely applicable to most plywood boats
that might be built quickly.
It is winter here and it was really pouring with rain outside
most of the time - this and the cold temps made it all a bit trickier
than building in France in summer. So this is what I have learned
or confirmed.
In OZ the cost differential between crappy looking exterior ply
from a big box store and the cheapest marine ply from a proper
boat materials supplier is so small that the exterior ply was
not worth considering.
The best tool for cutting out the panels for a minimum amount
of trimming, actually zero with careful cutting is the skilsaw
- incase of language compatiblities .. the hand held circular
saw. I had a battery powered one and it had enough gas to cut
one set of hull panels only - but it was cutting through two and
then four layers of ply at once.
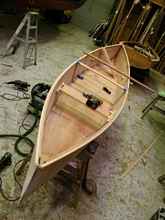
With butt strapping I put a butt strap on the inside as per the
plan and cut a duplicate and covered it with brown packaging tape
for the outside of the hull. I glued the inner one in place and
then screwed through the lot (temporarily) so the hull panels
could be assembled immediately. Worked fine - no problems at all.
The temporary duct taping of the hull assembly process works
in exactly the same way as using copper wire stitch and glue.
It is difficult psychologically because you feel it is never going
to work to make the boat hold its shape. But keep going on faith
and it works - and well enough that I was able to turn the hull
over while the glass tape was still wet. I did use a total of
four pieces of copper wire too to make sure the stems did not
move around or pop apart - two pieces in each. Had zero trouble
with the duct tape method. It even peeled off easily with no residue.
 |
Duck Taping |
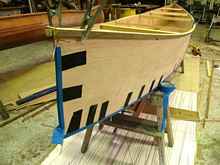
The glass taping using polyester resin for its fast cure went
very well with some fiddling with catalyst levels. I ended up
using an on spec 2 percent catalyst level but it was too slow
in the cold conditions. So I got the tape on with that then followed
up with a 4 percent hot coat once all the initial taping on the
inside had been done. Becuase of the cold weather I flipped the
boat over and put a blow heater under to make the inside glass
tape kick off. After coming back from lunch it was cured reasonably
hard and I was able to remove the duct tape and fair up the outside
chine to do the glass taping there. Same method. While I waited
I got on with the seat supports and seats and other furniture
- just making it up ready to fit.
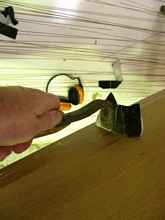
Glass tape edges were trimmed down using a carbide scraper with
some duct tape on the side of the blade that was in contact with
the plywood. Very fast. Aesthetic only.
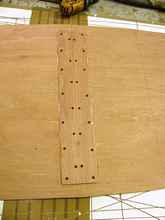
Should have fitted the little ply doublers that give enough meat
for the fastenings that hold the keel/skeg on at the ends at the
same time I did the butt straps. Silly not to realise. Will update
the plans.
With the other components the water based glue (a locally made
exterior crosslinking PVA) watching it dry was worse than watching
grass grow with the humidity of the torrential rain outside. What
is the humidity of the Loire valley? And the likelihood of rain?
I didn't want to use one of the polyurethane glues as the foam
that comes out of the joints would have slowed me down with excessive
cleanup. There was not a big range of glues available anyhow.
The glass taping was very satisfactory I think. But the weak
point was the load put on the glass tape at the bow when the gunwales
went on. Recommend a piece of copper wire or a cable tie just
under the gunwale at each end of the boat.
Fitted inwales - I think I would eliminate either the gunwales
or the inwales for a Loire
build. The inwales have a bit of an advantage because
they increase the bonding area for the permanent spreaders. Probably
3/4" square is just enough if two spreaders are fitted rather
than the standard one.
I used permanent fasteners and left them in mostly.
At that point, waiting for the inwale and seat glue to do something
useful it was 4.30pm and I was being kicked out of the premises.
Next day ... (could have been last night) got the keel and skeg
arrangements on, seats fitted to the hull and the inwale in place.
Waiting for glue to harden to any extent so I can get on with
things.
Still waiting for the *^*&^& glue to start drying on
the ... let me rephrase that ... dry anywhere. I check the buttstraps
(done around 8.30am the day before and they are OK - they were
heated when I was kicking off the glass tape - so remove the temporary
outside buttstraps and plug the holes tidily with car bog/putty.
At this point I have to go and do some useful work ... so won't
be back until Wednesday.
If the glue had dried faster I still doubt that I could have
singlehandedly built the boat in a day - two people or a team
- a bit more possible ... the painting would have added too much
time. So I think that a two day build probably needs to be planned
for with the aim of getting the paint on at a sensible time on
the second day.
So that is it for now.
The good thing is I built the boat on the Duck Flat premises
and they want to hang the boat in the showroom - to show that
a basic boat does not need to be time, money or skills intensive.
So now I have to make it look a bit pretty too.
Best wishes
MIK
More pictures HERE.
The Quick Canoe will be used in the Loire River Raid, 2011. See
the article by Brian
Anderson.
*****

|