| A treatise on scarf joining stringers for your next boat.
Scarfing is a task that frightens a lot of people off. I’ve seen many people choose a design on the basis that it was short enough to fit within a sheet of plywood rather than have to scarf join two pieces together. Its one of the less beneficial things about internet forums and discussion groups, discussion threads get out of hand and too many uninformed people contribute opinions that are presented as fact which leads the beginner astray, scares them off what is really a very simple task.
Many of my plans customers ask how to do this job. I’m having to make some short bits of wood longer for the stringers of the “Sunday Night Special” so thought that I’d show how I do it.
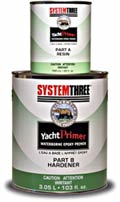
I used West System epoxy glue. It could have been Urea Formadehyde such as Weldwood or Aerolite, or Resorcinol. Note that I don’t use any polyurethane glues if the join is one that will have any real stress on it or if failure is likely to be embarrassing.
This glue is leftover from a project done some years back, and the hardener has gone bright orange yellow. I was wary of it but did some test joints and it seemed fine, so as “Sunday” is a boat being built from scrap, leftovers, and scrounged material it seemed appropriate that I used past its use by date glues as well. But I was careful with the test joints for sure!
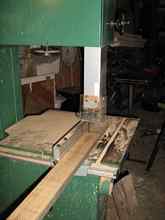
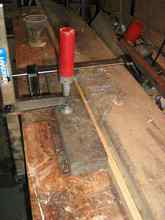
The first issue with making a scarf joint is the cutting of the slope. Here I’m cutting a 6/1 slope on the end of stringers which range from 22x 25mm, down to 16 x 25mm (that’s how they came out when I ran the feed stock through the bandsaw). I could do these by hand with saw and plane, but there were about a dozen to do so it was worth making up a jig.
|
I use a bandsaw for long ripping pieces to size, but a hand held circular saw with a fence, or a table saw, or even a hand ripsaw can do the job. But the bandsaw is quicker and loses much less wood due to the narrow kerf blade. |
The jig took about 15 mins to make, the base is a piece of scrap panel, particle board in this case.
|
The piece of scrap particle board used for a base, with its guide rail glued and screwed to the underside. That guide rail is a neat fit in the groove on the sawbench, so much so that I had to put some beeswax on it and push it back and forth for a while before it slid through easily, but better that than a loose fit that would allow it to move and make the cut of the stringers taper less accurate. |
There are two needs here, one is to be able to clamp the workpiece to the jig at the correct angle, repeated accurately each time, and to make sure that the jig is pushed through the saw blade on the same path and angle each time.
First, I made a strip of wood the right size to slide in the sawbenches guide groove, the one that takes the little angle guide that’s useless for accurate work but which all sawbenches seem to have.
But the groove is useful, parallel to the saw, straight and true. My strip of wood was made to be a very close fit both in depth and width, so much so that later on I put some beeswax on to help it slide easily. No slop was the criteria so a bit tight and some pushing back and forth then lubrication was better than loose.
I screwed and glued this to the bottom of the base, with the base overhanging just past the saw blade. Ran the base on its “guide rail” through the saw, cut off the excess and that made for a perfect fit.
I took the piece cut off (about 70mm wide in this case) and laid it on a line marked at the correct angle on the top surface (measure 100 across and 600 along, draw a line between the two marks to get the angle).
On scarfing angles. I’ve never had a failure at 6/1 scarf angle, but “the book” (The Gougeon Bros on Boat construction , my “Bible” for glued wood structures) says 8/1 . If you are confident in your methods and skills, and are backing up the joint within the structure, I’d go with the shorter scarf slope which saves material, but if inexperienced or not confident, use the longer slope)
So, screw and glue the offcut to the top surface of the base to make an angled fence, make sure there is no squeeze out of the glue to make lumps which will prevent the workpiece from sitting true. I’m using Aliphatic PVA carpenters glue here, it wont be going anywhere near the water so its appropriate and very easy to use.
Run that through the saw to take the excess off at the leading end.
Then you need a method of clamping the workpiece to the jig.
I have used these (see the photo) over center clamps on all sorts of jigs. Some for cutting, some for laminating, some just to hold things down while I work on them. They are available from the likes of Harbour Freight.
|
I screwed and glued the offcut to the top of the base piece, making sure it was at just the right angle, and mounted the over center clamps to the top of it. Take care that they all of them clear the saw blade when you slide it through! |
They are so cheap that making other means such as bolts and cross pieces is not worth the bother, and once you have them (buy four, you’ll use them ). You’ll find all sorts of things to use them for. But if you want to do it yourself, a hardwood cross piece bearing on the work at one end, and the other end on the angled fence with a bolt and wingnut through the middle to put pressure on will do the job. Countersink the head into the lower surface of the base so they don’t hang up on the sawbench, use good sized washers to spread the load and they will work fine.
Rule one, check very carefully that the clamps don’t project into the path of the saw, rule two, check it again to make sure!
When its all done, clamp your workpiece in, support the far end so there is no tendency for the workpiece to tip up or move relative to the jig, and slide carefully through the saw.
|
I’ve cut one piece, the offcut showing here. Note that I have the guard and riving knife out of the saw so the clamps can fit past the sawblade. Running a saw like this requires more care than usual, keep your fingers well away from the action and stand out of line with the saw as it can throw the offcut at you. |
On mine, I had to take the riving knife and guard off to get the clamps past the saw blade. If you need to do that, take care! Fingers don’t grow back and without the riving knife the saw blade can throw the offcut back at you so stand well out of the line of fire.
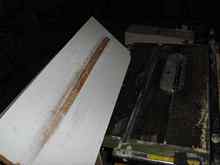
With the scarf angles cut, gluing them together is the next task. I’ve a 3m (10 ft) long bench, and was looking to make pieces about 5m (16 ft) long, so put a support under one end of the assembly, just to prevent the sag from upsetting the join.
I then clamped a piece of wood with a nice straight edge to the bench, buttered up the joint with a goodly amount of thickened epoxy (nitrile gloves for safety) and, putting a piece of kitchen wrap on the bench and up the edge of the guide piece assembled the first one, I overlap the slopes a little more than needed. They slide into place with the side pressure when applied.
|
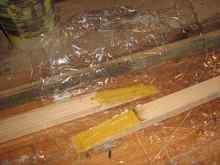
The big piece of wood behind has been checked for straight, and clamped to the bench, the kitchen wrap that will prevent the job for sticking to everything is in place, and I’ve put a good layer of glue on both surfaces to be joined. Ready to go. |
Note, when clamping up, especially multiples as with the example below, it is essential that the pairs being joined are the same thickness in both axies. If not the pressure on them is not even and a poor joint will result.
|
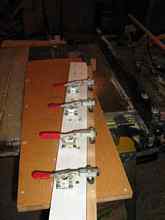
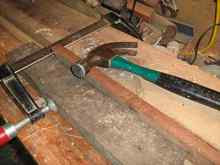
Here I have two stringers laid up, each with its own kitchen wrap cover so they don’t stick together, and they are lightly clamped ready for final alignment. I like to overlap the joints a tiny bit much, then when I tap them down with the hammer they slide into perfect position. |
I have in this case put two pairs together each with its own wrapper of kitchen wrap to prevent it from ending up as a single mass all stuck together and to the bench.
Next, clamp it sideways, so a caul piece is laid alongside the pieces to be clamped and an “F” clamp applied, just medium pressure. Then the joints are tapped down flat with a piece of wood and hammer before winding the clamp up tight.
|
Tap Tap, then tighten the clamps up firmly and leave until its all set hard. Trim the excess glue with a sharp plane and you have stringers as long as you need them to be. |
In this case the caul piece is tending to lift up so I’ve clamped that to the bench as well.
After clamping up at a medium pressure, I’ve gone around and put a quarter turn on each, and again to make sure there is enough pressure, watching carefully to make sure that the joints stay aligned.
Its winter here in New Zealand, not as severe as in some places but at night its getting down to about 5 deg C (40 deg F) so I’m leaving it for 24 hours before taking the pressure off.
|
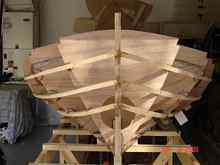
John French sent me this photo of his Navigator sailing dingy all stringered ready for planking, the scarfing joints as shown above makes joining all the long pieces together easy to do. |
When out of the clamps, I’ve set a hand plane up with a fine cut and carefully trimmed the excess glue off. I’ll leave these joints for another 24 hours before I put any stress on them as some of these stringers will have considerable stress applied to them as they are wrapped around the bow end of the boat and I would get very tetchy if they broke.
All done, I’ve scarfed sixteen pieces into eight stringers, total time used including building the sliding jig for the sawbench ( known in joinery terms as a “sledge” ) about 1 ½ hours. The “sledge” worked very well and will be put up on the shelf for the next project which will require a whole lot of scarfed long pieces.
|
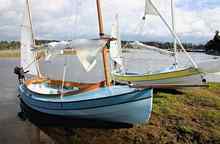
David Johnstone sent me this lovely photo of his Navigator Korora and Owen Sinclairs Nav Tusk on Lake Mahinapua on New Zealands South Islands West Coast, a particularly peaceful and beautiful place . |

|