|
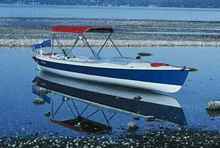
The designer’s catalogue describes her as: “…an oddball little boat that we built several years ago with and for our oddball friend Bill Hayward”. Bill was looking for a pedal powered boat that could navigate shallow rivers and have live aboard accommodations. Paul Gartside Design #92 “Blue Skies” was the result. Over the course of 15 months Bill pedaled her 7,000 miles from Alberta BC down the Milk and Mississippi rivers, along the Gulf and Atlantic Coasts and up the St Laurence back into Canada. https://www.wavelengthmagazine.com/1997/on97blueskies.html I just had to have this boat!
Figure 1: The first Blue Skies and to the right her sibling, aka Patuxent Queen
I had visions of exploring the Chesapeake Bay and its many tributaries free from the nagging concern of whether a suitable kayak campsite could be found before dark. Bad weather? Just pull into a sheltered cove, drop the anchor and snuggle into the bunk. There were practical downsides, however. At 20 ft. she was within 1 in. of the length of my garage and way too big to car top. And then the ominous phrase in the catalog:”skill level: intermediate”.
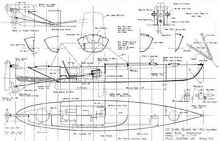
For a couple of years (yes, some of us don’t move too quickly) more practical sleep aboard options like the Kruger Sea Wind or a modified CLC Mill Creek were considered and discarded in favor of a boat one could really live aboard. Finally, in the fall of 2007 I bought the plans. After building a CLC (Chesapeake Light Craft) stitch and glue kayak, which had plans that included full scale templates, “how to” booklets and clearly labeled dimensions, the three Spartan sheets that comprised the plans for Blue Skies were a shock. So, this is boat building for grown-ups. Don’t’ get me wrong. All of the design information was there, it just presumed a level of boat building knowledge and skills that I clearly didn’t have.
Figure 2 Sheet One: I can’t do all this stuff.
Many evenings were spent staring at the drawings and mentally building the boat. The virtual tasks ranged from “been there, done that” (fiberglassing), to ”I can learn” (cedar stripping, lofting), to “nope, not me” (metalworking). For build photos see:
https://www.flickr.com/photos/doooo
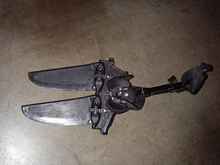
The “nope not me” stuff was easily taken care of by replacing the relatively complex shaft driven propeller system with a Hobie Mirage installation similar to what Chris Ostlind suggested in an earlier Duckworks article. Although the system is more prone to grounding damage, it makes up for that with lighter weight and the ability to perform maintenance while afloat. The only functional (and unavoidable I suppose) drawback is that vortices created by the fins cause an annoying thumping on the rudder in flat water conditions……and oh …..the drive units are expensive.
Figure 3 Hobie Mirage Drive System
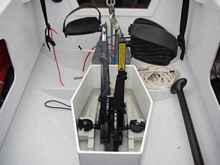
Figure 4 Installed Drive System: The thru-hull slot is fairly tight, but minnows still occasionally find their way in.
The “I can learn” stuff was covered by Nick Schade’s excellent book; “The Strip-Built Sea Kayak ” and by Google. The things I worried about most turned out to be nonissues. Quiet evenings lofting contours at the plotting board (kitchen table) and trimming soft, pleasant smelling strips of cedar were the most pleasant parts of the build.
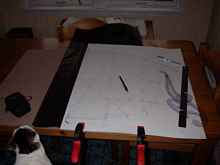
Figure 5 Lofting: Tracing loft lines to fiberboard for stations templates. The flexible steel ruler contributed nearly as much to the final hull shape as the coordinates.
The trouble came with the stuff I was confident I could do. My fiberglassing skills didn’t scale up to a larger boat, resulting in multiple wrinkles and sections of floated plies. Inattention with a long board on curved surfaces compounded the amount of fiberglass patching and fairing required. She has a fare hull only through brute force and micro-balloon filler. At least it made the paint versus varnish decision easy.
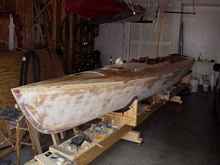
Figure 6 Patches: One of many fiberglass repairs
Figure 7 But for the grace of micro-balloon filler….
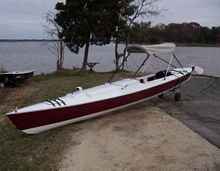
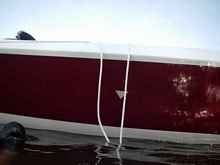
Although the single boat’s experience does not a boat builder make, the finished product at least reflects the original intent; a human powered boat with the performance of a touring sea kayak and the accommodations of a sailing dingy. Like a kayak she floats high in the water inverted and is easily righted and reentered with a rope step. Water in the cockpit and sleeping compartment only adds to her stability and electric pumps make quick work of bailing (primary reason for the electrical system). She cruises around 3.5 knot loaded.
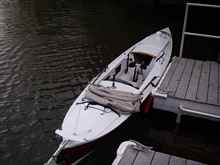
Figure 8 Finished Boat
Figure 9 Man Overboard View : The two lines are the righting line/boarding ladder. The triangle is a reflective patch to find the ladder at night.
Unlike a sea kayak, standing up and stretching is an option. You can also eat and drink while maintaining forward motion, which can be a significant advantage if traveling up wind. Pedaling is much less technical than paddling well, but it can be mind numbingly boring (think 12v electrical system and IPOD).
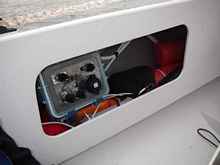
Figure 10 Electrical Panel: Top two switches are cockpit and sleeping compartment pumps. Lower two are navigation and compass lights. An absorbed glass mat battery in the aft (watertight) compartment provides the juice.
Figure 11 Top Side: The cabin air inlet scoop seems to be the most defining feature of this oversized kayak. The Dorade Box has so far worked great at providing ventilation while keeping water out.
Camping aboard is quite civilized, though a continual exercise in planning. Every time something is unpacked, something else has to be put away to make space. While awake, the sleeping compartment is the storage compartment and the cockpit is kept clear. The process is reversed at bed time. Gear shuffling aside, the boat is very comfortable. The drive well makes for a handy food preparation table. If you really get bored, the slot in the drive trunk provides a “glass bottom boat” view of whatever is sharing the space under your boat. And finally, the sleeping accommodations are great. At 6 ft. 3 in. long and 40 inches wide, the compartment is so large that I end up sleeping against one of the “corners”. Sometimes at night I’ll wake up and intentionally rock to the boat just to enjoy the sensation of being afloat.
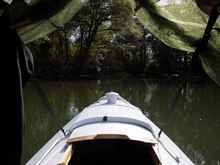
Figure 12 Safe Harbor: Small craft advisories on the bay, but you wouldn’t know it here. Mosquito netting is draped from the bimini. Three otters paid us a visit just before dark.
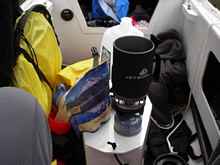
Figure 12a Kitchen: The pedal well cover makes a convenient table; just don’t try to move about the boat.
One beginner’s advice for anyone thinking of building a boat “over their heads”:
-
Break the job down into chunks and mentally address the challenges one by one ahead of time (don’t worry; there will likely be enough unexpected challenges to keep your interest later).
-
Ask for help. For some reason I “had” to figure out everything myself. Much frustration could have been avoided if had I asked for advice or assistance earlier.
-
Keep a Project Book. A spiral notebook was great for keeping track of part lists, sketching design features, jotting down measurements, figuring out material requirements etc. (I made the rudder that big why?)
-
Forget the completion date. Make some small bit of boat progress every day and it will get done (enjoyably).
-
Jump in!
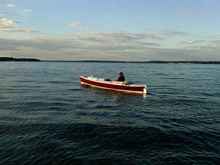
Figure 14: Underway
 |