| A Minimalist Hybrid Electric Shantyboat
A few years ago, I got a job offer I couldn't refuse, so moved from Tucson, AZ to Peoria, IL with my family of 5. The only way I could retain any sanity in that decision was to dream about riverboats. Peoria is known as “River City”, and is situated on the Illinois River about between Chicago (It's source) and St. Louis, where it meets the Mississippi after about 400 miles of twisting. Being a family guy, I needed a boat that will do everything and cost nothing. No problem, “Just design one yourself”, he said.
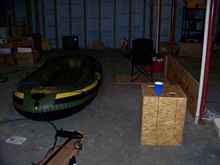
I bought a Sevylor Fishhunter inflatable boat, a Walmart 115 A*hr deep cycle battery, and a Minn-Kota Endura 40 trolling motor and did some river boating for about $350. The boat was 11' 6” long and about 54” wide on the outside, but only about 6' long and 2' wide on the inside. I took it out on the river several times and had a ball. It seemed about the right size for one person on the outside. (The date stamps have been wrong on all my photos so far, so please ignore them.)
|
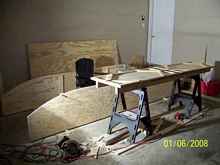
Mocking up Dr. Meg the next winter in my basement. |
The next winter, I set up a bunch of boards in my basement, and mocked-up several designs for real boats. I decided that the boat should fit in the back of my short bed pickup truck since I have trailerphobia. A rectangle four feet wide and twelve feet long seemed luxuriously comfortable for one person. My wife and kids were not interested in boating, so this decision became firm. I also wanted a design for using my Minn-Kota and battery that I just bought. I had a new rebuilt Chrysler alternator that I thought could be used with a small gas engine to give unlimited range to my trolling motor/battery combination.
I spent some time searching the internet for similar boxy boats. I found the “Bolger Brick” and PDR variations to be my inspiration! The “Lewis Chugger” was exactly the same size, but had a square stern. The Malachek “Harmonica” is another similar concept, but a little too big and heavy. I wanted a boat that would run with low trolling motor power, so wanted the stern of the boat out of the water like the Brick, but with a flat bottom for my sleeping comfort, like the Harmonica or Chugger. I wanted the comfort of a 48 inch tall cabin like Chugger and Harmonica, but without the wind drag, top-heaviness and built in furniture, so decided to make the cockpit to accommodate a sliding cabin top that could be lowered flush to the decks. I decided to use the bow curves from the Lewis Chugger on both my bow and stern, making the boat symmetrical fore to aft to guarantee I won't drag my stern in the water making waves even when I sit near the rear in heavy seas.
|
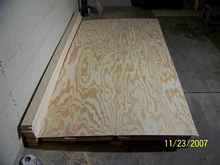
Four sheets of 5/16 BC plywood and 16 eight foot two by four pine boards that were to become Dr. Meg. |
I started by making the two side panels for the boat. I drew the Lewis curves using a six foot long board with a nail in one end and a pencil hole in the other.
|
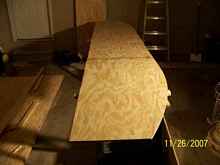
I made a butt-joint on the sheeting for both side panels using a 1 by 4 backing board and PL Premium glue. All joints were glued with PL Premium and screwed with galvanized steel screws. |
|
The chine logs and stiffeners were 1 X 2 pine. Notice that I cheated and cut the curves in 1 X 4's with my jigsaw instead of doing any board-bending. |
After building both side panels, I clamped them together and ground them down identically using a belt sander to be sure they were the same shape.
|
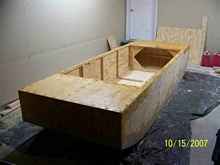
The side panels were set up, and the two bulkheads were constructed using 1 X 2 bracing. Now, I could assemble these four pieces together and have the basic boat shape. |
I built frames for the bow and stern panels, and glued and screwed them in place. I built a framework for the floor using 2 X 2 fir, and a 1 X 2 over a 1 X 4 for the center rib where the two bottom plywood sheets would attach together.
|
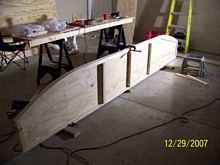
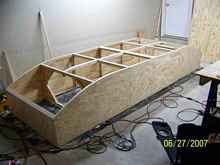
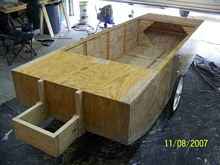
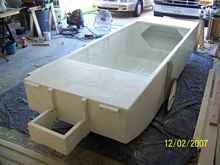
The side panels are all finished and the open beam floor stiffeners are in place. |
The side panels are all finished and the open beam floor stiffeners are in place. This makes the floor stiff enough to be walked on with the boat on blocks, or when camping on the trailer. I have hatch covers that dog-down to the hexagonal hatch openings to form water-tight storage compartments under the fore and aft decks. I wanted the bracing exposed on the inside, so I can push my feet against the ribs when rowing.
|
This is my method of bending the skins using big turnbuckles and 2 X 4s. |
This is my method of bending the skins using big turnbuckles and 2 X 4s. The two bottom sheets join at the center of the bottom. It was still difficult to bend the wood this much, about at it's limit. I had to drive at least a dozen #10 screws 2 ½ long on the plywood end to get it to hold position.
|
With the bottom skins glued and screwed, the countersunk #6 screw holes were filled with wood flour/epoxy, sanded flush, and 12 oz 6 inch wide biaxial tape was epoxied to the critical joints. |
|
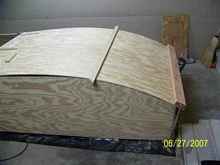
After righting, the fore and aft decks were fabricated and attached. It looks like a real boat at last, and kinda nice in natural wood finish. Maybe I won't paint it for a while. |
I happened across a folding 1967 3 HP Evinrude Lightwin that was in great shape for $300, and snapped it up so fast it hurt. I procrastinated for nearly a month figuring out how to make an engine mount for it, since I designed the boat for a 36 inch shaft trolling motor. I wound up with a sailboat style mount that overhung the transom by 14 inches, so the motor can tilt up fully.
I also built the retractable landing gear using 2 X 2 X 1/8 square aluminum tubing and 20 inch #150 rated garden cart wheels. The boat's framing was designed to have strong points for this attachment. This makes it hand-launch able like a big wheel barrow.
|
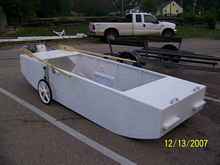
Then decks and sides were glassed, then the retractable landing gear and engine mount were mounted. It makes it really easy to move around now. |
An Illinois Department of Natural Resources Inspector stopped by and inspected the boat at this time in order to file needed paperwork to get legal title and the initial registration. He told me it looked better than most, which was a nice way of saying it. I left the surface rough on purpose.
Then I had to make a critical decision on how to paint the boat. I couldn't decide on either the color or the material to use. I wound up using a high quality ultra white satin finish latex house-paint, which has the desired degree of funkiness, but took a very long time to dry fully. Next time, I'll use white latex porch and deck paint or white pigment in the epoxy. I sanded the bottom very smooth to try and get maximum speed, but left the rest textured for better anti-slip behavior. I can't believe I have a white boat. I can always paint it some color later, like maybe light blue.
|
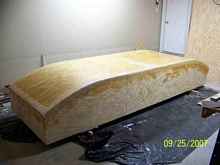
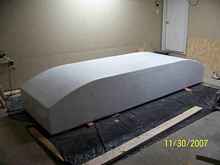
I removed the landing gear and engine mount and painted the entire bottom. It took nearly a week to dry in July 2008. The date stamps have been wrong on all my photos so far, so please ignore them. |
|
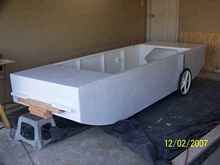
Turned upright, I painted the inside and decks the same way, and reinstalled the landing gear. I mounted blocks on the nose to catch under the front lip of my pickup truck bed to hold it in place. |
|
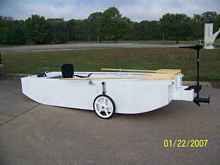
This is the rear view of the finish-painted boat. |
After another few days drying, we were ready for our first shake down cruise!
|
Just prior to her maiden voyage at the Chilicothe Boat Ramps with oars and evinrude mounted. |
That morning, it was a foggy as pea soup. After the fog lifted, I cruised 6 miles north to Lacon, Illinois and then returned to the Chilicothe ramp. It was a very successful voyage!
|
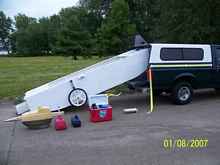
This is what it looks like loading the boat into my pickup truck after an outing. |
Note the fiberglass case that hold the Evinrude 3. Believe me, the boat barely fit, and the fact that I could self launch this #250 boat says how dedicated, strong and stupid I was. I was diagnosed with “anti-traileritis a few months later. Also note the yellow belt around my pickup bed that I used as a boat retainer. Yes, it can be done.
|
This was first outing using the trolling motor. |
At this time, the battery was just sitting on the floor. I am also launching at “Galena Marina” which has no other boats being launched, so it's like my own personal boat ramp. It's so shallow here (about 5 inches) that nobody can launch (except for me, yeah!). After I installed the battery permanently, and added an electrical system, the boat was too heavy for me to load into my pickup, so I had to build a trailer. The Harbor Freight trailer was the right size and cost for this project.
The next summer, I finished modifying the Harbor Freight Boat Trailer, finished the electrical system, and built my genset. I used a “PowerPro 2.5 HP” engine with a six inch cast iron pulley to turn my 60 A 1960 Chrysler alternator. My engine actually produces only 1 to 1.5 HP at between 2000 and 3000 rpm s, which are the limits of the governor. The alternator does not have an internal regulator. I use a 12 Ohm 50 Watt rheostat to adjust the field current to give me between 15 and 45 amps current. With it, I can run my trolling motor at full speed for a 3.7 mph cruise speed and charge the battery at 10 Amps. This gives me great range burning only about 1.5 pints of gasoline per hour, for a fuel economy of 22 mpg. Two five gallon gas cans will give 220 miles range. I can also cruise for more than 2 hours without running the generator, which makes the wildlife more comfortable. I have tons of electricity available on my little boat, and have any many electrical and electronic accessories.
I also fabricated a folding summer canopy top instead of the hard top I had planned. I didn't have time this summer to finish my sliding hard top, and I was in a hurry to get back in the water.
|
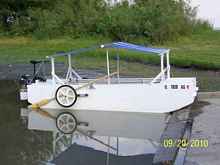
Dr. Meg with her luxurious blue poly summer canopy and full hybrid electric drive. |
The battery is mounted under the bow. Note the sophisticated rope steering system for the trolling motor. This was intended to be temporary, but I liked it so much it became permanent.
|
The Dr. Meg on her customized Harbor Freight trailer. |
The high current electrical connectors on the stern are 1 inch long ¼ inch brass bolts with brass wing nuts. I'm turning the alternator the “wrong way” to reduce the genset size, but it still cools properly. The genset weight 38 lbs. The date is correct.
Next spring, I'll finish the hard top, and take a long river trip over vacation. The boat is designed for comfortable camping and extended cruising. I have dual identical trolling motors for redundancy and emergency power. It's also very comfortable to just sit in and relax. So far, most of my piloting time has been in my garage, but with this project completion, adventure awaits.

|