|
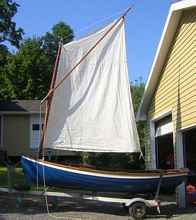
The Whaleboat Sailing Rig
Sails were often used in the traditional whale fishery, generally
sloop rigged; most were sprits and lugs, with the occasional gaffer.
Using the sail plan data from Willet Ansel's book, the total surface
areas varied from 100 sq ft to over 350, with mainsails in the
200-300 sq ft range. The masts were 20+ feet. The lead (center
of lateral resistance (CLR vs center of sail vector, eg center
of effort (CE)) was near zero in all the plans I measured.
 |
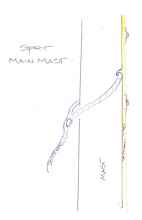
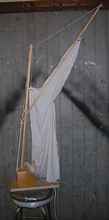
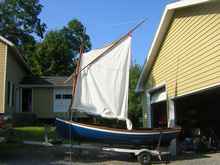
Historic sprit sloop |
I worried that the size of the masts and the dimensions of the
sloop mainsail would be too much for your average 21st century
week-end whaler, and decided to divide it up into a ketch. The
initial inspiration for this was Pete Culler's article on cat
ketches, with information added from Phil Bolger's "101 sailing
plans", and especially Tom Jackson's wonderful article about
designing a rig for his boat in Woodenboat 202. The advantage
of the ketch is that each sail is smaller, and the masts and spars
are shorter; setting the rig up in the water is easier, and sheet
tension is less overall. My spar length was set at 16' max , based
on my available wood hoard. The sail division also allows for
spreading the effort along the length of the hull and, thus decreasing
the heeling force. Plus the mizzen could allow for boosting this
long straight hull thru a tack, riding to while reefing the main,
sitting at anchor, etc.
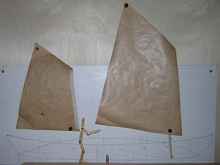
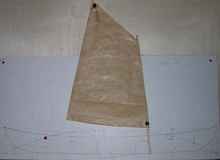
When I started this process a year ago I was drawn to a sprit
rig. I have a Catspaw that I have sailed for twenty years and
I love the sprit. I drew up an initial plan and pinned it to the
wall while the hull was building.
 |
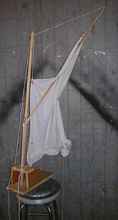
Ketch alternative |
Now and again I would return to consider it and became increasingly
concerned about the trouble the main (at 120 sq ft) would cause
during reefing. Sprits are simple, powerful and big for their
spar length, but they are not easy to reef. The Catspaw was enough
trouble at 60 sq ft; what would twice that area be like?
So enter the season of doubt. With the scale drawing on masonite
and a big roll of brown paper I made enough sail models to paper
a modest living room. With these models I was able to see the
sheet leads and spar length and to assess the CE; Shallow man
that I am, I was also looking for a certain rakish air, something
to strike fear into my intended prey: "petrolphagia annoyus",
the jet ski. I considered a gaff. but for the whaleboat the 16
ft mast would not allow for the enough surface area, and making
the sail the same size would require a 20+ mast and shrouds. How
about gunter?: Phil doesn't like them, which is enough for me.
The mast height issue is resolved but he feels they are inefficient
and prone to jam. The main contender is the lugger in various
forms. The lugs are efficient, relatively simple, easier to reef
and control. I like the way the dipping lug looks but did not
want the trouble of dipping on each tack. The standing lug just
looked funny to me with its forward canting luff. Phil likes the
balanced lug, which he describes as self trimming, since the boom
doesn't cock up downwind and the peak doesn't twist off. They
are safe on a jibe and have better drive than the standing lug.
They bundle up nice (like a sprit) for on-board storage. On the
other hand they are not trouble free: the yard comes down first
when the halyard is eased and this is a big spar (eg think hard
hat here). The boom may trip the boat if it heels too far in a
squall, and it does not allow for sail overlap. I drew up a number
of sail plans for the balanced lug.
 |
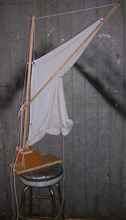
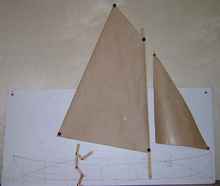
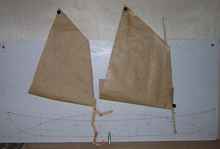
Balanced lug 1 : Bolger proportions |
 |
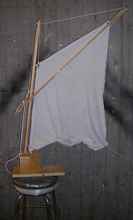
Balanced lug 2: Oughtred design |
The balanced rigs make sense, especially vis reefing and downwind
shape but the mast is taller for the same surface area, and the
mizzen has to be moved back to thwart 5 (and honestly I just didn't
care for the way it looked).
So back to the sprit; I like the overlap of the main and mizzen
and wanted to keep it. This allows the mizzen to seat on the 4th
thwart and the main to be boomless. This boomless sail goes out
of shape downwind but has good power and more importantly allows
for brailing (more later on this).
 |
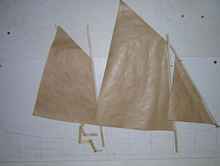
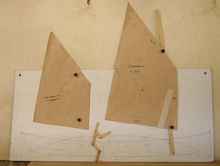
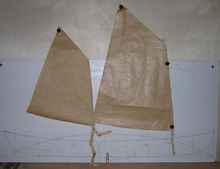
Ketch 2: reefed main shown overlaid |
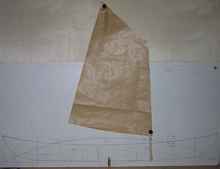
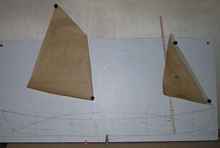
Between photo 2 and 5 there are small differences: the mizzen
I made slightly smaller to move the CE forward, the peaks are
slightly lower to bring the snotter within easier reach.
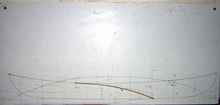
Calculating Sheet Leads
Would this long narrow hull allow effective sheeting of a loose
footed main? Using the top down half hull view on the scale masonite
drawing, I bent a batten to find the position of the the clew
for the main and jib 10 degrees off the center line.
 |
Main and jib curves |
Then using the side view, these points, marked with red thumb
tacks along the sheer, show the sheet position with the clew angle
bisected; both fall in good position on the plan of the hull.
 |
Clew sheet leads |
So far so good. The same was done with the mainsail moved to
the 2nd thwart.
 |
Main curve at aft step |
 |
Aft sheet lead |
This worked out pretty well too. The steps in the reefing process
for this ketch plan are shown in the next several photos. In each
one there is a metal bolt that indicates the CLR (center of lateral
resistance) and an orange thumb tack the shows the CE (center
of sail effort). The calculations for CLR and CE were done using
the methods in Dave Nichols book. On the masonite the CE of the
individual sails can be marked down (and erased, and marked down,
etc, etc.), and then the combination figured.
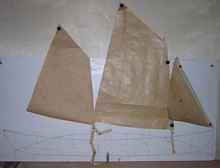 |
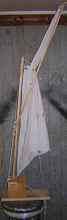
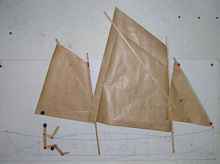
Full sail |
 |
Jib furled |
 |
Main reefed |
 |
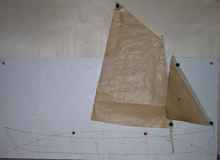
Main to aft step |
 |
Mizzen to aft step |
 |
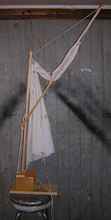
Mizzen and jib alone |
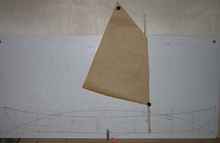
In light air with all three sails up (full sail picture above),
the CE leads the CLR by about 6 %. The total surface area is 225.
As the wind increases the first reef is dousing the jib (Jib furled
above); lead is 0, area is 190. Second reef is with the main reefed
(main reefed above); lead is -3% , area 160 . Third reef (main
to aft step above) full main moves back to second position and
mizzen is struck ;lead 0 , area 120. Fourth reef mizzen alone
at second position (mizzen and jib alone above); lead +3 area
70.
As an alternative, if all sails were up and it started to blow,
the loose main could be brailed, leaving mizzen and jib in configuration
of photo 15 (P15 sprit 6; lead -10 and sq 105); In this setting
the boat would be head to the wind and riding snug. Of note, Phil
states that the lead on long narrow hulls like a whaleboat is
relatively less important than on modern boats, eg fin keelers.
He also feels that sprits in particular tend to have more weather
helm than CE calculations would suggest, so recommends moving
them forward. I'm taking a leap of faith here. I could decrease
the rake of the masts to move CE forward but then the rakishness
suffers.
Reefing
As I said earlier,the sprit is wonderful for power and simplicity
but reefing is not among its virtues. So what to do about the
big main? Pete feels that once they get to about 16' sprit length
they can be too unwieldy to be practical. In the proposed sprit
ketch design getting at the snottier would involve standing on
the the thwart to bring it in reach; volunteers? I worried enough
about this to start fiddling with ways to make it easier. For
example, if it could be set up with the sail in a track (or on
toggled robands as in the Catspaw) and arranged so that the snotter
did not have to be moved in reefing, it would be relatively straightforward.
If the sprit is to remain fixed, the peak out haul has to be adjustable
and the sail has to lower without fouling the snotter. In a previous
article I proposed the snottier could rest on a bar athwart the
mast and leave the luff of the sail separate; one of my senior
sea-dog advisors gave me just enough of a look to have me drop
this idea as unseaworthy. Here's an alternative; the snottier
encircles the mast under the sail track.
The next set of photos shows a 1/4 scale model to test the ideas.
The sail is assumed to be in a track. Two other requirements are
that the brailing line is attached to the sail and not to the
mast, and that the sprit has a "spritstay" from the
mast to keep it from capsizing. (The more historical method is
to have a sort of halyard that attaches to the upper third of
the sprit, holding it up independent of the sail. With the sprit
freely supported like this and the sail in a track, the sail can
be lowered and removed with the sprit standing.) The photos show
the sequence of events in reefing.
|
1/4 scale sprit rig : full |
The brailing line can also serve to make it easier to wrap the
sail up in a bundle.
I then did the same process on the Catspaw: photos 23 and 24
show the shape of the final stages full and reefed. the peak outhaul
is attached to a ring that encircles the sprit.
 |
Catspaw reefed sail |
I have to wonder if it wouldn't be simpler just to brail the
main and drop it into the boat to reef it in relative comfort.
Next time, competing the hull.
*****

|