
 Custom Search
|
|
| sails |
| plans |
| epoxy |
| rope/line |
| hardware |
| canoe/Kayak |
| sailmaking |
| materials |
| models |
| media |
| tools |
| gear |
 |
 |
| join |
| home |
| indexes |
| classifieds |
| calendar |
| archives |
| about |
| links |
| Join Duckworks Get free newsletter Comment on articles CLICK HERE |
|
|
| August Treasure Chest |
Send
items to chuck.leinweber@gmail.com for inclusion here next month. |
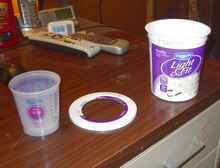
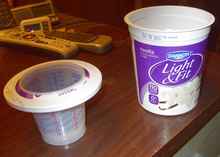
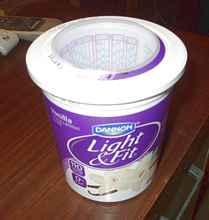
PlywoodJust went with Mike to pick up a big stack of marine ply in Houston. I will certify all I saw and heard and read. OK, it is an old business and not in good neighborhood now but that has grown up around them. It doesn't look very big from street but it is multiple buildings and go on and on. They have tons of inventory and it is very organized and neatly maintained, very clean. (I have been in more wood warehouses than most people probably.) We phoned in an order and they had it pulled and ready for us waiting, even though we were a few days early to pick it up. We drove in, Mike got out, I waited in truck to go where we had to. He came back and I asked where we moved to load it? It was already on truck! So, great service and beautiful wood. Mike is still waxing admiration for perfect wood. Prices for what we got, Hydrotek Meranti, 1/4 inch is $45, 3/8 inch is $63 and 1/2 inches $85, 5/8 inch is $105, 3/4 inch is $125. (These are given in mm sizes plus the closest equivalent to inches.) They have nothing smaller or larger shown.) There is a discount for quantity orders of 10-20-40 pieces per size/item that ranges from 5%-10%-15%. This is the middle grade, Aquatek is the least cost, starts at $40, Okume starts at $79. You can call them at 713-686-6178 M-F 7:30-5:00 Sat-8:30-12:00 They will mail you a total product list with sizes and prices. Or you can talk to them over phone. Jackie Monies Cooling ResinI made a simple little "fool-proof" thing from a big yogurt container (32 oz.) with a perfectly round hole (traced around a Campbell's soup can bottom on the middle of the lid) large enough to accommodate an "EZ-Mix No. 7008" paint mixing cup I got several of at a big paint store. The mixing cup (7 oz.) has a flange at it's top that "snaps" into place (when the hole is cut just the right size) when the cup is lowered into the hole in the yogurt container top.... with the yogurt container filled about half full of cold water from the refrigerator... no ice. It's completely spill-proof unless you totally knock it over. Throw away the old mixing cup after and re-use the yogurt cup and the lid with the hole.
It really greatly extends working time of the resin... the cold water absorbs all the heat of the initial reaction. Ray Whitney Mast Building
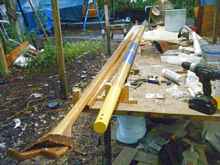
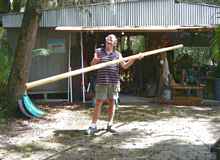
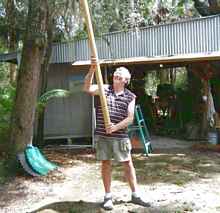
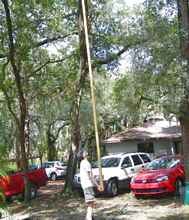
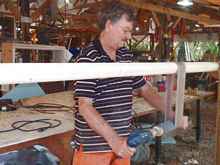
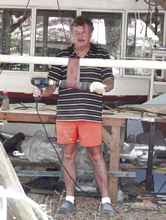
It's been a while since I've made a mast so when Peter the Plumber said he wanted to swap out his oak tree for a better mast I jumped at the chance. Wally had just finished the yellow one so I had a refresher on how to do it; mine is the bright one. Most of you think it's a big deal to make a mast for a small boat so I'll tell you the easy way to make one of these sixteen footers that are three inches at the bottom tapering to two at the top. First go to Lowes or Home Depot and pick out two sixteen foot "whitewood" 2x4's. Not yellow pine or cedar or fir, just the cheap stuff. Pick out ones with the smallest knots and straight. They cost about $6 each and are light. Lay them on your bench and route a one inch half circle down the middle of each one about two feet from each end. Get your chalk line and snap lines angling from three inches up to two inches at the other end; get out your circular saw and cut the line. Mix up some epoxy with a little silica to thicken it up some and smear it on both halves and clamp the hell out of the two halves. So far this has taken you about two hours and no super human skill. The next day you get your grinder and smooth off the hard epoxy that oozed out the seam then snap lines on that side. The bottom is already three inches so go from there to the two inches at the top. Saw the line leaving it all a little big. Set your saw to 45 degrees and eyeball off some of the square sides. Don't worry about getting this perfect, the next step takes care of that. Now the fun part; get your power planer out and go up and down the long stick for a while to get it half way shaped. Then, I can't believe I'm saying this, get your long hand plan out (I don't own one but Wally does ) and make a bunch of passes to get the humps out. Now for the sanding. go get a wooden rolling pin, pull off one end and put in a big screw so that end won't turn, take a bicycle inner tube wrap it around the pin and staple the ends. Chuck it up in your drill, turn a belt sander belt inside out and go to town. It'll be smooth and slick in about an hour once you get the hang of it. Like everything else there is a learning curve. That's it except for the finish. I wrapped the bottom with a couple turns of 9 ounce 60 inch wide cloth and then put two coats of uv resistant epoxy on the whole thing. You can see how heavy it turned out. I can hold it straight out with one hand and Steve is balancing it with three fingers. It weights about 15 pounds and will turn your boat over before it'll break. The only ones ever to break were the ones some dumb ass backed under tree limbs while backing down for a beach launch somewhere. Go for it, it really is fun and we've found these to be stronger and stiffer for masts this size than birds mouth masts made from fir. The total cost will set you back about $20. https://www.youtube.com/creativelenna Dave Lucas Boatworks and Happy Hour Club GlueTo spread my TB2 glue evenly on the parts I cleaned out an old Syrup bottle with the snap on top and poured TB2 in that.... When opened I can easily apply the glue and snap the lid back down for a tight seal. Chief Redelk DowelsWith scarfed gunwales you can cross pin the scarf with dowels. It keeps it from sliding apart during glue up/clamping, it provides just a bit more surface area for gluing, it provides some glue area that is stressed in shear rather than tension... and it looks darn nice. Don't worry about putting the dowels in perfectly straight. In fact, if you drill slightly undersize and install one at a time (drill, pound dowel in, drill, pound dowel in...) at all kinds of whacky angles the joint will stay together tightly with no glue. Think about it. Draw the scarfed pieces on paper, then put two lines (dowels) through it such that the dowels form say a 15 degree angle. How is it going to pull apart? Something has to give in order for it to do so. Last but not least, doweled joints are historically suitable to the ancient skin on frame technique. See how this guy dowels everything without glue: https://www.instructables.com/id/Build-a-Greenland-Kayak Seth |
To comment on Duckworks articles, please visit our forum
|