 Custom Search
|
|
| sails |
| plans |
| epoxy |
| rope/line |
| hardware |
| canoe/Kayak |
| sailmaking |
| materials |
| models |
| media |
| tools |
| gear |
 |
 |
| join |
| home |
| indexes |
| classifieds |
| calendar |
| archives |
| about |
| links |
| Join Duckworks Get free newsletter Comment on articles CLICK HERE |
|
|
| November Treasure Chest |
Send
items to chuck.leinweber@gmail.com for inclusion here next month. |
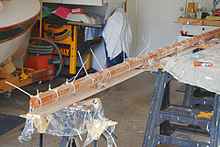
Birdsmouth ClampingI glued up my birdsmouth mast with System 3 T88 using zip ties.
They also work great for dry fitting the various components. Bill ***** I used hose clamps and epoxy - it was a mission to get it together but worked well. I had a couple of semicircular plywood cradles supporting it until it was clamped up. I did mine in two halves by putting plastic film across the middle after getting the first four staves in place. Then I fitted a couple of wooden blocks inside to screw into. It also allowed me to make the end plugs more accurately I think. Jim ***** I used pipe, cut in half the, long way, as a cradle, and pieces of dowels laid in to support the arch. Paul ***** What works for me is to take a 6" or so long piece of PVC pipe just a smidgen larger than the inside diameter of the finished birdmouth at about the midpoint or thirdpoint of spar (largest diameter). With the staves bungied to the piece of pipe, it is easy to start "zipping up" the staves in both directions. Once both ends are zipped up it's easy to loosen the bungie at the pipe and pull it out to finish clamping together. I usually use homemade toggles with heavy rubber bands and pieces of dowel, Already have the dowels and rubber bands are usually good for a time or two. Skip ***** Skip's version is similar; mine's a little easier, imo. The 'trick' is [I think] to use a cylindrical former and some tape as follows: Try a dry run and see for yourself. It really is easy. Derek
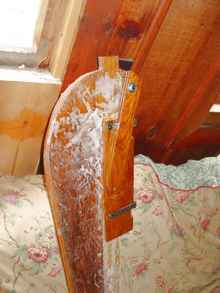
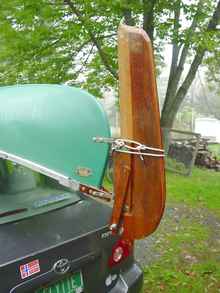
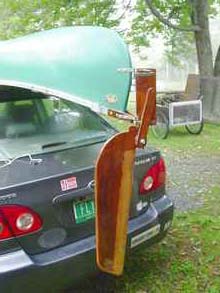
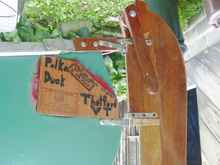
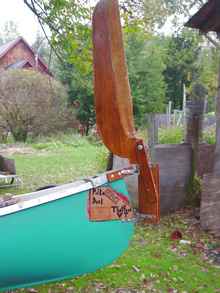
RudderI built a rudder for my canoe as a first step toward building Michael Storer's Drop In Outriggers. I got the out rigger plans from you. The only photo of the outriggers I've seen is at Mik's site.
I ground out the below water shape of a sailboard's daggerboard using a belt sander on two layers of 4mm marine plywood epoxied together then fiberglassed & sanded a number of times. Here is it on the canoe ready for its next dunking.
The rudder stays put perfectly at paddling speeds wedged into the holder. I haven't gotten the release cleat I got from you to let go quickly enough so when I sail it, I'll probably tie the rudder into its holder with a piece of string that would break when I run into shore with the rudder down. I don't like being stuck on the tiller so I've got a yoke with two rudder lines. I've taken a couple of trips where the passenger steered from the bow seat - not usual for a canoe. An unplanned but highly appreciated advantage of the design is that the rudder will stay up on its own for launching or if I need to paddle the canoe stern first.
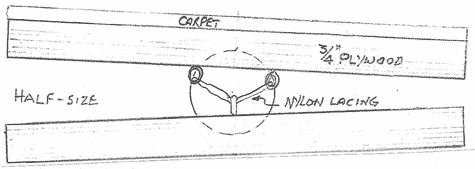
Finally when I got the rudder on I decided the canoe was a new boat. I painted her a shade of blue called "Greensleeves" and glued a hillbilly nameplate to her made of Lloyds Registered plywood. Besides her name and homeport, she carries the family motto of my wife's coal mining forebearers, "Onward if I am able" and a line of song. "Oh you New York Ducks, Can't you dance the polka." Tim Ferguson Golf-Ball-Bearings Make Handy Universal JointsWhen adapting a general-purpose trailer to accommodate your treasured small boat you want the surface of the supporting pads to exactly match the angle of the surface of your boat's bottom. You can accomplish that end by employing golf balls as bearings.
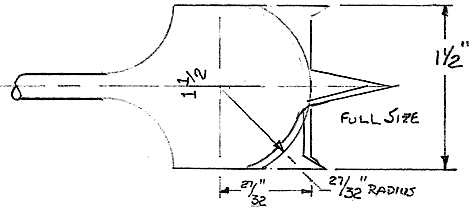
By making a precisely-formed, part-spherical depression in two opposing pieces of wood, a ball will fit in the depressions and allow the angle to adjust to the boat's hull. Pads mounted this way even follow the contour of the hull as the boat is slid or rolled on or off the trailer. To prevent the top piece from separating from the bottom when the boat is not on the trailer, the parts are laced together, using screw eyes and strong string. Three screw eyes in each of the pieces serves the purpose. The only tricky part of making these swiveled supports is forming the depressions. A cutter can be quite easily made from a 1 1/2" spade bit (about $8). Cover each side of the cutter with masking tape so you can make pencil marks on it. Locate a center-point 17/32" back from the approximate base of the point. From this new center, using a radius of 27/32", draw the semicircular profile of the new cutter blade. Draw the curve on the other side as well. You'll need these for grinding the cutter to shape. Using your bench grinder, slowly grind the corners back toward the new, curved line, angling the blade so as to put on it a cutting bevel on each side, similar to the bevel you are grinding off. As you hold the spade in front of you, the bevel should be visible on the right-hand side and invisible on the left-hand side, because it's on the back of the left hand side as you look at it. lf you get the piece too hot you may burn the masking tape and cause the curved lines to disappear.
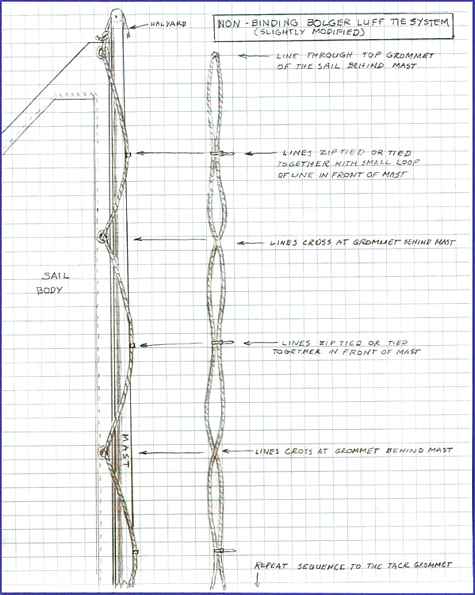
The diameter of a golf ball is just under 1-11/16" (actually 1.84"). lf you penetrate the wood parts to a depth of 3/8", there will be about 15/16" of the ball visible when the parts are assembled. lf the two wood components are 9" diameter, there will be about 12 degrees of movement from parallel in any direction, more if the plates are smaller and less if the plates are larger. Garry Osborn Painted Part CuringI've had some luck with heat curing small painted parts. I built a box, put two 60 watt lightbulbs and the parts inside. It heated up to about 120 degrees and they hardened up nicely in about a day. For a boat, you might build a tarp tent around it and put a space heater in there. Or, getting a bit late in the year for this now, leave it parked it in a closed up garage for several sunny days. If you're inclined to try this, use your brain and don't create a fire hazard. I put my light box out in the middle of the lawn for the first 4 hours or so to be sure it wasn't going to go up in flames and take my garage with it. Seth Luff Tie
I've had this diagram on my website for some time, but I'm not certain everyone is aware of this simple system that Phil Bolger advocated. If you want to be more traditional, you can substitute robands of 1/8" Kevlar core line tied in a square knot in place of the zip ties. However, the ties have to be very tight for the system to work consistently well. https://www.polysail.com/lufftie.htm Dave Gray Sail OklahomaThese two tips were spotted at Sail Oklahoma.
In above, Frank shows a wood wrench that you can make out of a scrap of ply that is sturdy enough to tighten the nut on a kickup rudder or leeboard.
In above, Paul explains that a squirting pool toy can make a good bailing pump for a small boat. Paul says it will get into small spaces between dry bags or other gear. Chuck |

To comment on Duckworks articles, please visit our forum
|