
 Custom Search
|
|
| sails |
| plans |
| epoxy |
| rope/line |
| hardware |
| canoe/Kayak |
| sailmaking |
| materials |
| models |
| media |
| tools |
| gear |
 |
 |
| join |
| home |
| indexes |
| classifieds |
| calendar |
| archives |
| about |
| links |
| Join Duckworks Get free newsletter Comment on articles CLICK HERE |
|
|
| Skylark's Dolly |
by Ralph Woodard - Mt. View, California - USA |
| I built and started sailing my Skylark 6 in 2006 and never really thought about building a dolly for it until recently. Since the hull only weighs 38 pounds it's not a big deal to carry it between the car and the launch site. However, without a dolly it meant several trips between the car and launch site and it always seemed like I'd get ready to get into the boat when I'd realize I'd forgotten something so it was back to the car one more time.
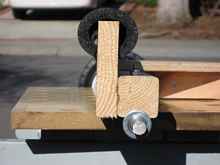
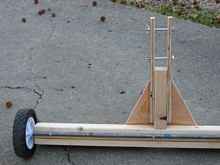
Since I didn't have any plans, I made it up as I went along. The description below is from memory and looking at the dolly as I'm writing. The axle The first step was to choose what size wheel to use because this would determine how high off the axle the hull needed to be. After a trip to the hardware store I came home with two 6-inch wheels without bearings. The hub is plastic and has a 1/2" hole for the axle, which I also bought. So with a 6-inch wheel I figured a 1x4 inch board would give me enough clearance so glued a 1x4 to a 2x2 that is 30 inches long (30 inches looked about right relative to the beam). To attach the axle to the 2x2, I drilled the axle for #8 machine screws in 3 places, in the center and each end (3 #8 looked about right). Since I didn't have any plans I relied on what "looked right" a lot.
Next I put the wheels on, marked the axle for cotter pins, removed the axle and drilled holes for the cotter pins. Then I cut off any excess axle.
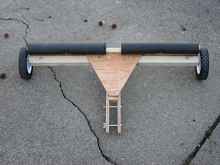
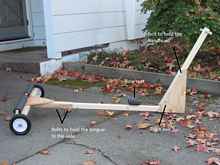
This took a little more head scratching then the axle part. I glued a triangular piece of 1/2" plywood to a 7" long piece of 2x2. I left 1 1/2 inches of the plywood overhanging the back end of the 7" On two sides of the 2x2 I glued a piece of 1/2" plywood, 1 1/2 by 12" to the 7" 2x2 piece. Hopefully this is clear when you looked at the photos. Next I glued the plywood triangle to the top of the 2x2 that the axle is bolted to. And just to be sure I added a few wood screws between the plywood and 2x2. So now I had a tee shaped thing with the top being the axle and wheels, and the leg being the attachment for the tongue. The tongue The tongue is fairly straight forward, the only question is how long? To figure this out I bolted a piece of 2x2, that was much longer than needed, into the tongue attachment, put the boat on the axle and let the bow rest on the tongue. Then I moved the boat back and forth until I had a comfortable tongue weight and said aha, this is the right length. The tongue is bolted to the axle with two 1/4" bolts and wing nuts. The Handle
Now when I'm at the water I assemble the dolly, take the boat off the top of the car and put it on the dolly, put everything I need into the boat, step the mast with sail and walk down to the water.
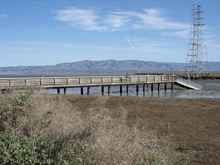
Photo 6 shows the Palo Alto Harbor with its long pier and ramp out to the floating dock. This is one of the places having the dolly is nice.
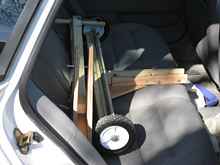
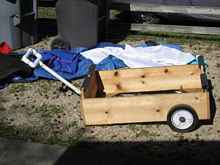
Photo 7 shows the dolly on the back seat of my car. Photo 8 shows the cart I built for storing the boat at home on. Not designed for throwing in the back seat of the car and going sailing. [And now for something completely different...] |
https://members.aceweb.com/rwoodard/index.html
*****
To comment on Duckworks articles, please visit our forum
|

 |