
 Custom Search
|
| sails |
| plans |
| epoxy |
| rope/line |
| hardware |
| canoe/kayak |
| sailmaking |
| materials |
| models |
| media |
| tools |
| gear |

| join |
| home |
| indexes |
| classifieds |
| calendar |
| archives |
| about |
| links |
| Join Duckworks Get free newsletter CLICK HERE |
|
|
| Handliner |
by Steve Chambers - Santa Cruz, California - USA |
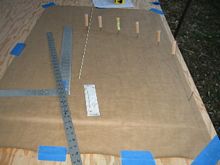
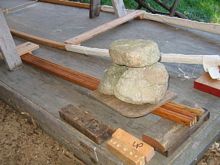
| After I finished the LFH17 about a year ago, there was a need for me to build another Skin on Frame (SOF) rowboat. Following Dave Gentry's idea of building SOF boats to traditional lines offered me a lot of choices. So far I'd built mostly mid-west or east coast boats, so I looked around for a west coast rowboat. I settled on the British Columbia Hubert Evans Handliner. It's 14' 6" LOA X 45" beam X 15" hull depth. Plans for it are offered by the Sunshine Coast Museum and drawn by Larry Westlake. I bought the plans. I decided to use the front quarter of the plans/offsets for a symmetrical hull shape and drew/lofted those lines up full size on brown wrapping paper. This gave me the frame shapes, three pair and one single (center).
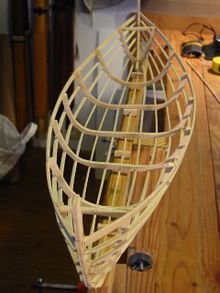
Following the plans I built a 1 1/2" X 12" scale model using the above frame shapes and thin sticks for stringers.
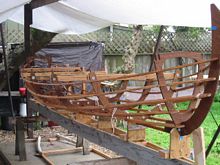
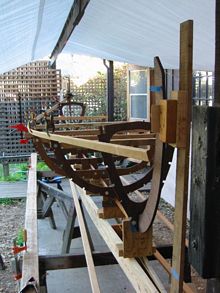
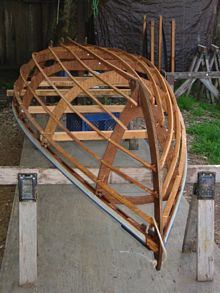
Then began cutting, finishing, and assembling all parts needed for this SOF. Seven frames of 12mm Meranti, two stems of 12mm Meranti, eleven stringers 1/2" X 1" clear -vg- doug. fir, and four 1/2" X 1 1/2" douglas fir (DF) inter/outer wales. I almost began construction using a previously used strong-back (3-2x4' on edge with a 2x6 on top) but saw the very simple but functional Thomasson designed clamshell strong-back which I built and used. Its two 1X6's, in my case 16' long, strongly screwed/bolted together at each end, then spread apart with three "spreaders" and these also solidly screwed together. This "beam" is then attached to two saw horses with small metal angle brackets. I'm very satisfied with it and I will use it again for future SOF rowboats. Jeff "Kudzu" Horton also used this type and has more info about it in his second book "More Fuselage Frame Boats". The pic below shows this strong-back with frame brackets attached and the beginnings of construction. Also, shown is my boat shop platform and its poly tarp roof.
Here's the not very efficient wale bending operation on platform below strong-back. I'm still working on better ways of bending DF pieces with limited success.
After getting the frames and stems attached to brackets and aligned, I thought I'd begin with the outwale but quickly realized there was to much stress generated which was causing distortion. So I attached the stringers instead and lashed them at necessary places as I went along.
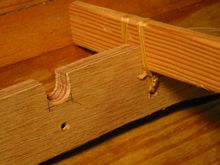
Usually stringers are set flush with the outside face of the frames, but here I tried something different, leaving them proud of frame faces half their width (1/2" in this case). This allowed skin clearance and narrower lighter frames. Here's a test piece.
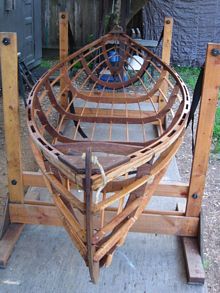
With most of the stringers in place, now was the time to attach wales, beginning with the outer wale. As the 1/2" X 1 1/2" DF had a limited ability to bend, the shear at the bow and stern are less than on the plans. All the stringers, and the wale to frame connections, are lashed with either tan/brown waxed artificial sinew or 100# test black Dacron kite line.
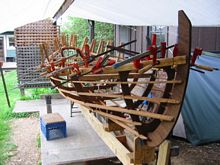
Here's the frame off strong-back and almost completed. Note the temporary cross cauls to keep the frames from collapsing while under construction. I was a bit nervous when removing them that part, or all of the boat, would fold up, but frames barely moved when cauls removed.
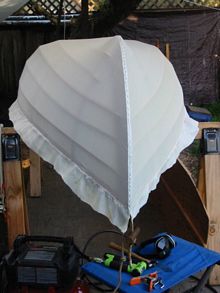
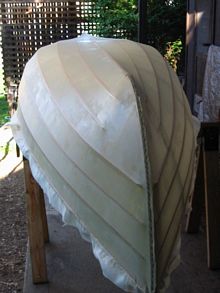
After a few/many adjustments, the frame was ready for skinning with 8 oz Dacron/Polyester from George Dyson. After draping the fabric over the frame, I used 3/8" monel staples driven with a Grex air gun. It was approximately 600 staples used on this SOF. After the stapling was finished, I gently, with a back up iron, tapped in the few proud staples. I used a soldering gun with a flattened tip to melt-cut the fabric to its rough shape. I like to overlap and staple fabric at stems to allow for wooden stem strips.
The first coat of slightly thinned oil based lightly white tinted varnish below. It was very runny so there were inside drips. Then the second and final coats were with unthinned white tinted varnish.
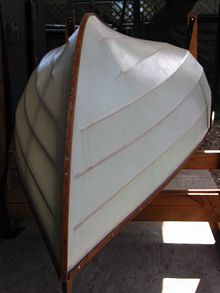
Here the 1/4" X 5/8" rub rails have been attached, plus the 1/4" X 1/2" stem and keel strips. The were bedded with silicone sealant and screwed down with Duckworks SS screws.
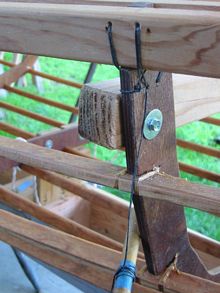
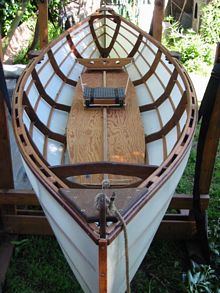
This is just before the first launch and it shows 1/4" DF ply floorboard with a center stiffner strip for my rowing seat box and adjustable stretcher. It also shows the adjustable outboard oar socket brackets. All wood pieces were finished with organic raw linseed oil and Stockholm pine tar and allowed to cure in the sun for many days.
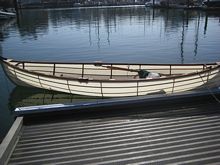
The final weight when pickup topping is around 60 pounds. As there's a set of wheels that strap onto the stern end for moving around. I'm only lifting between 30 and 60 pounds for launching and take out.
A very enjoyable SOF build and a stable fun boat to row. It trims best with the stern slightly down and this is easily done with the seat box I use and/or movable ballast. A few resources I've used in my SOF builds: Building Skin-On-Frame Boats: Building on a Ten-Thousand Year Tradition by Morris, Robert - the price of this book is down to only $100.00 and up, so I borrow it from my local library. Building the Greenland Kayak : A Manual for Its Construction and Use Fuselage Frame Boats: A guide to building skin kayaks and canoes by S. Jeff Horton More Fuselage Frame Boats by S. Jeff Horton. These have both kayak and open boat SOF information. Plus the "More" edition has info on clamshell strong-back. Hilary Russell's SOF canoe book here: www.berkshireboatbuildingschool.org/store.htm And these internet sites:
|

|