|
By Rob Rohde-Szudy - Madison, Wisconsin - USA
The Hamernik
Hull Drain
How to mount a drain
in a thin-bottomed boat
|
|
|
In my article about the Chicagoland
Messabout, I referred to Tom Hamernik
as “the smart one”. Tom is very self-deprecating
about this, but he’s lived up to the title once
again.
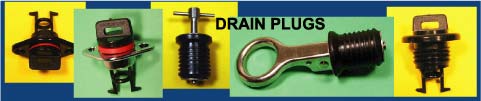
The problem at hand is how to mount a hull drain
in a thin-bottomed boat. Expanding rubber drain plugs
need to have good support over their entire depth.
If you try to insert one in a hole through half-inch
plywood, you’ll be lucky to get it to lock in
place at all. I doubt it would work at all in quarter-inch
ply. Even if it could, in either case the plug would
be sticking below the bottom to collect mud and weeds.
Yet these bottom thicknesses can be found in boats
plenty big enough to herniate a disk or two if you
try to flip them, so dumping the water out isn’t
always an option. My light schooner is a perfect example
at over a quarter ton. Sponging gets old pretty quickly
in a boat that size, especially when you have to sponge
several gallons of freezing cold water during a winter
thaw. (Sure wish I could find where that tarp is leaking…)
And you might want one of these even in a small boat
if it lives on a trailer. It’s a huge pain to
drag it off just to dump some water out. So how to
install this drain with that thin plywood bottom?
The easy approach would be to bore a hole down through
the false keel, providing plenty of wood to support
the plug. Unfortunately the centerline is exactly
where you don’t want the drain. It would never
drain all the water unless the boat were perfectly
level! Practically, the drain needs to be in the corner
that is lowest when your boat is parked for storage.
For me this is the forward port corner of each cockpit,
since I park the trailer with the starboard wheel
slightly elevated. (If I were ever unsure I’d
park it with that wheel on a scrap of lumber.)
But I don’t have any convenient chunk of timber
beneath the bottom plywood at the cockpit corners.
Some powerboats have skids that work nicely, but I
don’t. I could have added a faired section of
skid, but it would increase my draft unnecessarily
and seems inelegant to glue on a tiny bilge keel just
to drain the cockpit.
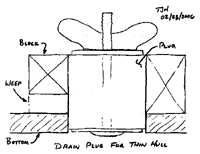
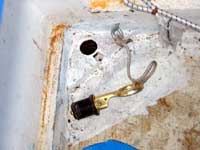
Trust Tom to come up with the elegant solution.
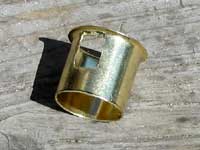
The Hamernik Hull Drain
The plug has to be supported throughout its entire
length, but the water doesn’t have to drain
into that channel at the top. Tom’s method involves
adding a block inside the cockpit and boring a plug
hole through it and the bottom. This supports the
expanding plug. A channel or channels cut in the block
allow water to drain into the vertical plug channel.
The picture is worth 1000 words.
 |
The Hamernik
Hull Drain
(click
images to enlarge) |
|
Some might point out that with a ½”
bottom it might be easier to epoxy a stainless nut
into a hole, then seal it with a regular bolt and
Teflon tape. Or a nylon bolt. Maybe, but I wouldn’t
feel very comfortable installing such a system in
mere ¼” plywood. Furthermore, it is harder
to get that system crammed deep into a corner without
cutting away material we’d rather keep. You
have to get a wrench on it, after all. Tom’s
drain channels can be guided to wherever the hole
needs to be.
Devil in the details
But construction is not as simple as it seems. I
tried test molding some tube assemblies in fiberglass.
It is surprisingly difficult to get the bore of the
drain tube correct. Either the plug doesn’t
want to slip in or it cannot be tensioned. I have
a feeling there is a reason the commercial suppliers
use metal. Back to the drawing board.
It saves a lot of effort to use a $3 commercially
available brass tube, and these have a flange around
the top edge, which helps with strength. We will need
to cut a slot for the water to drain, but it will
be easier to locate that slot after we build the parts
that will surround it.
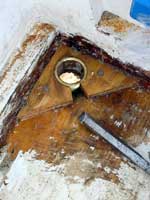
The block
Now we need to fit the wood piece that will support
the drain tube. First we need to know the right thickness.
This depends on the drain plug’s dimensions.
The only part where the plug will actually seal water
out is in the thickness of the bottom. We need at
least two of the plug’s rubber rings compressed
in that space. This might mean a little of the plug’s
brass center rod will protrude below the bottom of
the boat. This should present little trouble in the
water or beaching on sand, but if you beach on concrete
a lot, you might want a plug that is flat on the bottom.
My plug fills a hole about 1” deep. ½”
of that is the bottom, so I needed to add a ½”
thick block inside the hull. I used ½”
plywood because it was easiest. (A ¼”
bottom would probably require about a ¾”block.)
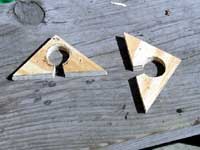
First we fit the piece into the corner where our
drain will go. With a flatiron skiff this is pretty
easy, but it’s not terribly hard with a stitch
and tape boat either. In the age of epoxy, gaps aren’t
bad. Just make sure it’s snug against the bottom
so the tube length is right. I made these by cutting
a 3.5” square of plywood, then cutting it diagonally.
A belt sander did the final fitting.
| The drain
block dry fitted |
|
|
But don’t glue it yet!
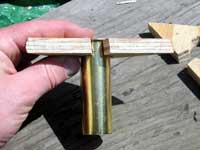
Drain channels
First we need to locate the drain hole. I already
had holes bored in the bottom because of my earlier
experiments. So I traced their location on the bottom
of the blocks. You can make it easier, though, by
just boring from the top. You don’t want this
hole so tight you need to hammer the tube in. Leave
a little space for epoxy. I used a 1-1/8” drill.
Next we mark a 3/8” slot where the water will
drain into the tube and cut it through to the hypotenuse
side of the triangle.
 |
Drain
blocks cut
|
|
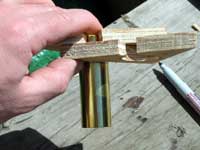
Now we’re ready to nail down our blocks. I
drilled pilot holes in the block for two ¾”
ring nails. Folks with thinner bottoms will have to
do this the other way around and put in screws from
underneath. I wouldn’t try to nail it that way,
as it would surely knock your block out of position.
Drain Tube
Now we need to cut the tube to fit. First we mark
the slot to match the slot in the block.
| Marking the
drain tube |
|
|
Then we use another scrap of plywood (the same thickness
as the boat’s bottom) to mark the cutoff line.
 |
Marking
the cut-off line |
|
| Drain tube
marked |
|
|
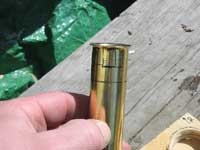
Then we drill the tube along the lines. Drill a little
inside of them and file to the lines. This is quickest
if yo udril a few holes and connect them by snipping
out the intervening metal with a side cutter. A Dremel
or similar tool is helpful in finishing to the lines,
but a file works fine. Finally we hacksaw off the
bottom of the tube and file to the line. Make sure
you smooth all those edges now, since you won’t
be able to later.
 |
Drain
tube finished |
|
Mounting
This step takes a little preparation. Lightly sand
the outside of the tube, and coat the inside of the
tube with a couple coats of automotive paste wax so
it will shed any epoxy you manage to get on it. Finally,
carefully wipe the outside of the tube with acetone
shortly before mixing the epoxy. Don’t let it
take off any of the wax. Finally, slap a piece of
duct tape on the bottom of the boat to cover the hole.
When you mix the epoxy, paint the entire wood block
and hole with unthickened resin. This is also a good
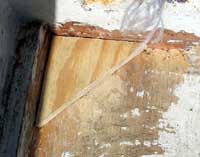
time to glass any limbers you had to make. In many
of these skiffs, the bottom panels are held together
with butt blocks. This get in the way of water draining,
so we need to cut a limber along the chine on the
“downhill” side. It’s usually a
good idea to glass it after the ugly chiseling that’s
required.
| Glassed limber |

|
|
Add thickener to the rest of the resin to get something
between the consistency of mayonnaise and peanut butter.
Butter up the block and nail it in. Then butter up
the inside of the hole and the outside of the tube
and press it into place. But you’ll need a chopstick
or something similar to work the epoxy out of the
channel leading to it. You’ll definitely want
plastic gloves, but I’m assuming you are already
taking appropriate epoxy precautions. Don’t
try to scrape epoxy out of the bottom of the drain
tube. You’ll only scrape away the wax so
it can stick. You might also want to prod the epoxy
with toothpicks to work out any air bubbles. Just
don’t pierce the duct tape.
Important note: Do NOT
use an epoxy filler with FIBERS! They will drag when
you’re trying to shape it in the channel. You
will not be happy. Stick with wood flour or something
similarly non-fibrous. Without fibers I could have
done this in one shot, but with fibers I had to go
back and fill a gap.
 |
Drain
epoxied |
|
I hate spending half the day scraping at epoxy,
so I added heat here to speed up the process. But
check it frequently so it doesn’t get away from
you. An incandescent light bulb up close makes a lot
of heat!
| Heating the
epoxy |
|
|
Once the epoxy reaches “green cure”
we can finish up. This is where it doesn’t sag
anymore, but it is still rubbery. Carefully pull off
the tape and push the epoxy “plug” out
of the tube. Push downward, or you’ll dislodge
the tube. I used a chisel, but I’m sure other
things would work. If it doesn’t want to move,
scrape the epoxy off the bottom of the metal tube.
Then leave the light on it overnight for a fast cure.
 |
Drain
cut out |
|
This is also a good time to add any other fiberglass
you plan to add. I didn’t bother, opting to
paint the whole arrangement with epoxy and call it
done.
When cured hard, a light sanding is needed to remove
the gloss and any “blush” so paint will
stick. You might consider re-waxing the inside of
the tube if you’re messy with paint. Here it
is sanded and painted. The finishing touch is a screweye
and lanyard so we don’t lose the plug.
| Lanyard tied
on |
|
|
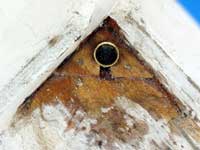
And from below…
 |
From below |
|
The test
With a ½” thick bottom, I have experienced
no leakage. It doesn’t seem to leak even when
I retract the plug by ¼”, which is promising.
The true test will be when someone builds this into
a boat with a ¼” bottom. I think the
plug will have to project a bit, though, to get a
good seal within ¼”. (Maybe Tom will
test this on his Michalak Mixer.)
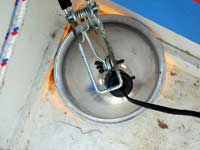
Tom also asked me how fast this drain clears the
cockpit of rainwater. I always tarp the boat, but
I unintentionally tested the draining ability. I’m
told that you only have to back the trailer in with
the plugs out once. I hope that’s true. Here’s
the water running out.
| Water running
out |
|
|
It drains about like a garden hose with no water
pressure. It slows down a lot when the level drops
to where only the small slot is draining water, but
by then you’re in sponging range anyhow. And
obviously you have to be alert to any blockages. Any
little chunk of refuse can plug the small slot, and
leaf can about shut it off completely. Though I suppose
that is no different from any other hull drain. Perhaps
better, since we have a slot and a top hole, and with
any luck at least one of them will be draining. I
would want more drains if I stored the boat uncovered,
but I think that’s a bad idea anyway because
the boat’s bottom turns into forest floor pretty
quickly. And a polytarp cover is cheap and easy to
make.
A caution to the really cheap people
It is tempting to think this can be done even cheaper,
but I bet it can’t. 1” copper plumbing
pipe has an inside diameter larger than 1” and
won’t work with commercial drain plugs. You
probably could make it work by buying rubber stoppers
and tensioning them with a carriage bolt, wingnut
and a couple washers. But I am almost certain this
would cost at least as much as buying ready-made parts
unless you’re a really good scrounger.
Rob Rohde-Szudy
Madison, WI
robrohdeszudy@yahoo.com

Other Articles by Rob Rohde-Szudy:
|