The 9.5 Laura Bay - Part 3
|
|
|
design by Warren D. Messer - Seattle, Washington - USA |
Part
1 - Part
2 - Part
3 - Part
4 - Part
5 - Part
6
Now that the eight side panels and the
stern panel are all joined together to form the finished
hull, the hardest part for me as a designer begins.
I find it easy to work through the hull shaping process
to arrive at the finished design. But I find it hard
trying to figure out what I will do for the interior
layout, or layouts. I've been coming up with several
different ideas as to how the seats, bulkheads, and
such should be arranged with each design. I try to
make the designs appeal to the broadest segment of
home builders as possible, but I'm finding that the
more choices I come up with, the more choices I come
up with.
The Laura Bay gave me a chance to build my movable
center seat option as a way to balance out a small
rowing boat with an uneven load distribution. I found
while rowing the 8ft Nuthatch Pram, that the addition
of an extra person in the stern seat makes the boat
squat way too much in the stern with the standard
side to side middle seat. A third person in the bow
will counter this effect, but I wanted a better solution
than always making sure you had an extra person around.
I changed the middle seat in the Nuthatch to run fore
and aft and it now makes a "T" with the
bow seat. I added an extra set of oarlocks forward
of the original set and now I only have to slide forward
in the seat and move the oarlocks to the forward set
of holders. The "T" seat also helped in
locating the mast partner.
But when I did the calculations for the CLR and
CE, the mast for the Laura Bay was farther aft of
where I wanted the bow seat to stop. I could have
used the "T" seat, but would have lost a
lot of space (leg room and storage) in that area.
I had thought about using a movable seat in the 12ft
Nuthatch and had worked up some rough ideas about
how to do this. I had also worked on a new idea about
incorporating a centerboard trunk into that design
too; which was a modification on the center seat pyramid
I had used on the Hudson Springs Pram. When I saw
where I had to locate the centerboard, and at least
one bulkhead to support it, I decided on putting the
movable seat in the Laura Bay. I added a pyramid centerboard
trunk and designed a removable curved arch for the
upper mast support. The center seat can be moved over
a 12" range to balance the boat for rowing or
left behind when sailing. If the wind dies while sailing,
the centerboard pyramid makes a good seat to row home
with.
With all the "why I did that" out of the
way, we can get on with the rest of the story. There
are three main things to help insure that everything
goes in correctly. The first is that the hull is level
and square. In Part Two, I went on about measuring
from each corner to the bow to make sure the distance
was the same. It doesn't matter what the distance
is, just that they are the same. Remember, your boat
may/will be different than mine through accumulated
measuring differences, but just slightly. If you look
at the photo in Story Two, you can see the two cords
I used to pull the hull into alignment. They are attached
to the upper bow tie wire and one goes to each upper
corner tie wire. I tie a loop near the end of each
cord and use that as my pulling point coming back
from the bow tie wire. On this hull I only had to
pull in on the Port cord to square up the boat.
The second thing is that you made some pencil marks
at each of the one foot station marks along the edges
of each of the hull panels. They are matched pairs
and the station marks reference all the hull panels
to each other. There will be some shifting of the
station lines as the hull panels are wired together
and bend into shape, but the line offsets will be
mirror images of each other on each side. The lines
will give you a visual reference when lining up the
interior bulkheads and such.
The third thing to have done in the original lofting
of the hull panels, was to have made small cuts on
the "upper" edges of the top side panels
at the station lines, with a hacksaw blade or equivalent.
These cuts will now be used as fixed points to line
up with and measure from in order to establish the
positions for all the interior parts of the hull.
They will make sure that things are square with the
centerline of the hull. You also want the interior
parts to be level, but you will have to find new attachment
points for the leveling cords since the tie wires
were removed during the taping process. We will level
the boat again after installing the corner blocks.
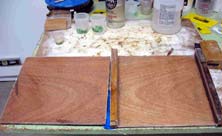
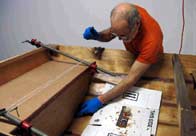
The corner blocks are cut from the same material
as the gunnel wood, unless you laminate up some other
woods for color. I did this with the breasthook, by
using some old scraps of oak and maple flooring I
had laying about. One word of caution is to not cut
all your hardwood into rail material. You will need
blocks. Think ahead. I'm running at about 90% on this
matter. I used a ¾" x 3" x 6"
block for this. You have several angles coming together
here, making cutting out the blocks a thinking game.
There is the vertical angle of the stern panel, the
vertical angle of the side panels and the horizontal
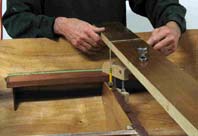
angle between the stern to side panels. The stern
angle is the same on both corner blocks, so I cut
them at one time. Place a board across the tops of
the side panels at the stern and measure the angle
between it and the stern panel. Set your table saw
and cut this angle.(its also listed in the plans,
but still check it on your boat). Measure the angle
between the board and one of the side panels (check
both sides) and set the table saw to this new angle.
I like to measure the horizontal angle between the
side and stern panels and use this angle to set my
sliding miter gage. I then make a test cut close to,
but not on the finish line to check for errors. Then
make the finial cut. Now reverse the angle in the
miter gage and make the cut on the opposite end of
the block. Now cut the block in half and you have
your two corner blocks. You still have to square the
forward outside corner of each block to 90 degrees
with the new side panel edge to match up with the
square aft ends of the inside gunnel rails. The full
and study plan sets go into this and the placement
of the blocks.
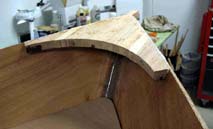
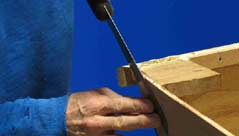
The breasthook is a little more problematic in it's
installation. In my plan sets I have a couple of different
ways to fit it to the hull. With this Laura Bay, I
made the center lamination longer than all the others
so it would stick through a notch in the bow. It looks
good, and gives a little extra meat to attach the
outer rails to at the bow, but was a bear to cut the
bevels to match the side panels, without cutting off
the extended center lamination. If you have a tilting
bandsaw this is no problem. Did I mention that both
sides are continuous curves with a bevel. The easiest
way would be to just level and screw the breasthook
to the hull and fill the gaps with EZ-fillet
and sand smooth. We're Duckworks, we don't do easy.
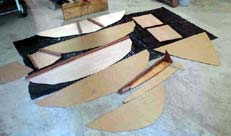
Make up as many cardboard and wood templates as you
need to get this part to fit. It is the visual focus
point of the hull and sets the level of finish for
the whole boat.
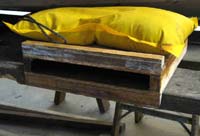
Now its time to level the hull again. Put a couple
of screws in the corner blocks for the tie down cords
or just loop them over the corners as in the photos.
You will cut in the corners once the rails are installed.
Level again at the middle and bow cross braces. Add
screws as holding points or just loop around them.
The cross braces stay in until the rails are installed.
Now comes the beard twiddling period where I walk
around the hull again and again trying to figure out
the real world heights of seats and such. My first
design drawings are only a starting point, and may
or may not be that accurate. I only know where the
centerboard and the mast should be in relation to
each other and to the hull. The mast will come later,
so now the centerboard is king. The centerboard has
it's fore and aft location limits, but it has to be
held in place by something, and that something has
to be sized and placed in the hull, along will all
the supporting structures. The centerboard case fittings
need to be made and fitted to the hull. Some can be
cut and assembled, but some (most) have to be cut,
assembled and fit (edge trimming) to the hull.
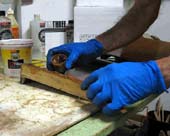
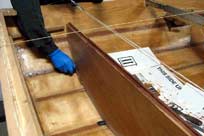
I cut out the centerboard trunk parts and use Gorilla
Glue ® and some stainless screws (removed later)
to attach the two spacers to one of the side panels,
and the top cover support rail to that panel and the
support rail for it's mate. Then the inside of the
"spacer" panel section gets a layer of fiberglass
and two coats of epoxy. The glass goes up the sides
of the spacers and over the top. The other side panel
gets a layer of glass and two coats of epoxy. When
cured, the two spacer blocks each get a buttering
of EZ-fillet to seal and joint the sides together.
Weighted and cured overnight, trimmed the next day.
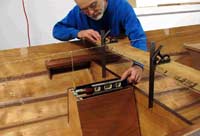
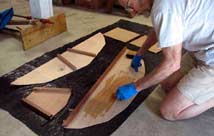
While the CB trunk is curing, I work on the layout
of the middle bulkhead. I know the forward measurement
for the CB and the thickness of the CB trunk spacer.
I use this information to determine where I will mark
the boat from one of the existing section line cut
marks. I then use a giant pair of calipers I made
from scrape 6mm plywood, and a cord held by sticks
and clamps at the panel seams for measuring. I take
these measurements and lay them out on large sheets
of cardboard I get from my friends at EdenSaw Woods.
I use these cardboard cutout templates to determine
fit. If they are correct or need adjustment, I use
those new measurements to layout the plywood. I never
trace off the cardboard mockups. I layout square lines
and measure off the dimensions I just found onto the
plywood. Any adjustments are noted and the drawings
for that part are made later. The plywood is cut and
fit(trimmed to clear the fillets and tape). Reversed
and checked for symmetry. Check the bulkhead for level
against the still level hull????
Once I am happy with the location and fit of the
centerboard bulkhead, its time to line it all up,
mark the hull and cut the CB trunk opening. The centerline
is all important now. The fillet and tape are covering
the seam and I want to make sure the seam is the true
centerline. Stretch a cord tight from the center of
the stern to the bow. Line up a straight edge on the
marks measured from the station line cut marks. Hang
a couple of "bobs" (I use pencil bobs, with
strings jammed into holes drilled in the ends of the
used up erasers, and nuts screwed on the pointed ends
for weight) over the edge and line up the bulkhead
and mark it's location. Line up another "bob"
with an adjustable square, so the square touches the
centerline cord. Mark this location on the top of
the bulkhead. Check the bulkhead for vertical alignment.
This is a relative term as the hull may or may not
be setting on it's waterline(I have an idea where
it might be, but nothing to measure it from). What
you are looking for is a close square (88°- 92°)between
the bulkhead and the CB opening. I use the "bobs"
on top and a small square wood block on the bottom
to determine vertical, and it is very close from boat
to boat. Your eye will rule here.
Attach, and align with a couple of temporary screws,
the partial aft CB bulkhead to the aft end of the
CB trunk housing. Measure and mark the center of the
forward and aft ends of the now "CB trunk assembly".
Clamp the CB trunk assembly to the bulkhead lining
up the centerline marks. Drop a "bob" off
the centerline cord and position the aft end of the
CB trunk assembly to line up. Make any adjustments.
Check the position of the main bulkhead again to see
if it has moved. If everything looks good, check the
bulkhead again for level and square; then mix up some
fillet material for some small jump stitches to attach
the bulkhead. After the jump stitches have cured,
do a full fillet and glass tape on the forward side
only.
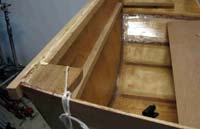
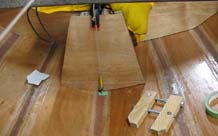
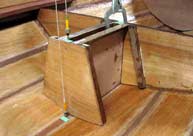
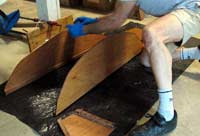
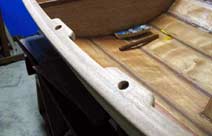
As you can see in the photos there is more to the
CB trunk assembly than I have mentioned. With the
main bulkhead firmly attached, its time to mark and
cut the CB opening in the hull. If everything is still
square, or make it so; then take a pencil and mark
the outline of the CB trunk. Remove the trunk assembly
parts and mark 3/8" inside the side lines you
just made and 1" inside the ends. You are trying
to give yourself some wiggle room here when you make
your cut. You will trim the opening when the boat
is upside down. Coat all the edges with epoxy and
the fore and aft ends of the CB trunk assembly. Clamp
or screw, the assembly back into place and check for
level and square from the centerline again. Put in
a couple of small jump stitches on the partial aft
bulkhead and let cure. In the photo I had to put in
a pusher stick to make it line up. After it cures,
fillet and tape all seams and coat all the trunk area
with a couple of layers of straight mixed epoxy. They
won't see the sun again. Attach the top and side panels,
and be sure to round all edges well for the glass
tape to form to and coat. Fiberglass doesn't/won't
bend around sharp corners.
Determining seat height is and ongoing process.
I try to settle on 12" above the centerline of
the hull for the middle seat. When I was twisting
by beard on this hull, I had placed a small full length
batten inside and marked a couple of height lines
to see what looked good. Once I was happy, I started
my measurements off one of the lines. As I got farther
into fitting the movable seat, things changed, but
not before the stern seat bulkhead was installed.
The new plan drawings have the stern seat bulkhead
¼" shorter in height than hull #1. The
bow seat and bulkhead was another pulling of hair
that I can't afford to lose.
I use an outside stiffener on the upper edges of
my seat bulkheads. They are notched for the seat to
rest on and be screwed to. If you want to permanently
attach the seats to the hull with epoxy and tape,
put the stiffeners on the inside. Cut the rails longer
that the width of the bulkheads and trim to fit. Take
your time here and get it right. When I install the
stern seat, I have the aft bulkhead seat rail already
attached and glued to the bulkhead. This gives me
a fixed point for installing the rest of the parts.
I measure and cut the stern seat for it's designed
depth; then cut and trim the width and end bevels
to fit(rounded for the fillets). I use the fitted
seat to determine where the bulkhead will be located
and make some "jump" stitches to hold the
bulkhead in place. I install the port and starboard
seat side rails after the bulkhead is glassed in.
I use some scrap cut to fit, between the stern rail
and bulkhead to line up the tops of the side rails.
Then glue and screw them in place.
Before you install any bulkheads or seat panels,
its a good time to give them a coat of epoxy. Do them
out of the hull and on the floor where they are flat
and the chance of runs are at a minimum. This is where
the rubber squeegee comes to the rescue again. Do
one side of all the parts, cure, flip and do the other
sides. Don't forget to get the edges too. The edges
are plywood's weakest areas and prone to rot quickly
if water gets in.
The center seat support "wings" height
is first set by the centerboard bulkhead and then
their alignment with the bow and stern seats. The
wings have a small plywood fillet at their stern end,
and are double screwed thru the hull to a block attached
at the forward end. I stain these ahead of time and
hide any gaps with a small fillet against the hull.
These will be drilled for "pin holes", later
when I locate the seat positions after sea trials.
Photos of this will be in a future story.
I use a rough position line for where the bow seat
will go. This changes a little as I align the center
seat with the stern seat. You will never have to deal
with most of this as the plans will reflect all the
heights and placements of the interior parts. The
bow seat and bulkhead will be the hardest part to
complete, but not insurmountable. The problem has
to do with the continuous curves of both side panels
at the bow. You will have an idea of that from getting
the breasthook to fit. I like to start with a piece
of cardboard larger that what the finished seat will
be and mark a centerline on it to make sure I trim
it square with the centerline. I do a rough trim to
get the cardboard to fit close, but not exact. I take
a pencil and slip it into the clip on my tape measure
and slide the tape measure housing against the side
panel and mark a line the thickness of the housing
on the cardboard. Now I a have a good line to measure
back to my working edge from. I mark a new line "outside"
of, and parallel to the "tape housing" line,
as close to the edge as I can get, to get rid of any
large gaps. This trims the down the cardboard and
makes it slide in, closer to the bow. That's why I
started with a piece larger(wider/longer) than the
final seat. I go to smaller blocks of wood to guide
the pencil, or if I was close the first time, I just
lay the pencil along the side panel and slide it along
as I make a true curve line. I keep trimming to a
final fit and then make a gridline system to measure
off of for the plans.
I then take those numbers and transfer them to my
plywood seat, and with the help of a small batten
and a few nails, lay out the curves. The plywood seat
is then trimmed, beveled, and sanded to fit the hull.
I use a long batten resting on the center and stern
seats to hold up the bow seat panel for measuring
the bow bulkhead. There is some leeway in the cutting
of the bow bulkhead itself as the fillets and tape
can fill any gaps. The only thing you want to be sure
of is the fit of the bulkhead rail. You want to make
sure you have some extra length to trim as you fit
the seat, bulkhead, and rail together. Clamp the rail
to the seat, trim the rails, and then glue the rail
to the bulkhead. This will make things easier for
final fit. Just take your time and it will turn out
ok. It helps to have some waste stock to play with
first. Did I mention that the boat has to still be
level and the bulkhead and seat need to match too?
The building order is, fit the seat to the hull, level
and inline with the other seats. Fit the rail to the
seat. Fit the bulkhead to it all. The bow and stern
seats also look good if they follow the shearline
curves.
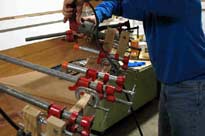
Now to attach the gunnel rails. Start with the outside
stern rail first, and make it longer than the width
of the hull. Level it to the tops of the corner blocks,
glue and screw in place. I love my Samona dowel cutting
saw for trimming the rail ends flush to the hull.
Just lightly press to the hull as you pull.
The outside rails come next and you want to start
at the bow as you will need the length of the stern
half to bend the rail to fit the hull of the bow half.
I always do a dry fit first and I don't know why I
didn't take any photos then. Later when they are covered
with glue, you have your hands full keeping them in
place and not smearing glue all over the hull. On
a Vee bowed boat, you don't have much at the bow to
attach a clamp to. I take one of my video lighting
"C" stands and support the stern end of
the rail as I clamp the bow end as close to the breasthook
as possible and with the top of the rail even with
it. I then drill a couple of spaced holes in the rail
and into the hull and breasthook. I will use these
as clamps when I attach the rail. You will have seen
in previous photos that I have had the rails pre-bent
for several weeks. This gives them a slight curve
and helps me install them, and reduces the chance
of snapping. Once I'm happy with the fit, I smear
on the Gorilla Glue and get ready to rumble(you want
it to curve, it wants to stay straight). Drive in
the first screw, bend and clamp as you go. Keep an
eye on the changing curve along the shearline as you
move aft. Once the clamps are temporarily set; go
back an line everything up. Sight down the rail to
check it, and make any adjustments that are needed
for a smooth and flowing curve. Try to have the plywood
even with or above the rails as you smooth the curve.
Add lots of clamps so there are no gaps anywhere.
Come back after you've caught your breath and place
stainless screws at the one foot station cuts, from
the inside out. Leave a couple of inches of gap for
the screws near the stern corner and breasthook. You
need the space for the ends of the inner rail screws.
The inner rails are fitted pretty much the same way,
but when you make the dry run to mark the length,
add at least 1/8" past what you think is the
true distance. This gives you some wiggle room, and
will probably be the true length from past experience.
The rails are drilled, countersunk, and screwed from
the inside at the half marks between the station line
cuts. The oarlock supports go at the station line
cuts referenced in the plans. Cut out the radiuses
in the corner blocks and then trim, round, and sand
all the corners and rail parts. I do not like to use
a router rounding the rails. I have had bad experiences
with blow outs, with the rails under such high tension
from the bending. Its more fun to use the rasp and
a lot cleaner. The plans go into greater detail of
how to shape the transitions between the rails and
the corners.
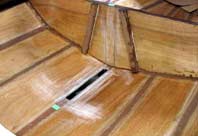
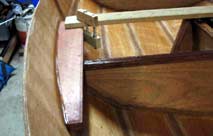
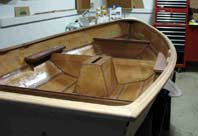
A couple of shots of the hull with all the interior
parts installed. The centerboard shot shows the middle
seat in it's forward position. The making of the centerboard
and rubber will come in a future story. Part Four
will have Laura getting her bottom seam taped, faired,
glassed, weave filled and painted (if the paint is
ready).
Until the next time.
Warren Messer
Stitch and Glue and Stylish Too!

|