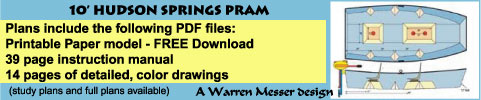
Part Three
Part
1 - Part 2
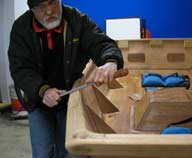
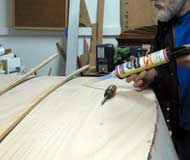
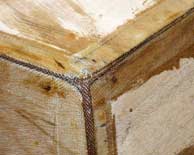
I've gotten so used to quickly shaping and finishing
the rails and corners, that I sometimes forget to
write about doing it, and adding a couple of photos
to the stories. Most of it is done just with the eyeballs.
I do add a couple of measurements to show me where
the transition curves start and end, coming in and
out of the corner blocks. Then a finish sand, two
coats of epoxy, followed by two to three coats of
marine varnish, and I'm done.
|
|
|

|
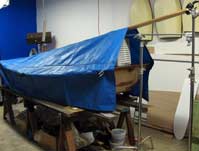
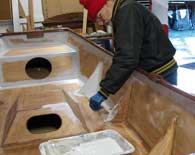
Seems like it took forever for the interior primer
and paint to dry in the cold snap we had up here.
I finally had to walk to the local hardware store
and buy a small electric space heater to speed up
the drying times between coats. The System Three
WR-155, two part epoxy primer took two days to
cure in my cold, cold barn, but the Marine Enamel
just said, "sorry it ain't possible to evaporate
my base water at these temperatures". Once I
set up a "tarp tent" and hung the heater
on one of my old video light stands, it was just a
mater of hours until the paint's water carrier evaporated
and the paint was ready for the next coat. Normally
I apply three coats of paint to the interiors of my
prototype hulls, but the epoxy primer cut that back
to just two.
 |
|
The WR-155 epoxy primer goes on smooth and easy,
and you only have to say "water" across
the rollers and brushes, and the darn things are almost
clean again. It's almost that easy, but it still takes
a few swishes through the water bucket, and a couple
of squeezes to get them clean and ready to apply the
next coat. The only bad thing about the primer, is
that the light gray shows you every ugly frizzled
end you made in your taping and epoxy work. It wasn't
that bad; but until you get some contrast between
the flat and the rough, it's hard to tell if a tape
end is really neat or frizzled. The clear epoxy on
the glass and wood, doens't have enough contrast for
the bad spots to stand out. I'm going to competely
change the way I do glass work on any future boats
I build. I will show these improvements in the next
prototype hull I construct.
 |
|
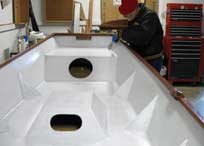
For the FlyCaster, I would not use glass tape again
to cover the seams of the bulwarks used to stiffen
the hull sides. After the bulwarks are tacked in place,
and the seams smoothed in with EZ-Fillet
material; I would place "blue" masking tape
to the hull sides and bottom panel at 1" beyond
the edge of the seams and around the perimeter of
the bulwarks. Then I would use glass cloth, pre-whetted
and placed over the bulwarks, and smoothed into the
seams (cut darts where needed). After the epoxy has
turned "green" (curing, but still tacky);
use a box knife and trim the glass along the "inside"
edge of the the masking tape and lift off the waste.
Pull the masking tape up and press back down any of
the glass cloth edges that may have lifted. Another
thing I would do in the same vane, is to place masking
tape along the edges where several glass tapes come
together. Say where the seam tapes of the top and
rear panels of the bow compartment come together at
the hull sides. I would place the masking tape so
the side to side seam tape would climb up the side
and over the other two tapes a bit, then I would have
a straight line to cut the excess tape back to. Sounds
more complicated than it is, and I will go into this
more in the next hull and it's series of stories.
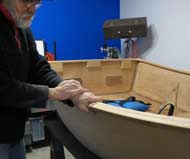
Once I got the interior finished, it was time to
flip it over again and complete the outside work.
The interior would then have enough time for a total
cure while I worked on the bottom. With the hull seams
already rounded over, glass taped, and the bottom
runners attached and covered with 3" tape, it
was time to fair in any edges that I felt needed it.
Whether or not you spend the time making it "pretty"
is up to you. If it was going to be my boat, and covered
in fish guts and scales, I would just finish it off
in a "work boat" level of quality. You have
to remember you are building it to go fishing, and
not for a trophy case; and that it's just a tool to
get you where the big one's sleep. My 79 VW bus gets
me to the same fishing holes as someone else's 40k
SUV. But this was going to be a show (for sale) boat,
and it needed a higher level of quality. Which means
several applications of QuickFair and lots of sandpaper
and some dust. My sander and shop Vac keep most of
the dust to a minimum, but there is always some that
escapes and hangs in the air.
|
|
| |
|
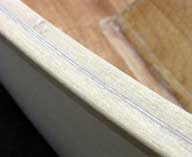
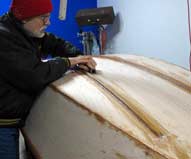
Once the glass tape edges were faired in to hide
their locations, it was time to unfold the 6oz glass
cloth and give it some time for the creases to go
away. But before I do the smooting thing, I have to
measure out the "upper" edge on the sides
where I will trim the glass cloth. On this hull, I
had glass wide enough to go up(down) from the hull
seams by 2". I mark this location with a pencil
around the premimeter of the hull and apply masking
tape on the "sky" side of the line. I will
later spread epoxy to just into the middle of the
tape, and will trim off the excess glass after it
has turned "green" and pull the masking
tape.
|
|
|

|
I've found that if I give the glass cloth a few
days to relax, and give the cloth a "hand smoothing"
every day, I can chase all the folds and creases out
of it. I didn't have to make a single cut or dart
in any of the seams or corners. For the majority of
the bottom, just smooth the wrinkles to the sides
and ends. To finish the corners, I just had to open
up my hand, and by running my thumb and fingers down
around them, I was able to open and close up enough
of the glass cloth's loosely woven "warps and
weaves" to have them fit tight to the hull underneath.
No cuts, no darts.
|
|
|
|
|

|
The only thing that I came to regret, was putting
the bottom strips on before adding the glass cloth.
Keeping the whetted glass tight to the sides, and
tops of the two strips as I did the rest of the bottom,
reduced the hair count on my head more than I liked.
Do the cloth first, then epoxy on the strips, followed
by one or two layers of glass tape. Once all the glass
has cured, then fill the weave with a mix of epoxy
and QuickFair. For a usable (time to do it right)
working time, I like a 2oz (A) + 1oz (B) batch of
"fully mixed"QuickFair, and a 1oz (A) +
1/2oz (B) "fully mixed" batch of epoxy,
stirred together to form a soupy weave filling batter.
A gloss finish will take two to three full applications
to the bottom and up the glassed over part of the
side panels. Even if you don't want a smooth glossy
bottom, the weave filling will cover the proud parts
of the glass cloth and protect them from getting cut
and fuzzing up.
I also like to add a skim coat of straight epoxy
to the side panels, from the faired in top edge of
the glass cloth, and up to the rails. I do this to
protect the wood and seal off the surface from any
moisture that may try to sneak through the outer layers
of primer and paint. Once all the epoxy had cured,
it was time to sand the hull to get a smooth and even
surface for the finial finish.
Side Bar: I was going to add graphite to the
mix when I did the weave filling to (as I have heard)
give it more resistance to abrasion. A chemical
engineer told me that there was no way that I could
mix in enough graphite with a popsicle stick to
do more that color the epoxy black. Hummmm? To get
enough graphite in the mix to where there was a
lot of graphite near the surface protecting the
epoxy, and not just the epoxy protecting the graphite,
I would need an industrial strength mixer to stir
it into suspension. And that just stirring with
a popsicle stick, I would only get about 25-30%
(by volume, if that much) of the graphite powder
into the mix. A heavier proportion of graphite than
just mentioned, would also be a very dry mix, and
be difficult to spread on the hull. BUT YMMV.
This is the second hull that I have filled the weave
on without adding pigmented pastes to color the epoxy.
It was something that had me kicking my own butt around
the shop for a couple of minutes, because I knew better.
The pastes give the surface a high contrast opaque
finish that brings out all the flaws. The bumps, groves,
and unfilled spots in the glass cloth, literally jump
out at you. You then know where work needs to be done
to the surface, and you only have to fix those spots,
and not be adding more epxoy to places that don't
need it, because you can't see that it's ok.. By knowing
where to work you save a lot of time, energy, expensive
epoxy, and achieve a better finish on your hull.
Don't add the pigmented pastes to any epoxy
that will be used on the first wet out of tape or
cloth. You won't be able to tell where the
glass has adhered to the wood, or where is has not.
Only use the pigmented pastes in the epoxy mix during
the last one or two coats while filling the weave.
Check with the epoxy manufacturer to see whether or
not the pigments, and what types of pigments may be
added to that version of their epoxy. With some plain
epoxies, dry pigment powders can be used. With other
epoxies, the paste versions need to be used. The paste
is actually a little bit of Part A resin mixed into
the pigments to put them in suspension, and aid in
the mixing. So you will need to think about how you
measure out the part A's & B's when you add pigment
pastes. Put in a bit of the paste in the measuring
container, add part A to the line (or by weight),
mix throughly, then add the part B and mix again.
You will need to experiment a little to determine
the amount of pigment paste to use, and from that,
how opaque a surface needs to be inorder for the flaws
to stand out. I could help with this if I had actually
remembered to get the paste myself. Ow!
The pigment pastes come in a range of colors. For
weave filling, I would use the light gray, or maybe
white. With these two light colors, the blemishes
jump out at you. For the more adventuresome, you can
always make up your own if you have access to the
dry pigments. Just add the powders to some epoxy part
A and mix into a thick paste. You could also go to
your friendly hardware paint person and get a couple
of onces of the color pigments they add to the uncolored
"base paints". Add both types of pigments
(powdered or hardware store) to some part A to get
them into suspension for later use.
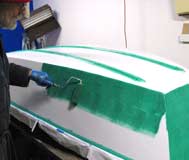
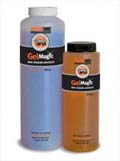
Now give the hull a light sanding with some 100-150
grit to prep the hull for either primer or paint.
With this hull I put on three coats of System Three's,
WR-155 two part epoxy primer, in light gray. The first
coat acted the way a finial rolling of pigmented epoxy
would. All the flaws jump out and go, "you blind"?
A little back tracking with some QuickFair and 100
grit sand paper leveled the playing field so to speak.
With the next two applications of the WR-155, I was
building up a nice thickness of primer for the final
finish sanding with the 150-220 grit, or higher. The
WR-155 needs a few days for the epoxy to cure, after
the finial coat, and before it's sanded for the last
time. Its also nice to have a "duck" around
looking over your shoulder to keep you honest.
After the cure and finial sanding, wipe the hull
a couple of times with a damp cloth to remove any
dust that may remain behind, or has drifted in from
the ethers. If everything is hunky dory, it's time
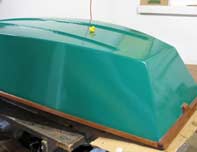
to paint. Pick your poison and have at it. I'm going
to use System Three LPU two part linear polyurethane
topcoat, in Mercer Green. All the Sys3 LPU's are named
after local islands, and I think they used Mercer
Island for the "green", because it has the
highest per capita income of any place in the state.
Mercer Green is a dark, and "rich", forest
green. It should go well with the dark mahogany rails,
and light tan interior.
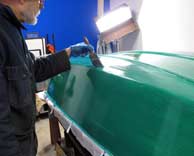
This is the second hull I've applied LPU to. My
first boat, the 8ft Nuthatch, was a learning experience
on just about every aspect of boat construction. Stitch
and Glue, epoxy, glass tape and cloth, and LPU paint.
I think applying the LPU was the easiest part. Measure
out some paint, add the required number of "eye
droplets" of crosslinker to an once of water,
mix it all up, and roll it out. Follow the paint rolling
with a bit of "tipping" with a high quality
brush, and the LPU pretty much took care of itself.
Like the WR-155 primer, the LPU is just as easy to
clean up. It dries fast between coats, so you should
be able to get on four coats in one day if you have
moderate temperatures in your shop. If it's cold,
you will have to add some heat to your work area to
evaporate off the water base. The can says "Dries
by evaporative drying and chemical cure. Additional
coats may be applied without sanding within 24 hours
of previous crosslinked coat, or 14 days for
previous uncrosslinked coat". I added
the underlines for clarification. One quart should
give you four good coats on a "normal" 10ft
hull.
I let the hull set for about 1 1/2 weeks before
I flipped it over to add the hardware. I wanted to
let the paint cure and reach it's full hardness, and
I do mean hardness. It's one tough paint, and I'm
amazed at how resistant the LPU paint on my Nuthatch
Pram has been to scratches and wear. For a "wet"
look, give the hull a couple of coats of LPU clear
coat, and put on the shades.
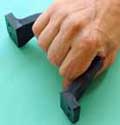
With the hull upright again, I could add the bow
and stern handles
and fit the 10" kayak hatch to the bow compartment.
Installing the nuts and washers for the bow handle
gave me a chance to do some stretching exercises,
and with the hull still on the work platform, a test
of my ability to balance on a stool.
I wanted to make sure the screw holes for the kayak
hatch were spaced evenly and that there
were enough of them to hold the frame securely to
the panel. After about a dozen trips around the hatch's
frame with a compass, I found the correct spacing
that brought me back to within 1/8" of the starting
point. Close enough for me. I then drilled the holes
in the frame, and matched the hole pattern on the
bow panel. Break out the caulking gun and lay a bead
of sealer around the inside lip on the frame, and
install; wiping up any excess that may squeeze out
around the edges.
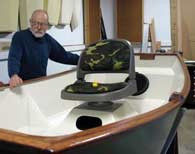
With the lifting handles and the kayak hatch in
place, I only had to go get a seat to finish off the
hull so I could take it to the water for launch day.
I don't know if the devils in the details, but going
to one of the big sporting goods outlets in the Seattle
area can give you more choices than my be needed.
I had my friend Bob take me around to see what was
available locally, and after I had spent some time
online doing research for seats to see what was out
there. I wanted something that could be removed if
the boat was carried bottoms up, or just kept out
of the hot sun. There were lots of different seats
and bases to consider. Bob steered me away from the
$20 specials, because the backs flexed too much and
were not that comfortable for long days spent fishing.
I finally settled on an Attwood ProForm seat with
a Swivl-eze seat adapter (the pin was off about 1
degree, and the seat listed to port, I leveled it
with a shim) and base plate system to mount on the
pyramid. My other choice was from Temptress; with
their special mounting system that I really liked.
It was a little more expensive, but with the way it
mounts, the pyramid could be fitted with a small waterproof
hatch and turned into an air chamber. But they didn't
have a color in stock that I liked and I went with
the one you see in the photos. It's still a very
good seat.
 |
|
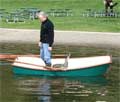
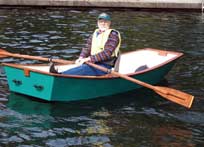
Launch day came and I met Bob at the lake for a
real world test by someone who actually goes flyfishing.
He's had a well known 8ft fiberglass pram for awhile,
but I think after rowing the FlyCaster, it may be
for sale. ;) He said as he was rowing the boat, "it's
more stable and faster". I don't have any superlatives
to say about the design. It's just a boat with a special
purpose; "take one person flyfishing to where
the big ones sleep". I think it does that in
an attractive form; and at only 80 pounds as you see
it in the photos. The build and study PDF plans
packages are ready for sale in my section of the "Plans"
page.
Remember to check out www.flickr.com/photos/flycaster
to see the latest photos that I've added since the
last time.
Thanks again for reading my stories and the comments
you take the time to make.
Warren Messer
Red Barn Boats

Other Articles by Warren Messer
|