It began with that uncomfortable feeling of “something amiss” which takes one when the tongue detects a wiggle in old dental work and the mind is forced to acknowledge movement in something requisitely solid. From all external vantages the boat appeared sound yet there it was a distinct wiggle at the partners and movement throughout the foredeck structure when the mast was loaded; in the half century’s old wooden Blue Jay, CASPIAN, something was very much amiss.
According to the class rules a Blue Jay’s deck is to be constructed thus: “Waterproof fir or mahogany plywood 1/4" thick…canvassed or glassed” CASPIAN’s deck was certainly ¼” fir, relatively new and glassed (one of the selling points when I purchased her). However, also according to the rules, “Side decks must be strong enough to lift boat” and the partners “permanently fixed to prevent movement of mast at the deck.” Mine were most definitely NOT.
 |
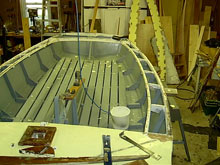
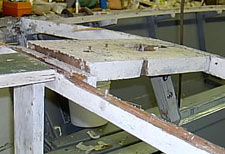
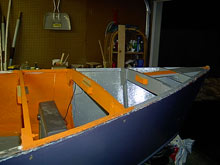
Mast Partner/Foredeck--Something’s Amiss Here |
A Blue Jay is thirteen and a half feet long and removing the wooden glassed over deck meant removing a lot of fiberglass to face screw heads filled with resin--a daunting task.
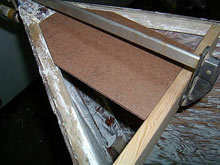
| Glassed Plywood Deck |
 |
On all previous boat projects when confronted with old screw removal my method of approach was: (1) using heat gun & scraper, clean area around the screw head, (2) using heat gun & brad awl, clean out the slots, (3) using screwdriver, try to remove screw, (4) when the slots stripped out, drill off the head and using one of the hollow screw extractors, remove the body of the screw, and (5) epoxy a plug into the hole. If the body of the screw had enough meat, I would attempt using an “easy-out” in place of the hollow extractor.
It is a method I hated, timely and fraught with risk of damaging the area when, inevitably, the drill bit would run off or miss the shank of the screw. Certainly I had tried to mitigate the risks, like when facing the refastening of a 60+ year old bronze fastened solid teak deck on a 40’ ketch, I had employed one of those “drill press” attachments on my best Milwaukee 1/2” drill and used a “bit guide”. Still the old bronze would break away or the drill bit would flex just enough to run out. Unfortunately it was, quite frankly, the only method I had found which worked.
I began removal of the Blue Jay’s deck with the above process in mind. Beginning with the smallest deck section, the poop, I stripped enough glass to find the screw patterns, measured the center-to-center spacing with a compass, marked off locations and scrapped the screw sites. The first couple screws came out ok after clearing the slots and then I hit the drill/extract wall replete with missed shanks and run-outs. About six screws into the project and I realized I had not enough years left in my life span to deal with all those #8 bronze screws. True I could cut up the deck, chisel around the fasteners & then get to them with vise-grip pliers, but I really wanted as much of the deck layment as possible for use as template stock.
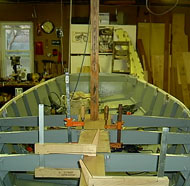
 |
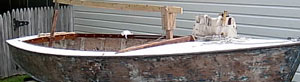
Side Decks and Poop removed (side deck ply shown by wall) |
In the movies, the technique in known as the “flashback”. OK, here we go... flash back to the summer of 2007, Mystic, Ct, and Wooden Boat Show. Tool tent. It was then and there I picked up a set of screw extractors going by the trade name “Grabit”. Flash ahead now to the winter of 2008/2009. Those Grabits had been tucked away in their nice little plastic case in my tool bag for some 16 months. What the h*##, I’d try anything at this point, including another of those shiny wooden boat toys one acquires at boat shows. One screw, two, three... a hundred. This thing works, so well, in fact, I began to vary my method. No longer did I need to clean the slots and after some practice, no longer did I need to scrap around the screw head—as long as a screw could be detected, even under layers of old flaky paint, it could easily be removed and in about the same length of time it took to initially install.
| Typical Wood Screws Extracted as is |
 |
I realize all this rings of infomercial, but I have no association with Grabit other than being a satisfied customer; a single extractor, several hundred screws removed, only one broken head and still going strong. Dare I say “better than grits”?
‘nough said, back to the Blue Jay.
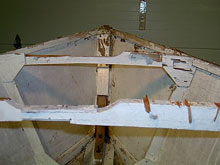
With the decking removed, some major structural problems, aside from age-failed fasteners, were noted in the method of construction employed in the foredeck. This in part I think was induced by misinterpretation of the class rules. The building plans call for 5/4 stock in the mast partner between beams at stations 3-4, 5/4 blocking between beams at stations 2-3 and 5/4 breast hook between stem and an intermediate beam approximately half the distance between the stem & station 1.
The class rules make specifications as follows:
DECK BEAMS. To be spruce or fir, 7/8" x 1 1/4" or 3/4" x 1 3/8" sided and moulded as shown. Not applicable to fiberglass hulls.
DECK. Waterproof fir or mahogany plywood 1/4" thick. Covered with eight (8) ounce canvas or fiberglass, carried down over edge of deck and covered with moulding. Doubling blocks, etc.. must be uncovered only if made of mahogany plywood 1/4" thick, thoroughly painted. Not applicable to fiberglass hulls.
Side decks must be strong enough to lift boat.
Mast partners are be permanently fixed to prevent movement of mast at the deck. Refer to Section 17a for prohibition of movement of mast during race.
However, and here in, I suspect, lay cause of my troubles, the rules also state, “A king plank may be used on wood boats in lieu of or in conjunction with blocking on the forward deck centerline. King plank must not project more than 1/16" above decking. King plank must not exceed 6" wide (including rabbet) and 3/4" thick.”
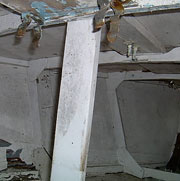
Note that the above specifically states blocking, NOT breast hook; in my case the breast hook and intermediate beam as well as the station 2-3 blocking had been omitted in lieu of a 3/4” plank of 5” width. This was not a king plank in the classic sense as it did not extend above the surface of the deck, its only purpose being to back up the centerline seam of two fore deck sections of plywood.
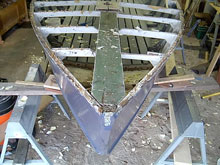 |
Backing Plank—note cut away beams |
Additionally, this plank had been let into the beams—in other words the beams were cut away to allow the ¾” plank to lie fully beneath the plywood. This had the net result of reducing the load bearing section of the beams from 1 and 3/8” to 5/8”—more than half the beam. In actuality the beams had even been over cut and ¼” shims placed between the plank and beam. Needless to say all beams had suffered breaks while weakness in the bows due to omission of the breast hook (the plank was toed in to a block screwed to the stem with nothing tying to the hull) was evident from numerous repairs to the stem.
| Missing Breast Hook/Intermediate Beam—Station 1 and 2 Beams (note shim) |
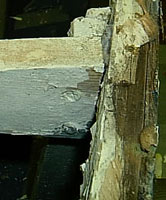
 |
 |
Loose/poorly fit Partners |
The partners had been cut short, a piece of 3/4 pine screwed to the end and the whole screwed with substandard sized wood screws to beams without glue or bedding—this came out in my hand…
So, where to begin? Someone once uttered the most profound advice, “begin at the beginning.” Well, on a boat that might be construed as the bow—so let’s start there.
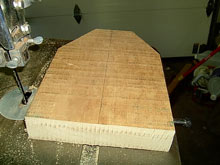
| Breast Hook Template & New Beam |
 |
After stripping all the old paint we begin with a breast hook and intermediate beam per drawing.
 |
Nice old Honduras Mahogany |
| Breast Hook & Beam Installed |
 |
The breast hook is bedded in epoxy and tied to the hull and beam with 3” #10 woodscrews.
 |
Red Lead and Gray Bilge Paint |
Working aft from the breast hook, long pipe clamps were set to keep hull shape and one beam at a time was removed and replaced. Following removal of the old beam, each frame bay was wooded down. The beams and gussets were cut a bit oversized to increase bearing area on the frames and to get into new wood for the fasteners. The beams were dry fit, then bedded in epoxy and 3 ½” #10 screws run in from the hull. The pipe clamps were left in place until the gustsetswere fit, glued and through bolted. All then received a healthy dose of red lead primer followed with bilge gray.
In the accompanying pictures a small electric space heater can be seen. It is my practice when working through New England winters to tent over the boat after setting epoxy joints and run this heater inside the boat. I tent as small an area as possible and run the heat to maintain about 60 degrees at the epoxy. This allows the epoxy to be fully kicked by morning.
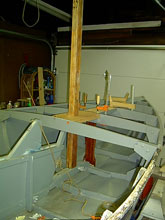
| Here it gets tricky—the CB trunk’s connected to the mast partners |
 |
Partner and blocking beams--full sized blocking per drawings gets fit forward of the partners—it is narrower than the partners to allow fasteners to be reached when installing the partners; however, the fasteners for the block will get covered by the partners, so all must be well & snug. Shelves have been screwed and glued to the beams and fastener holes drilled and counter-bored. Fasteners are 5” lag screws. Blocking and partners bedded in epoxy.
 |
All snug |
| So Far so Good |
 |
Next installment we’ll look at the side deck and poop structure and look into the steam box.
***** |