Part I: Hull Construction
Part II: Outfitting
Kayleigh : 18' Sharpie Camp Cruiser - Part II: Outfitting
Outfitting is an ongoing process for any boat. Like an artist
doing a painting, at some point you just have to quit. But I never
seem to quit on my boats. Even as I type this She is sitting out
there waiting for me to complete the monkey stick steering system
(see Duckworks
articles) and install the new bimini. Below was the stage of outfitting
at the annual Quinn's Cove Summer Solstice Messabout at Caterpilar
Island's Fishermen's Slough June of 2009 on the Columbia River
in Oregon.
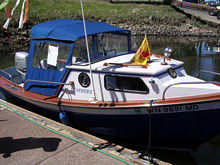
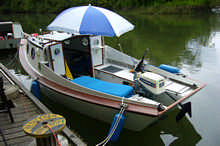 |
Temporary bimini |
I was fully loaded for a week's voyage of circumnavigating Sauvies
Island via the Multinomah Channel on the Columbia River. Must
have had several hundred pounds of water, food, camping stuff,
books, and fuel on board. With me added to the load, she was well
down on her lines with the bow foot and transom just under the
waterline. There are several things to note in this view: 1. The
starboard cabin door shelf where the depth sounder is located;
2. The watertight storage hatches just aft P & S of the engine;
3. The fact that the cabin doors swing open over the cockpit seats
allowing for greater hatch storage area and security for electronics
when doors are closed. The blue seat cushion (Sportacushion) adjusts
to different positions for sitting, lounging, reading etc., and
works great for a beach seat/cushion. The umbrella served as my
temporary bimini.
So how does one go about deciding to outfit one's boat? The pocketbook
notwithstanding, each venture demands its unique requirements.
But the basic vessel-human interface needs apply to all outings.
Let's start with the floorboards. Experiences with the use and
maintenance of al types of floor boards - varnished teak, oiled
teak, varnished or oiled mahogany, oiled cedar and painted cedar
- has lead me to some practical conclusions. Varnishing and/or
oiling of any woods is beautiful but labor intensive and unrelenting.
Teak is best but still requires continual maintenance. For a boat
like this where it will be gunkholed and beached in al kinds of
environments, easy maintenance floorboards are the answer since
your floorboards are gonna be sandy or muddy on the first day
out.
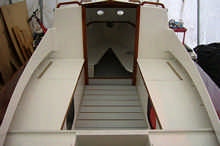 |
View of cockpit and floor boards |
I used good tight knot cedar fencing for the floorboards and
painted them with Rustoleum Painter's T ouch Latex Primer Grey
(a quick drying very tough flat finish). It can be just washed,
repainted and used with a couple hours any day to keep fresh.
The floorboards are mounted on cleats attached underneath port
and starboard and along the center so the whole assembly can be
easily removed. Since there are no holes anywhere in the hull,
and the center of longitudinal gravity of the hull (and all the
water will locate that gets inboard) is just at the aft side of
the cabin bulkhead, this is where the hand operated bilge pump
goes. Later a hinged flap was installed there to access the inside
bottom of hull. Note the cockpit hatches P & S. They good
sized for easy access and loading large items such as life- jackets
and coolers. To make them water resistant extruded plastic hinges
are epoxied on. Further aft are the cockpit seat cutouts P &
S for the fuel tanks.
Before viewing what I used for portholes, lets have a look at
the conformation of the cabin door assembly. I research other
boats and plans debating long over what kind of cabin door and
porthole arrangement arrangement would be best. I liked the cabin
door and hatch arrangement I had on the 18' Baymaster Dory-like
sloop I had. The hatch raised up on forward hinges (clam hatch)
and when closed fit down over a drop board like hatch door. It
was simple, very functional and easy to make secure with padlocks.
The problem was that the drop hatch had to be removed completely
for cabin entry - which is how we sailed the boat - so we could
get in and out of the cabin easily. When removed the damn thing
was always in the way, no matter where we put it. I wanted a helm
position at the aft cabin bulkhead inside the cockpit, so the
navigation instruments had to be at eye level there. The structure
below shows how all these requirements were solved.
 |
The structure left shows how all these equirements
were solved. |
The solution is a combination of swing out cabin doors that
open over the cockpit seats, and a removable drop board bottom
for full cabin access. The doors are permanently hinged, and when
open swing over the seats and have some of the navigation instruments
on back of the doors - making them easy to read when the doors
are open. They are secured open with small bungee bal cords. The
drop board slides out of its slot and is easily stored alongside
the cockpit seat longitudinal bulkhead with bungee hook cords.
Now for the portholes. I wanted those fancy brass round opening
ones, but couldn't justify the some $400 each cost. I would have
had ~ $3200 in portholes! I did more research considering a variety
of homemade openings, RV type windows, and other marine boat types.
Then Mark Neuhaus, a Coot buddy who was building a Kayleigh sister
ship, sent me the following picture of a boat he saw in Cathlemet,
Washington, at the Wooden Boat Show there.
 |
Cathlemet, Washington, at the Wooden Boat Show
(Photo by Mark Neuhaus) |
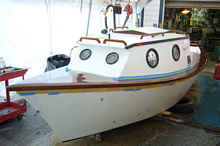
This is a bar running Pacific Ocean sports fishing version of
the Kaleigh. It sports a planning hull configuration (option included
with the building plans from Tracy O'Brien) with at least a 50
hp four cycle Honda. A beautiful rendition with lots of good ideas.
Note the round portholes. Close inspection reveals screw in type
portholes (available at a very reasonable price from Duckworks)
installed backwards and trimmed with a matching ring on the outside.
So that's what I did.
 |
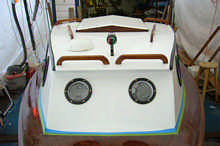
The portholes |
Inexpensive screw-in deck plates installed backwards so they
will open in, and trimmed with matching outside rings make perfect
portholes and are easy to install. The outside trim rings are
made from patterning the deck plates and cutting them out of 3/8"
double sided MDO. The MDO is very strong and finishes nicely.
Note the clam shell object on the port side of the cabin toward
the rear. This is an intake cabin vent with a butterfly air valve
on the inside so it can be opened or closed. Its located above
the area where my stove, cabin heater and portapotti are. The
hand rails are al hand made from the same mahogany as the decks.
Note the placement of al the hand rails. Very handy for messing
with lines and ground tackle from outside the cockpit. The hand
rails on top of the cabin at the cockpit make for bracing oneself
entering and exiting the boat, and hanging in choppy conditions.
 |
Close-up view of the cabin front lights and
cabin top assembly. |
he running light mount was fabricated by modifying slightly the
bracket it came with. Al running lights are LED's which are very
bright and the batteries seem to last forever. I have two-three
led clam lights inside the cabin which are quite bright. They
are placed at the fore and aft end of the sleeping bunk for reading.
The round hump thing on the starboard cabin top is an air powered
vent. I have an interchangeable stove, gas light and heater that
mounts on propane cans (the green ones). I have a 4-D cell 5"
folding fan I run when any of the propane devices are lit. With
the cross draft of the intake vent and the cabin top exhaust vent
the cabin stays cozy, I can cook and read. A CO detector is mounted
inside the cabin in the area where my head is when I sleep. This
al works very well, but there is still a lot of residue moisture
inside the cabin roof in the morning. While it is safe now, I
suspect the cabin could use more venting. The hatch is a one piece
deal that folds up from the cockpit side and help open by a hatch
spring (see Duckworks Hardware). The down angle of
the hatch top is the same angle as the cabin top.
|
Returning to the aft cockpit view |
This view shows how the cabin doors open out over the cockpit
seats. Note that the cockpit seat hatches are vented; there are
step in pads P & S up near the cabin where the boarder can
hold onto the handrails on top of the cabin; the cup holders P
& S near the cabin doors; the rear hatches P & S aft of
the motor well are watertight with compression gaskets and the
tops held down with small bal bungees; and, the motor well and
motor board are inside the false transom (an integral structural
piece). Outboard power is a 1976 6hp Evinrude completely gone
through (its like a new engine) and runs like fine watch, very
smooth and quiet. Fuel tankage are four 3 gallon pressure tanks
(I usually only carry two). Back-up auxiliary is a 46# thrust
Min-Kota electric trolling motor powered by a 125 amp hour deep
cycle batter located in the cabin underneath the starboard side
bunk just at the aft cabin bulkhead.
I really like the arrangement/accommodations of this boat. The
cabin has a full 7'+ usable length inside; the cockpit has a full
6' usable length. The cabin easily accommodates two people overnight,
and another two could sleep in the cockpit on seats. Plus there
is ample stowage for the endless boating gear involved in safety,
navigation, communications, ground tackle, camping gear, galley
gear, groceries, water, toiletries etc.
Once while cruising our 18' Baymaster Sloop in the San Juan Islands
under power during a bad weather/tidal day we got caught (another
story) having to run at a shallow angle in the trough and peaks
of severe swells. The boat, even though it was a semi V hull,
pitched and squirreled and leaped and pounded and even flew at
times followed by near broaching. Scared the holly crap out of
us and the dog! Part of my worries during this unscheduled carnival
ride, was that the outboard motor was mounted on a lifting bracket
outboard of the transom. In these horrible conditions the motor
alternated between loudly cavitating out of the water and near
swamping by following waves. I swore I would never have another
motor set up like that again.
Prior to getting the Baymaster we had a 21' Drascombe Longboat
with a tombstone transom and the motor well tucked in forward
of that. That was the most seaworthy arrangement I had ever seen.
There wasn't the sliding, squirreling motion in a bad following
sea situation or in the big troughs, and the motor was always
protected from cavitating or being swamped.
As can be seen in the above photo the motor is safely enclosed
and protected inside a false transom design just like the Longboat.
The displacement version of the Kayleigh design incorporates a
somewhat narrow transom for her beam that is well tucked up to
a steeply rockered hull in the aft bottom sections.
 |
Going back to the lines drawing shows this rockered
and tucked profile. |
The lines drawing best shows the highly rockered bottom and tucked
in transom. Also note here the lines of the center of lateral
resistance of the hull, where the deepest section of the floorboards
are located immediately aft of the cabin bulkhead. This is where
the bilge pump goes. I don't know how many gallons the cockpit
can hold before breaching the 8' water barrier between the cockpit
and the cabin, but it seem to be a large safety margin. This drawing
also demonstrates the crash/floatation area at the bow; the floatation
areas just aft of the bow and the floatation/stowage areas just
aft P & S of the motor well. Some comfort issues can be explained
here as well. The heights of the cabin bunks are 9" from
the floor allowing for at least minimum comfort when sitting inside
(as in galley activities), and allows good stowage underneath
(as is in groceries, water bottles, fuel bottles etc). The heights
of the cockpit seat tops are 11" which gives longer term
seating comfort and great stowage room.
I'll get into more details of performance characteristics of
this boat later. Here I wish to point out that while such a severely
rockered bottom and narrow raked transom make for a relatively
slow hull speed, it more than makes it up in sea handling and
at anchor behavior. I have seen many boats moored in the open
water on mooring buoys splashing and bashing themselves silly
in headlong waves and wind. This hull behaves like a duck in pond
happily and smoothly just rocking along. No worries! This is a
typical Sharpie design that I have modified according to my needs
and previous experience with the kind of waters I venture out
in. Sharpies and banks type dories have a lot in common. The dories
are historically planked crosswise on the bottom, have steeper
raked and narrower transoms, higher and more extended bows. Sharpies
historically have wider transoms, more rocker, lower profile bows,
and lower freeboard at the cockpit. They are an empirically derived
boat for turtle fishing in the Gulf Coast where its shallowness
lends to choppy waters and steep waves. The low cockpit freeboard
allowed the fishermen to work their traps over the side. The highly
rockered bottom and tucked transom allowed them to work in choppy
waters without getting pitched overboard. There have been evolutions
and interpretations of both dories and sharpies. The sharpie design
was the basis of the evolution of the modern racing yacht, according
to Dave Gerr, in his book "The
Nature of Boats."
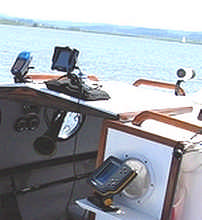 |
Now lets have a look at how I arranged my navigation
station. |
My apologies for the poor quality of this photo, I tried to magnify
the image and it pixelated. But you get the idea. On the top of
the hatch are the two GPS devices. One is a Garmin Legend that
keeps tracts and gives me current trip data such as an odometer,
current speed, maximum speed, and total elapsed moving speed.
I have the read set at max magnification so I can scan it at a
glance. Just to the right this is the chart plotter. Below and
on the right is my depth sounder.
The Garmin Legend is an economical GPS that keeps tracks with
reciprocals, landmarks with routes saved from plotting on the
computer via Garmin Mapsource. I got it on sale for $99. For an
easy to read chart plotter I have the Lowrance XOG running NauticPath
Marine Charts. The screen is much larger than any of the hand
held's and is very clear. The unit combines Points of Interest
data right on the marine chart so you can see what facilities
(marinas, restaurants, services, etc) are in the immediate area
of your position. It also tracks. I got it on sale for $160. So
for $260 I have a complete chart plotting and GPS system with
back up, al very easy to read. The NauticPath Charts are very
distinct and colorful. The boat position is continually plotted
in the readout chart graphics. Both of the GPS units are mounted
on quick change mounts so they can be secured easily when leaving
the boat. The depth sounder folds into the cabin on the door.
I found this system very useful in navigating the Columbia River
on a three day trip last summer. Between the depth sounder and
chart plotter which shows depth contours, I was able to navigate
the river in the most efficient and safest way by following the
depth contours along the shortest course possible, moving from
side to side on the river along the channels and staying more
or less in the eddies. Since it was in the spring with high water,
I was also able to determine the safest overnight anchoring spots
by navigating into hidden sloughs or high water lakes. I always
have paper charts to refer as well. Using the electronic chart
plotter along with the paper charts gives me a much better mental
picture of what I am seeing with my eyes. Boating in unfamiliar
waters it is often difficult to relate to what one sees on the
chart to what one sees in the real.
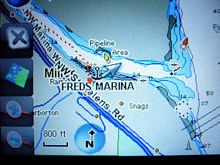 |
Here are some example of the GPS system readouts. |
This is from the Lowrance XOG Chart Plotter. It has a 3.5"
screen (looks just like a car GPS). The location is Fred's Marina,
where the anchor symbol is. The red dotted line is my track from
heading up the Multinomah Channel on the Columbia River near Portland,
Oregon. The screen is zoom and brightness adjustable, and is very
clear. It is not a sunlight backlit screen like the Garmins, so
a hooded lens shade is needed to read in bright sunlight. Al during
my trip I had no difficulty in reading the screen. Control icons
are available for finding local points of interest with full information
of address, phone number, what's available and how to get there.
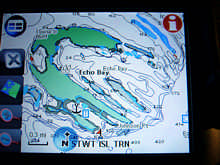 |
Hear is a shot of Sucia Island in the San Juans. |
The blue "T" is an icon for tide and current tables
that are kept up to date according to your GPS position. No matter
where you are you can go to a simulator mode, find another port
or anchorage you want, press "goto" or "find"
or "map" and it brings up your route.
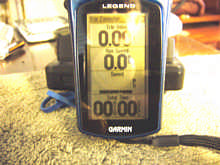 |
Here is the Garmin Legend set on the "Trip
Computer" page in full magnification. |
Having two GPS data sets in front of me saves taking my attention
away from watching where I am actually going by having navigate
the GPS screens.
That about covers the outfitting of my rendition of the Kayleigh
Design, the "Marsh Hawk."
(Photos by Author unless otherwise noted)
Copyrighted 2010 by Terry Lesh
First E rights to Duckworks Magazine. Others by permission only
*****
|