|
Part 3: Materials and Initial Construction
In the last installment, the project of designing and building a low-powered outboard boat for use on large Maine lakes had reached the modeling stage. I built a stretched Hartley Trailer-Sailer according to plans in inch-and-a-half to the foot scale, and then started playing with what I call “ghost models” --simple structures consisting of gunwales and chines wrapped around a mold and fastened to a stem and transom. The rigidity and ease of construction of these models got me thinking that maybe I could translate the ghost concept into a real boat: heavy-duty gunwales and chine logs providing most of the structural strength for a craft that would be covered with a thin plywood skin. Using the design of the last and smallest ghost model, a modified version of the Lark crabbing skiff in the collection of the Chesapeake Bay Maritime Museum, I got to work.
The first challenge was coming up with suitable materials. The gunwales and chines in particular had to be long and strong. The typical “one-by” material available in lumberyards wouldn’t do at all. Consulting Sam Rabl’s chapter on boatbuilding woods, I read that mahogany and white oak would probably be perfect for the job. But I was sure that either would be prohibitively expensive for my budget, and even back in 1947 Rabl was complaining that good white oak was becoming “very scarce.”
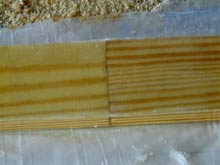
Luckily there was an alternative. Rabl noted that what he called “long-leaf pine” is just as good for boat framing as the oak. Now I’m not sure that he was referring to exactly the same species that we now refer to as southern yellow pine, but I bet it was close. Southern yellow pine is a traditional wood for the construction of Chesapeake Bay crabbing skiffs, and I’d been able to get some good, clear boards of it for planking the first time I built one of those boats. That had been nominal one-inch stuff, though, with an actual thickness of three-quarters. I felt I needed something a bit heavier for this project. Five-quarters nominal (actually an inch thick) would probably be about right.
Fortunately, southern yellow pine is anything but scarce. Unfortunately, most of it these days is made into the ubiquitous green treated lumber used for things like decks and fencing, and that stuff is almost never boatbuilding quality. But they also make untreated yellow pine stair tread stock. It’s an inch thick, eleven-plus inches wide, bullnosed along one edge, nearly clear and available in long lengths. If your lumber guy will let you pick through the stacks, you can get some very nice wood for a reasonable price--as of this writing, a 16-footer is less than 60 bucks. That’s what I got for my framing lumber, and ripped to four inches wide on my trusty old Craftsman table saw to use for chine logs and gunwales.
Ripping those big heavy boards is a chore for one person, impossible without a roller stand like the one shown in the photo below. To avoid kickbacks, make sure your fence is aligned so that it doesn’t pinch on the outfeed side. Sometimes I’ll stop cutting about halfway through and drive a little wedge of scrapwood into the kerf just to make sure the two pieces stay apart. As I look at the photo I realize that the roller stand would probably be a lot more stable if it were turned around. And it goes without saying that you shouldn’t have crap like a roll of fiberglass tape on the saw when you’re using it.
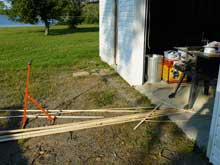 |
This picture was taken when the day’s ripping was already done.
(click images to enlarge) |
16-foot pieces are obviously not long enough to serve as chines and gunwales on an 18-foot boat, so I needed to do some joining to make pieces about 20 feet long. Following this project’s goal of simple construction, I settled on a simple butt joint, reinforced with three layers of fiberglass tape in epoxy, to add an extra four feet of material to each stick. The first tape strip, next to the wood, was about ten inches long. Each subsequent strip was about four inches longer. The surface of the wood was dished slightly with a belt sander before assembly, so the joint wouldn’t be too lumpy.
Here’s what I actually did to make these joints: After painting the ends to be joined and about two feet back with unthickened epoxy, I laid plastic sheeting down on the garage floor, positioned the three layers of “bottom” tape and saturated them with slightly thickened (with wood flour--to keep it from just draining away) epoxy, positioned the joining pieces of wood on top of the tape, and then applied the three remaining “top” layers of tape with the slightly thickened epoxy.
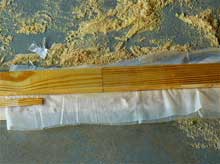 |
This photo shows the first layer of “top” tape applied, as well as the sawdust that I should have gotten rid of--at least I whisked it away from under the joint--before beginning the assembly:
|
Then I put another layer of plastic over the joint and weighed it down to cure. Here are a couple of shots of that process:
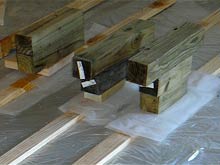 |
The first shows the “sandwich” up close (and a good boatbuilding use for pressure-treated pine). The assembly sitting on edge is the test piece that I eventually had to do over because I was too aggressive in sanding it down after assembly and went right through most of the glass tape. |
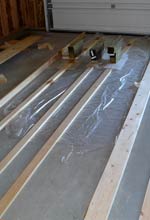 |
The next shot gives a better idea of the length of the assembled pieces. The dark areas outside of the joint are small, tight knots that I filled with thickened epoxy. Notice how few of these there are--this material is mostly quite clear. |
 |
The final photo in this sequence shows one of the cured joints. Not necessarily pretty, but very, very strong.
|
Now here’s how I SHOULD have assembled these joints: one side at a time. The sandwich idea saved a day of curing, but I will always have nagging doubts about the strength of the bottom tape job. A lot of epoxy, even though I thickened it a bit, wound up as excess on the plastic sheet, not in the joint. If I had done one side from the top, then carefully flipped the piece when it was cured, and then done the other side, the whole process would have been more controlled, and helped, not hindered by gravity. My confidence in the result would have increased tremendously.
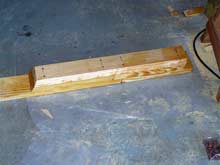 |
The keelson was another piece that needed to be a little longer than 16 feet. Because of the stress in this area near where the transom attaches, I used a stepped joint with reinforcing blocks, all buttered with epoxy and fortified with glass tape.
|
Now I needed to build a mold and a transom--which meant I had to get some plywood. Although cheap CDX for the mold was a no-brainer, especially since I already had a partial sheet left over from another project, the “good” plywood that would be part of the finished boat was not. I’d had great experience over the years with the okoume ply sold by Chesapeake Light Craft, but I’d never had to buy anywhere near as much of it as I needed for this boat. At around a hundred bucks a sheet plus shipping for half-inch material, the okoume would be a budget-buster. So I went to the local lumberyard and looked at what they had: fir marine ply for about 70 bucks a sheet in half-inch, and AC for less than half that. To my eye, the AC was not only cheaper, but better. The C surface was superior to the “good” surface of the fir; the A side was absolutely beautiful. I have no idea what kind of wood it is, but it’s hard, close-grained, and very, very smooth. That’s what I bought, figuring that I could fill some voids if I needed to. Now that I’ve cut quite a lot of it, I’m happy to report that so far those voids have been very few and far between.
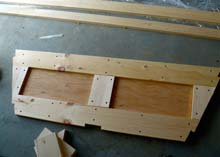 |
Here’s the mold, made up from CDX ply and scrap lumber:
|
 |
Before I could make the transom, I had to settle on a radius for the crown of the decks, which would be constant from the foredeck through the washboards to the transom. I drew a radius that seemed pleasing and made some templates out of CDX:
|
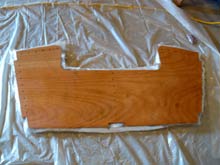 |
Next, I used the female template to trace the top radius of the transom, and constructed that piece as a sandwich of my one-inch yellow pine between two sheets of half-inch AC, for a total thickness of two inches, glassed on both sides. Note the high quality of the AC ply: |
Now I had my longitudinals, a mold and a transom. All I needed to complete my full-sized ghost frame was a stem. I had something special in mind for that piece--one more case where the shade tree designer/builder couldn’t refrain from making changes to a perfectly good plan. I’ll tell you about it in the next installment.
*****
On to Part 4
|