|
Part 5: Topsides Planking and Floor
As last month’s article ended, the Lake Skiff had just started to take on a shape resembling that of a boat. The gunwales and chine logs had been fastened to the stem, bent around a mold, and attached to the transom (or rather to two-thirds of the transom, since the outermost layer of the plywood and timber “sandwich” had not yet been applied). The last photograph in that installment shows longitudinals being fitted with plywood fairing strips that bring them out even with the stem; that photo also shows that the longitudinals extend considerably beyond the transom. They were, in fact, 20 feet long, and the length of the boat to the transom was, as designed, 18 feet.
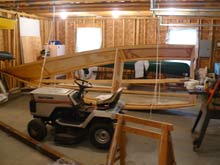
Being cheap at heart and having already paid for these lovely pine sticks extending out from the back of the boat, I wondered if I couldn’t make good use of that extra length, rather than just cutting them off. I even went so far as to make another model, showing one possible configuration: sponson-like structures enclosing what would then amount to a well for the motor.
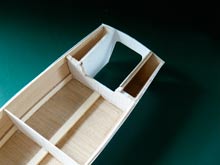 |
This photo shows the model. Decking would, of course, have been installed over the sponsons, and maybe even a lid over the motor itself.
click images for larger views |
Advantages to this sort of structure would include longer waterline length--which might add some speed to this displacement hull, extra floatation for the motor if the resulting sponsons were filled with foam or just sealed up, and what I thought was a pretty neat appearance. I mulled it over for a couple of days before deciding that the benefits would not justify the extra complexity of construction, especially since the resulting boat would be a 20-footer, not the originally planned 18-footer I actually had room for in the garage. I brought out Mr. Sawzall and let him do his thing. I still look at the model sometimes and have second thoughts, though.
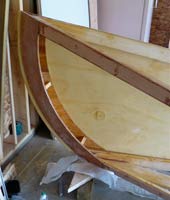 |
The longitudinal fairing was completed. Here’s what it looks like at the stem end. You can also see the first piece of quarter-inch plywood planking being fitted. The plywood planking was simply cut to very rough size, tacked to the frame with enough sheetrock screws to hold it in place, and then marked and cut to accurate size. |
The remainder of the topsides planking went on easily, with plywood butt blocks backing up the seams. I originally wrote the preceding sentence to say that the planking went on smoothly, but I had to change it because that wasn’t entirely the case. I joined the planks on the boat, using clamps and screws to position the butt blocks while the thickened epoxy glue dried. In retrospect that was a mistake. I should have joined the plywood on my nice, flat garage floor and then attached it to the boat, one whole side at a time. The resulting panels would have been a bit unwieldy to be sure, but as I write this the hull is completed and painted, and a couple of the seams, while plenty strong enough, still show as minor but irritating bumps despite multiple sandings and applications of fairing compound.
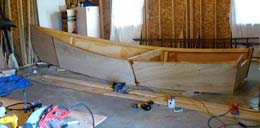 |
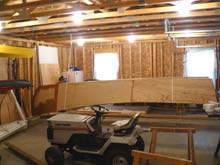
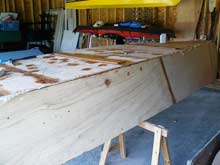
The photo shows the planking completely installed. This skiff really looks like a boat now. Only problem is there’s no bottom. |
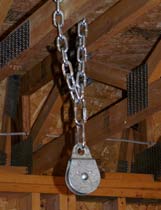 |
By now the boat was heavy enough that I could only with some difficulty lift one end of it at a time. Turning the whole thing over so I could work on the bottom would take some doing, since I had to do it by myself. I rigged up two heavy pulleys, attaching them to the garage trusses with chain, as shown. |
Then I got some half-inch braided synthetic rope and cut it into two suitable lengths. This stuff is silky-smooth to work with--important for this job, I think--but will unravel in a minute if you don’t somehow secure the cut ends. I wrap it with electrical tape before I cut it and then torch it lightly to melt the strands together. I tied a bowline in one end of each length, led the other end through the pulley, around the boat, and through the bowline loop. The rope is actually slick enough that the loop acts like a second pulley, giving you pretty good leverage as you hoist first one, then other, end of the boat up, bit by bit. I would hoist one end a little, tie a slip knot to hold it there, and then move to the other end and repeat the drill.
 |
This photo shows the boat about halfway up. |
 |
Obviously you have to have a firm grip when you go back and pull out the slip knot for the next haul. Keep pulling into your hoist or the whole thing could come loose and fall. Maybe this is time for the disclaimer: Don’t try this at home, boys and girls. The man in the story is not quite right in the head. Anyway, I didn’t kill myself or the boat. It wound up nicely upside-down, as you can see in the next photo. |
 |
Here’s what it looked like underneath. After a little cleaning up with the belt sander, I was ready to fit and install the floor. Not the bottom, because this isn’t a flat-bottom skiff. There’s the nice flat part you stand on (which I call a floor even though I know that’s not traditional), then the vertical component of the keelson which attaches to the floor, then the actual deadrise bottom. It’ll all become clearer as we go along, I hope. |
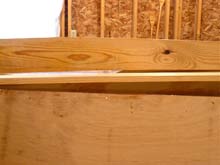 |
Once the boat was upside-down, I wanted to check the fit of the keelson vertical. This was precut before any assembly was done, and its shape reflected the rocker I was hoping to build into the boat. When I checked it, I found two problems. First, despite my attempts otherwise, I’d lost a bit of rocker, which meant that the shape of the keelson didn’t match up to the shape of the actual boat. You can see the gap here, which was fixed easily by scribing and cutting. |
The other problem was that as cut, the front of the keelson didn’t gracefully continue the curve of the stem as I intended. There was what could only be described as a hump. I had to think on that one awhile, but I had some time: the keelson vertical would only go on after the floor had been fitted. So on with the floor. As with the side planking, plywood (this time half-inch) was rough cut, temporarily fastened, marked and close cut. Since this section was, except for the by now very moderate rocker, perfectly flat, it was an easy job of fitting.
 |
Once again the joints were made with butt blocks--this time on the garage floor. The final step before permanent installation was to fiberglass the entire “good” side to provide what I hoped would be a tough, waterproof walking surface. |
 |
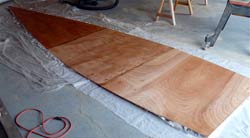
The final photo shows the floor installed. You can see the butt blocks, the little bits of overhanging fiberglass, and the dark areas where knots and splits in the “C” side of the plywood have been sealed with epoxy. |
The next installment will detail the installation of the keelson vertical and deadrise bottom, and get on to (ugh!) sanding the completed hull.
*****
On to Part 6
|