|
Obsolete Outboards |

|
| by
Max Wawrzyniak - St Louis, Missouri - USA
Bringing
a 1956 Johnson 15 hp Back to Life
Part
V: Carburetor
Work,
and a Few Words on Fuel |
 |
Part
1 - Part
2 - Part 3 - Part
4 - Part 6 - Part
7
Although we had the magneto ready to reinstall last
month, I usually suggest that one wait until the carburetor
(carb) work is done before reinstalling the magneto.
Although the carb can certainly be removed and reinstalled
with the magneto on the engine, leaving the mag off
gives one a bit more room to work.
Before we get into the carb, however, we need to discuss
some late-breaking developments in the gasoline situation.
As most residents of the USA are probably aware, refineries
are discontinuing the use of an gasoline additive
known as MTBE in favor of another additive known as
ethanol. The August/Sept. issue of Professional Boatbuilder
Magazine has a very cryptic article concerning the
problems that this "reformulated" gasoline
is causing in both old and new marine engines. As
of this writing (Sept. 2006) this issue of Pro. Boatbuilding
can be accessed online HERE.
(if there is a newer issue showing,
try the "Archives" for the Sept/Oct 2006
issue - Ed)
A quick summary of the problems that reformulated
gasoline containing ethanol is causing in boats: The
ethanol is literally dissolving fiberglass fuel tanks,
which had previously been considered to be a high-quality
alternative to corrosion-prone aluminum and steel
gasoline tanks. Some very expensive production boats
built by top-line builders may require very expensive
tank replacement. Plastic tanks, such as the common
portable tanks used with outboard motors, are fine
as long as they are in good condition.
 |
No caption
needed.
(click
images to enlarge) |
|
Another problem is that the ethanol can absorb a
very large amount of water, and if the water is allowed
to settle to the bottom of the tank and then drained
or pumped out, the ethanol component of the gasoline
will stay combined with the water and will also be
removed from the tank, leaving one with gasoline that
is missing a major part of it's chemical make-up.
The article mentioned suggests that one ALWAYS use
a non-alcoholic fuel stabilizer, at ALL times. Gasoline
now just does not have the "shelf life"
that it used to, so try to avoid storing gasoline
for months at a time and always protect the tanks
from water intrusion while being aware that the ethanol
can absorb humidity from the atmosphere as well.
And it is getting more difficult to check for water
in one's gasoline tanks. For years I have advocated
the use of "water finding paste;" one smears
a bit of the paste on the bottom of a stick, pokes
the stick into the gasoline tank, and if the brown
paste turns purple, there is water in the gasoline.
I have been using the same tooth-paste-size tube of
"Kolor Kut" water finding paste for over
15 years (no kidding !) but have now been informed
that it will not detect water combined with ethanol.
I now need to buy a new tube of Kolor Kut especially
formulated to detect water in ethanol-laden gasoline
(figure SF 32).
Ethanol is dissolving varnish and other "gunk"
that was once considered to be more-or-less permanent
in the fuel system, resulting in plugged fuel filters
and plugged carbs. It is more important than ever
to have good fuel filters and water separators in
one's fuel system. My habit in the past was to utilize
the glass-bowled filter/separator that was usually
factory equipment on old OMC outboards, and in addition
to install a clear plastic "in-line" filter
in the fuel line under the engine cowl. Time will
tell if I need to modify that arrangement. I should
add that I always carry spares for the disposable
in-line filter. Try to start out with as clean a fuel
system as possible.
| Plugged passages
are the most common problems one will encounter
with carbs. |
|
|
It should go without saying that all fuel hoses
should be replaced. This means the hoses under the
engine cowl as well as the hose to a remote tank.
And the use of a rebuild kit for the carb with new
gaskets is always a good idea. The Sierra brand carb
kits I usually use also come with a very nice set
of instructions (figure SF 36).
A question still unanswered is how ethanol will affect
the varnish coating on the cork carburetor floats.
For the time being I intend to "run the gas out"
of my engines when done boating for the day in order
to minimize exposure to the ethanol, although running
the gas out does not totally drain the float bowl
of fuel.
One more note: in the column
on converting outboards to use a fuel pump instead
of a pressure tank, I recommend the use of a hard-setting
gasket sealant for sealing passages that are not needed.
I have a report from a reliable source that the gasket
sealant dissolved,
possibly due to ethanol exposure. Apparently J B Weld
will hold up to the ethanol better, but might make
a later conversion back to the pressure tank more
difficult, if that is a concern.
Getting back to the job at hand: The carb is held
on by (2) nuts, but before you loosen the nuts have
a look at the linkage from the carb throttle "butterfly"
shaft up to the magneto plate. When you twist the
"twist-grip" throttle, you are actually
rotating the magneto (stator) plate back and forth,
which advances and retards the ignition timing. This
action alone will cause the engine to speed-up and
slow down, and I have a few very old outboards where
advancing and retarding the magneto timing is the
primary means of "throttling" the engine.
The engine will run smoother and more efficiently,
however, if the flow of fuel and air mixture to the
engine is varied to match the needs of the engine
at a particular throttle setting. To accomplish this,
most of the older OMC outboards of less than 35 hp
have a sheet metal "cam" or "ramp"
on their forward side which moves a "follower"
that opens the throttle butterfly though a linkage.
On some engines, this linkage of levers and bell cranks
is attached entirely to the carb and one need not
mess with it when removing the carb. On other models
it will be necessary to disconnect the linkage in
order to remove the carb. On these latter engines,
usually loosening a set screw on a bell crank, or
removing a tiny cotter pin from an arm, will disconnect
the linkage. Figure SF 35 shows where
I disconnected this linkage on the 1956 15 hp Johnson.
Another item needing to be removed is the fuel hose
to the carb from the fuel pump, or from the "quick
connector" on pressure tank engines.
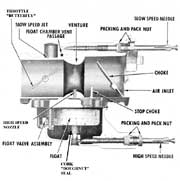 |
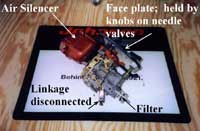
A less
"cluttered" look at the typical
carb found on old OMC outboards.
|
|
The 1956 Johnson has a "face plate" over
the front of the carb that is held in place by the
knobs or levers used to turn the high - and low speed
needle valves. Similar vintage Evinrudes did not have
this separate face plate. Later model engines with
the "one-piece" fiberglass hoods will have
other arrangements of knobs and/or levers for controlling
the high- and low speed needle valves, and engines
manufactured after about 1963 will have a low speed
needle valve but the high speed needle is replaced
with a fixed "jet " (orifice ) that is not
adjustable. To remove the carb from a particular engine
may require you to disassemble some or all of these
linkage arrangements. Be sure to take good notes and
maybe a few photos to help when it comes time to reassemble
everything. Once this "gingerbread" stuff
is out of the way, the carbs are all really very similar.
On the '56, I was able to remove the carb with the
face plate and the air silencer intact as shown in
figure SF 37. The air silencer is
sometimes mistaken for an air cleaner but very few
old outboards were fitted with air cleaners. Just
a side note here: a modern outboard fitted with fixed
jets, when run without the restriction of it's factory-fitted
air silencer, can get too much air and run lean and
hot. Don't run modern outboards with the air silencer
removed, unless the carburetor has been "re-jetted"
to handle the extra air flow.
All we are going to do to the carb is to clean it,
replace a few parts and gaskets, check and adjust
the "float level," and put it back together.
Most of the things that can go wrong with the carb
involve "clogg" in the tiny passages through
which the gasoline must flow (figure SF 33).
This cleaning takes me about 10 or 15 minutes: if
you haven't done it before it might take you twice
as long.
| A carb fitted
with a high speed fixed "jet"
or orifice instead of an adjustable high
speed needle valve. The low speed needle
remains. |
|
|
The first thing I do is to unscrew and remove the
high-speed and low-speed needle valves (if your engine
is about a 1964 or newer model, you will only have
a low-speed needle and a plug were the high speed
needle would be - remove the plug)( figure SF
35). Note that there are threaded sleeves
that surround the needles that can also be unscrewed
and removed. These are the "packing nuts,"
and behind them is the "packing", which
are tiny rings of gasket material. Tightening the
packing nuts compresses the packing against the needles
themselves and the carb housing and seals the needles,
much as a packing gland or "stuffing box"
seals an inboard boat's propeller shaft or the valve
stem of an ordinary water valve. Remove these
packing nuts and if you can "fish out" the
old packing rings that's fine, and if you can't easily
get them out that is fine as well.
Next I invert the carb and remove the (5) or so screws
that hold the float bowl (bottom of carb) on. Once
you have the float bowl off, keep the carb upside
- down and carefully remove the hinge pin for the
float, the float itself (looks like a doughnut, and
probably made of cork unless a plastic replacement
has been installed at some point). Also remove the
float needle valve which sits underneath the float
arm. If you happen to turn the carb right-side up
with the bowl off, this needle valve will probably
fall out. Also note that the "seat" that
the needle valve fits into is made of brass and is
removable if you have a "regular" screwdriver
with a very wide blade. Since you are following my
advice and using a rebuild kit which includes a new
needle and seat, you ought to try to remove the old
seat. If you strip the tiny slots on that brass seat,
however, you have a problem. I have been able to remove
these, without the proper wide-blade screwdriver,
by using (2) small regular screwdrivers braced against
each other in an "X" pattern, with the blade
of each driver engaged in opposite sides of the slot.
If you tear-up the seat trying this, it aint my fault.
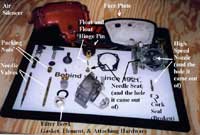
See figures SF 35 & SF
38 for a look at the parts you will be dealing
with and their locations inside the carb.
| 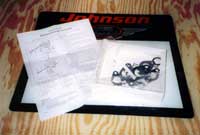 The
Sierra kit that I used on the 1956 Johnson
15 hp, part # 18-7043. This particular
carb kit fits several different of OMC
outboards and contains extra parts such
as gaskets in various sizes that were
not used on the 15. This kit includes
a nice set of instructions with great
drawings. The
Sierra kit that I used on the 1956 Johnson
15 hp, part # 18-7043. This particular
carb kit fits several different of OMC
outboards and contains extra parts such
as gaskets in various sizes that were
not used on the 15. This kit includes
a nice set of instructions with great
drawings.
|
|
While the carb is still upside down the final object
to remove is the high speed nozzle with is usually
threaded into the center of the top half of the carb
body. Note that there is usually a cork "doughnut"
seal around this high-speed nozzle (do not confuse
the high-speed nozzle with the high-speed needle valve
or the high-speed fixed jet we have already discussed.)
You can now safely turn the carb body right-side up
if you so desire.
You will note little "welch" plugs (similar
to tiny freeze plugs) plugging various holes in the
body of the carb. These are to close the holes formed
when the carb's inner passages where drilled. The
manuals will tell you to remove these welch plugs
(which destroys them) in order to property clean passages
behind, and then to install new plugs, which are included
with the rebuild kit. I almost never remove the old
welch plugs, as new ones are hard to get properly
sealed without the special tools for installing them,
which I don't have. (bet you don't either.) Old manuals
also generally recommend soaking the carb body in
carburetor cleaner, which is also something I rarely
do. I generally use an aerosol carb cleaner, which
is what is generally recommended for the mostly plastic
carbs found on late model outboards. Aerosol cans
of carb cleaner always come with a long thin tube
for shooting cleaner into tight places, and I generally
spray cleaner into all of the carbs openings in addition
to giving the float bowl a good bath to remove any
accumulated sediments, and that is usually enough
to clean most carbs, although I occasionally run across
one so encrusted that soaking in carb cleaner for
a couple of days is required.
A word of CAUTION: If you spray cleaner
into a little passage on a carb, it will invariably
shoot out of another passage right at your face. Wear
chemical protection goggles at a minimum! A full face
shield is better, and rubber gloves will kept the
stuff off your skin - it burns something fierce!
You have been warned.
By the way, carb cleaner removes "varnish,"
and if you have a cork carburetor float it is coated
with varnish, so don't let the cleaner get near a
cork float.
 The
carb on the 15 can be removed with the face
plate and air silencer intact although you
can certainly remove these items before
removing the carb if you wish. Depending
on exactly which model of old OMC you are
working on, you might need to remove other
types of hardware, although underneath it
all the carbs are remarkably similar. The
carb on the 15 can be removed with the face
plate and air silencer intact although you
can certainly remove these items before
removing the carb if you wish. Depending
on exactly which model of old OMC you are
working on, you might need to remove other
types of hardware, although underneath it
all the carbs are remarkably similar. |
|
With the carb clean, you are ready to reassemble
(this is going purty quick, aint it?). With the carb
body again inverted (up-side down) you can screw in
the new brass seat for the float needle valve - note
that there is a little gasket that goes underneath
it. The needle valve itself just sits down in the
seat but if you check your rebuild kit carefully you
will probably find a tiny little wire "hair pin"
looking thing. This snaps onto the needle valve and
slides onto the sheet metal hinge arm of the float,
so that when the carb is right-side up, the weight
of the float (and not just fuel pressure) will pull
the needle valve down to the open position. Your old
needle valve may not have had this little hair pin
attaching it to the float.
Next you can install the float by sliding it's hinge
pin in - be sure to put the float on up-side down
(the carb is also up-side down, remember?). Next comes
checking the float level setting.
With the carb upside down, and the float all the way
up (which is actually down, since the carb is upside
down) the top surface of the float (bottom when upside
down) should be flush with the bottom edge (top edge
when upside down) of the float bowl.
"Say what??" Yeah, I hear ya; have a look
at figure SF 39: One picture can
explain it better than I can say it. The Sierra carb
kit instructions usually also have a good drawing
showing this. You make any necessary adjustments by
bending the sheet metal hinge plate on the float (I
have always said that these old outboards are "low
tech," haven't I?)
 |
The carb
disassembled as far as needed in order
to clean it and install the new parts
contained within the kit.
|
|
Screw the high speed nozzle back into the center
of the body in the center of the float, and CAREFULLY
push the little cork ring seal over the nozzle.
You can now screw the bottom of the float bowl back
on, using the new gasket included in the kit (the
kit, intended to fit several different carbs, may
have extra gaskets and parts not needed for your particular
engine, so in this instance having "extra parts"
left-over when you are done is not necessarily an
indictment of your mechanical skills).
You can now insert new packing rings into the threaded
holes for the high-speed and low-speed needles (if
you were able to remove all of the old packing, use
(2) or (3) rings; if you left the old packing in,
as I do, try adding just (1) new ring of packing.
Carefully screw the packing nuts on just a bit (don't
tighten them down yet) and then carefully screw the
needle valves themselves in. You have to be VERY careful
that you do not "bottom-out" the needle
valves on their seats, as the needles are soft brass
and if their pointy ends are damaged even a little
bit, the engine is not going to run well. GENTLY screw
the needles in until they BARELY bottom, then back-off
one turn. NOW you can tighten down the packing nuts,
which will greatly increase the drag on the needles
(making if difficult to know if the needles are bottomed-out,
which is why we did not do this first.) The packing
nuts should be tight enough so that the needles take
a bit of effort to turn, so that they will not vibrate
and change their settings when the engine is running,
and so that there will be no air or fuel leaks around
the needles. One potential danger here is that a ring
of packing might get underneath the point of a needle
valve and block the passage, so use some care.
| Setting the
float level consists of nothing more than
bending the sheet metal hinge tab for the
float until the surface of the float is
level with, and parallel to, the rim of
the carb body. Make sure, however ,that
the new bowl needle and seat are in place
before you start bending. |
|
|
The carb is now ready to go back on, and reinstalling
the carb and the magneto will be next month's topic,
as will those little cyanide capsules.
Happy Motor'n
Later,
Max

click here for a
list of Columns by Max Wawrzyniak
|